This example demonstrates the process of configuring PDF report printing within COSMO Mobile Solution.
The goal is to print a warehouse shipment document and to print the posted warehouse shipment document following its posting.
Add a Printer
In the first step, a printer needs to be added for PDF printing done through the network.
- In the Printers page, choose the New action.
- In the Description field, enter a unique identifier.
- In the Printer Type field, choose Generic Printer.
- In the Connection Type field, choose TCP/IP.
- In the Address field, enter the address of the printer.

Enable Printing for Users
The next step is to configure the COSMO Mobile Solution users to access the new printer.
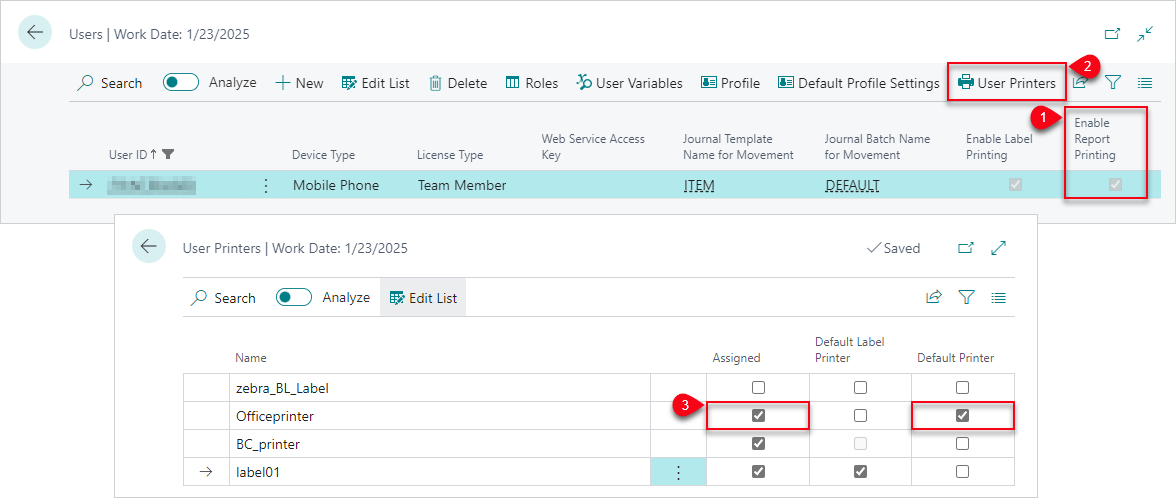
- In the Users page, select the Enable Report Printing checkbox for the user.
- Choose the User Printers action.
- Select the Assigned and Default Printer checkboxes for the new printer.
With this setup, report printing is enabled for the user and they can use the new printer can be used.
Set Up PDF Function in Page Customization
In this step, the PDF function is set up for the warehouse shipment page customization, CCSMSWhseShipmentHeadWS. The PDF function will generate the PDF that will be either printed by the mobile application or will be shown in the mobile application as a preview.
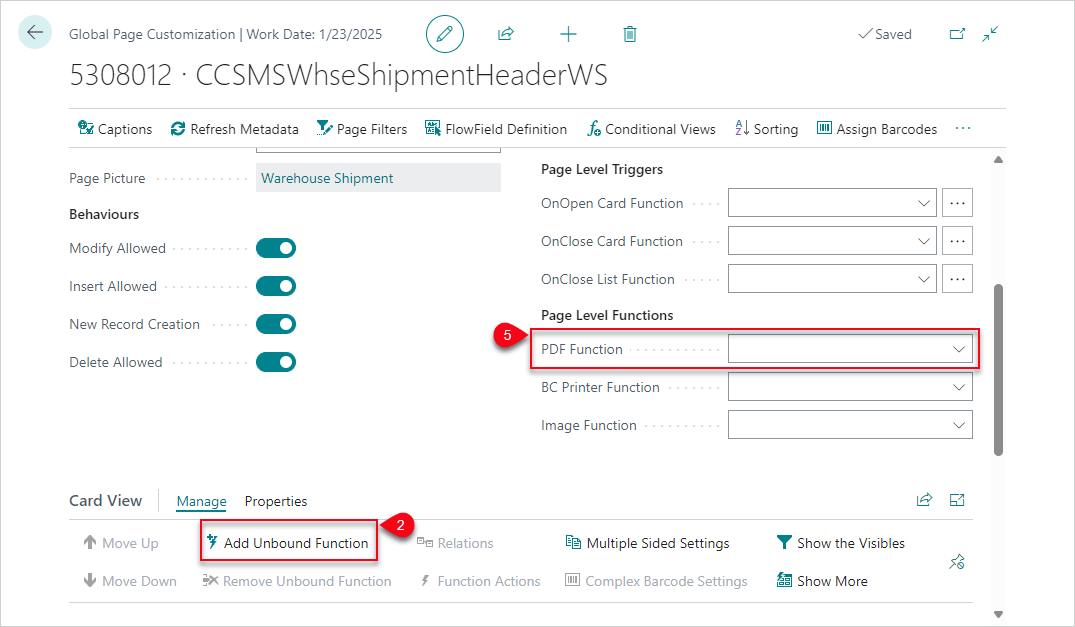
After opening the CCSMSWhseShipmentHeadWS page customization, the first step is to add an unbound function to the page. This must be done for a PDF function to work with the custom report functionality.
- Open the CCSMSWhseShipmentHeadWS Global Page Customization (Object ID 5308012).
- In the Card View FastTab, choose the Add Unbound Function action.
- In the Function Browser page, select CCSMSServiceFunctionsWS_PrintReport.
- Choose the OK button.
- In the General FastTab, set this function in the PDF Function field (within the Page Level Functions field group).
Add Custom Reports
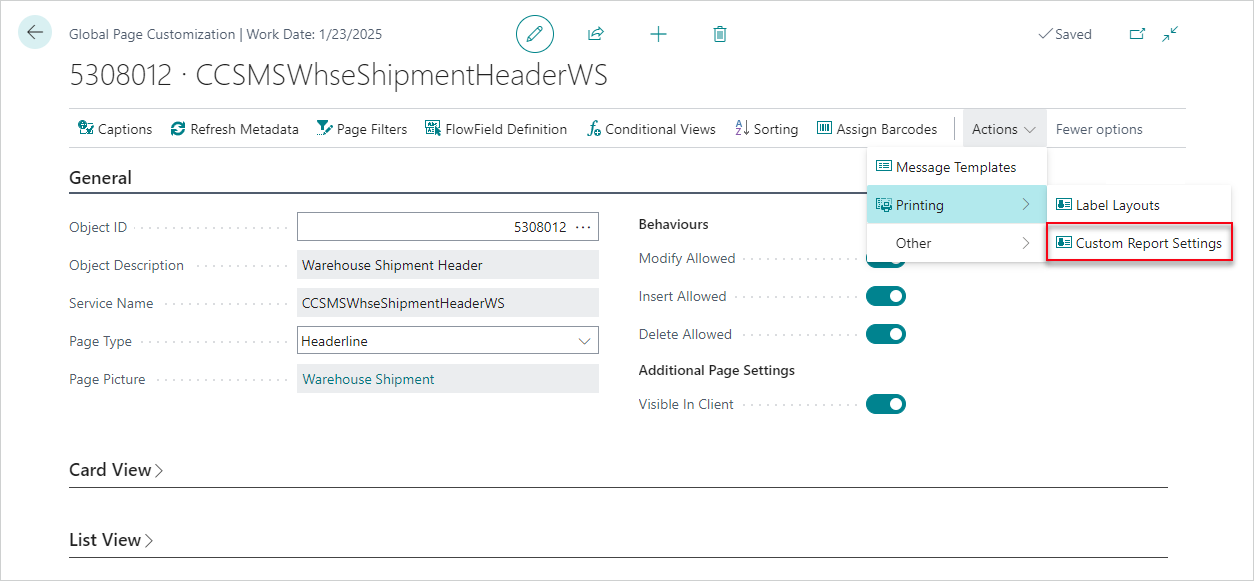
Now the reports must be defined. On the Actions menu, choose Printing > Custom Report Settings.
Warehouse Shipment Report
First add the Warehouse Shipment report.
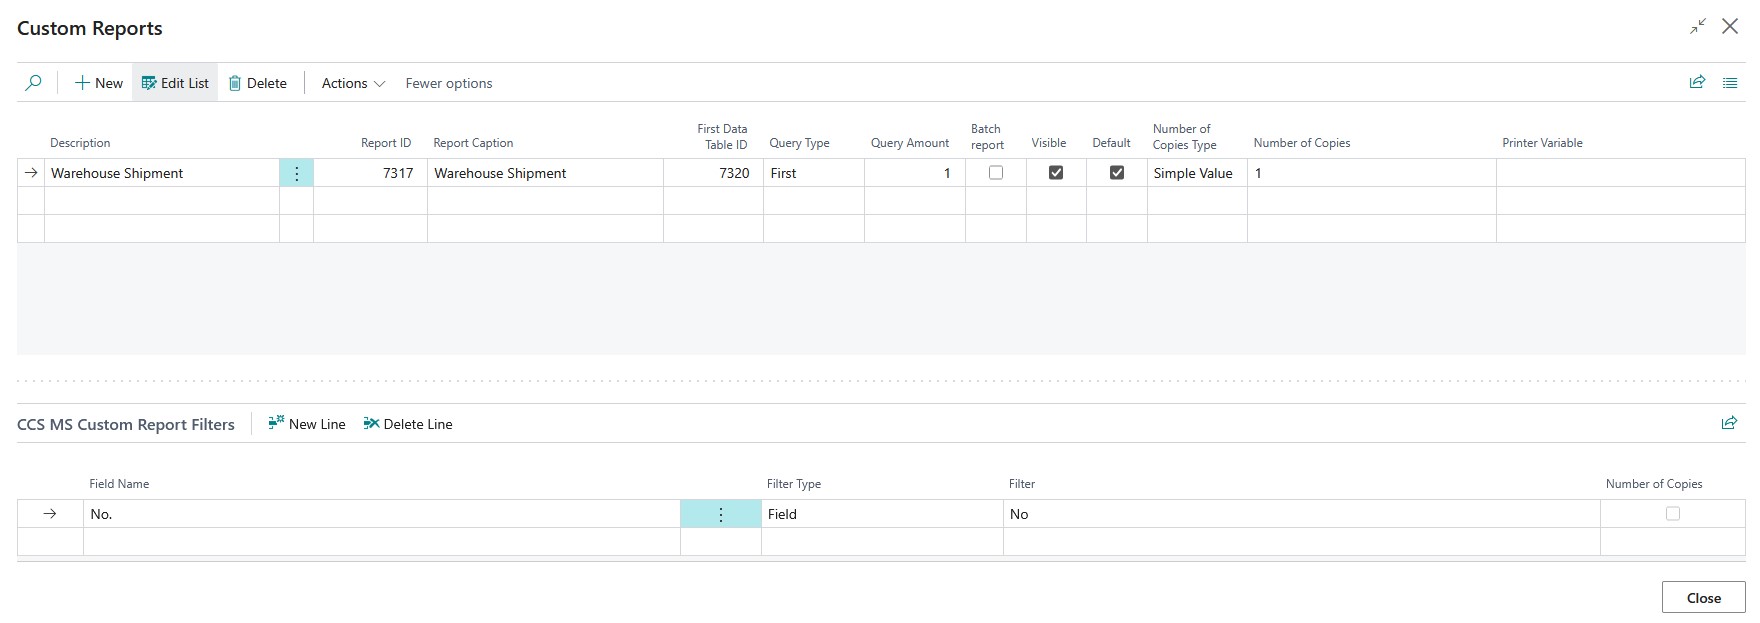
- In the Report ID field, enter 7317. This will fill in some fields, such as First Data Table ID and Report Caption.
- It is a good practice to use a meaningful name for the report in the Description field; in this case, the default Warehouse Shipment is sufficient.
- In the Query Type field, choose First and then leave the Query Amount field set to 1. This ensures that the first record based on the specified filters will be used when generating the report in this case.
- Select the Default checkbox to make this the default report. This setting automatically selects the Visible checkbox.
- Leave the Number of Copies Type and the Number of Copies fields as they are because only one copy of this document is needed.
- Leave the Printer Variable field empty; the default printer is already defined and sufficient for this example.
The last step of setting up this report is to set a filter on the No. field. It is important to mention that when you want to create a custom report filter, you will always set filters on the report's First Data Table ID, which in this case means 7320, the Warehouse Shipment Header. If you are going to filter based on a field, this typically means that the value is coming from the service page, in this case "WhseShipmentHeader".
- In the Custom Report Filters FastTab, enter No. in the Field Name field.
- In the Filter Type field, choose Field.
- In the Filter field, enter No (without the period (.)).
This set up means the system will set a filter on table 7320 table's No. field with the value of the current Warehouse Shipment from COSMO Mobile Solution.
If you have followed the above instructions, your custom report setting should look like this:
Posted Warehouse Shipment Report
Now add the Posted Warehouse Shipment report. The process is the same as described for the Warehouse Shipment report so the steps are shortened.
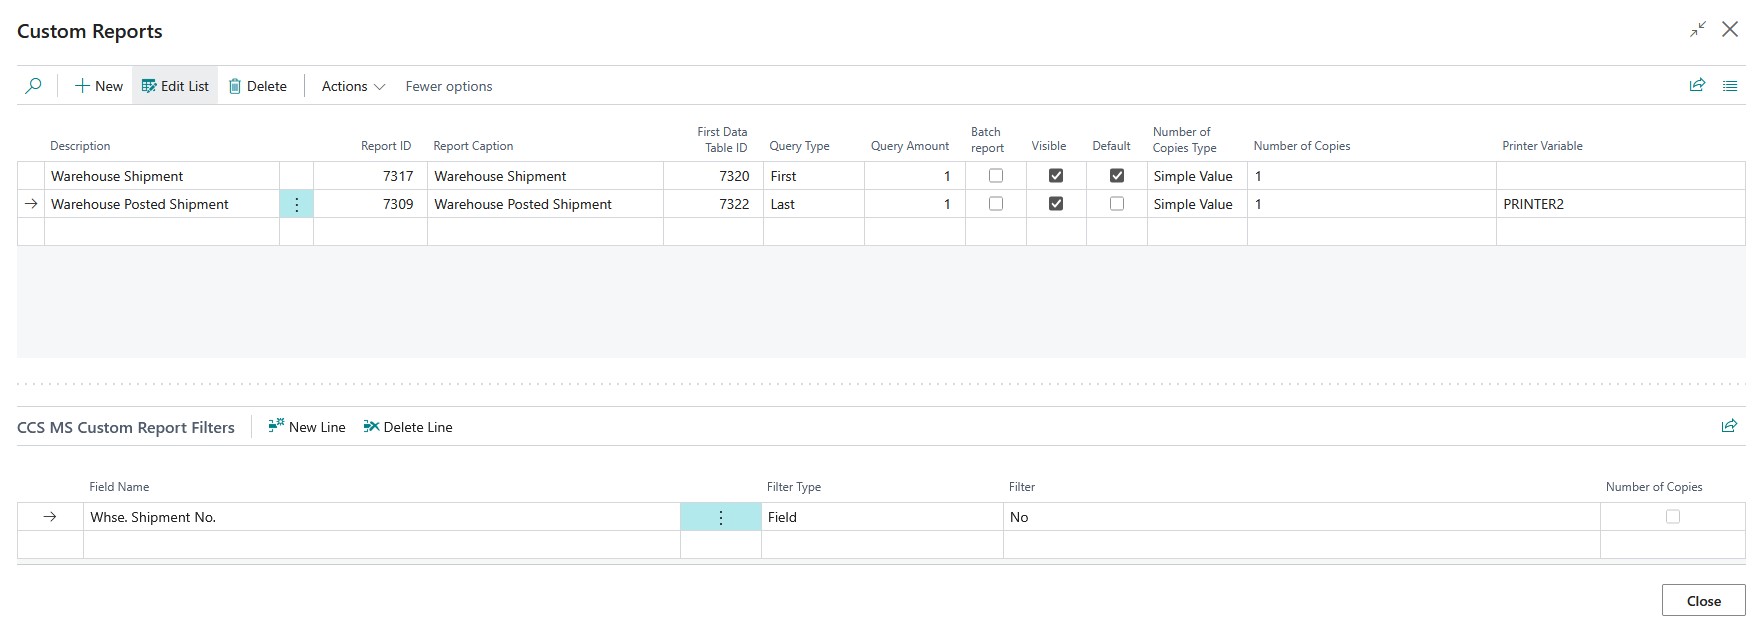
- In the Report ID field, enter 7309 and leave the Description field set as Warehouse Posted Shipment.
- In the Query Type field, choose Last and then leave the Query Amount field set to 1. This ensures that the last record based on the specified filters will be used when generating the report.
- Select the Visible checkbox.
- Leave the Number of Copies Type and the Number of Copies fields as they are because only one copy of this document is needed.
- To ensure that the posted document is always printed on a specific printer instead of the default printer, enter the desired printer variable in the Printer Variable field.
- In the Custom Report Filters FastTab, enter Whse. Shipment No. in the Field Name field.
- In the Filter Type field, choose Field.
- In the Filter field, enter No (without the period (.)).
If you have followed the above instructions, your custom report setting should look like this:
Settings in Mobile Application
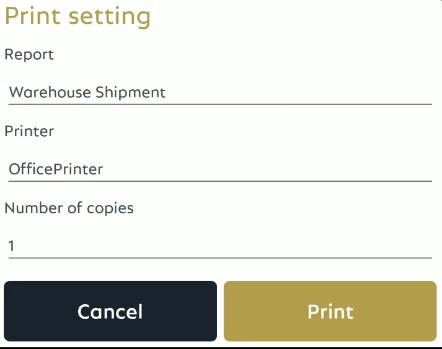
At this point, when choosing the Report print button or the Print Preview button in the mobile application, the default report will be printed to the default printer (based on user settings). Since the posted report was set to be visible, if the user long taps on the Report print button, a page will open that allows the user to change the target printer, select a report, or change the number of copies. Changing the report will automatically update the printer to the corresponding value configured on the Custom Reports page.
Set Automatic Printing after Posting
For this example, the posted shipment needs to be automatically printed after choosing the Post button on the page.
- Go back to the Global Page Customization page.
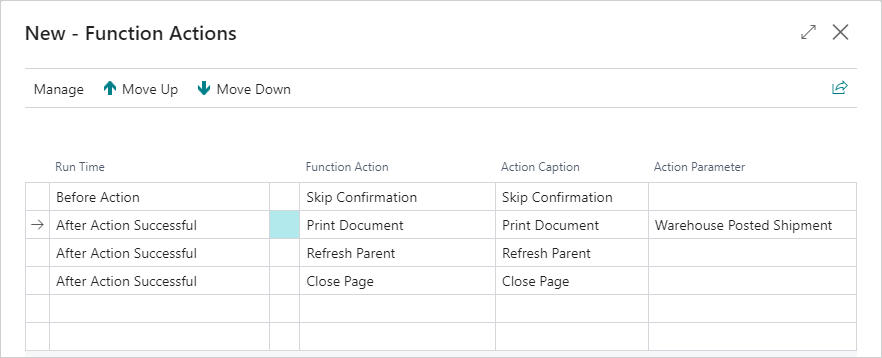
- In the Card View FastTab, choose the WhseShipPostShipment line within the Function List group, and then choose the Function Actions action on the Manage menu.
- In the Run Time field, choose After Action Successful.
- In the Function Action field, choose Print Document.
- In the Action Parameter field, choose Warehouse Posted Shipment.
With the setups in this example, users can print on demand the shipment document and the posted shipment, and when the shipment is posted, the posted document is printed.
This example demonstrates the process of configuring BC report printing within COSMO Mobile Solution.
The goal is to print a warehouse receipt document and to print the posted warehouse receipt document following its posting.
Add a Printer
In the first step, a printer needs to be added for BC printing, which means the Business Central and other services are responsible for delivering the report data to the printer.
In the Printers page, choose the New action.
In the Description field, enter a unique identifier.
In the Printer Type field, choose Business Center Printer.
In the Connection Type field, choose Function.
In the Address field, choose the function that starts the printing process in Business Central. In this example, choose CCSMSServiceFunctionsWS_UniversalPrint.
Important
The function that is set as the address in this case must match the BC printer function on the page customization you want to print from.

Enable Printing for Users
The next step is to configure the COSMO Mobile Solution users to access the new printer.
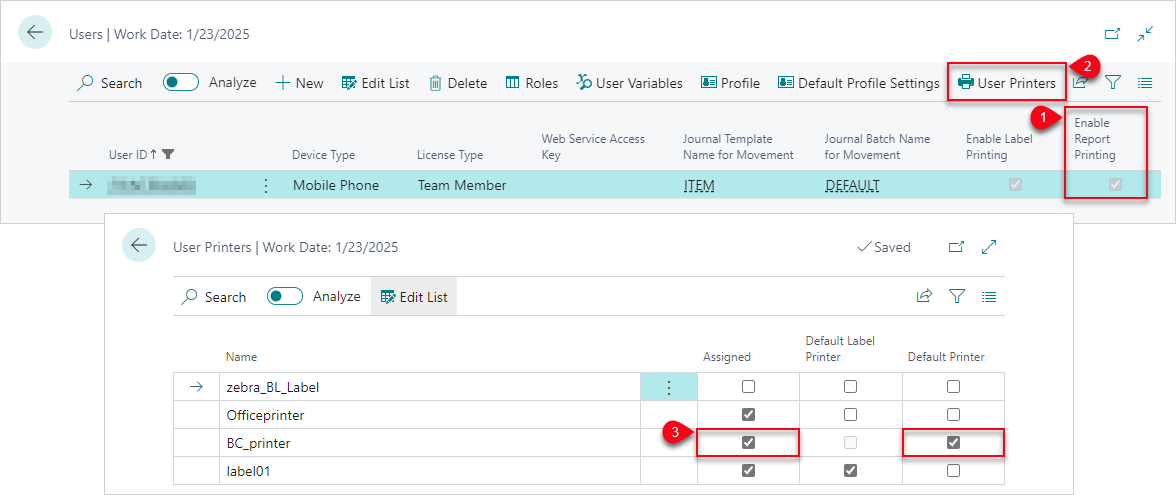
- In the Users page, select the Enable Report Printing checkbox for the user.
- Choose the User Printers action.
- Select the Assigned and Default Printer checkboxes for the new printer.
With this setup, report printing is enabled for the user and they can use the new printer can be used.
Set Up BC Printer Function in Page Configuration
In this step, the BC printer function is set up for the warehouse receipt page customization, CCSMSWhseReceiptHeaderWS. The BC printer function will start the printing process in Business Central.
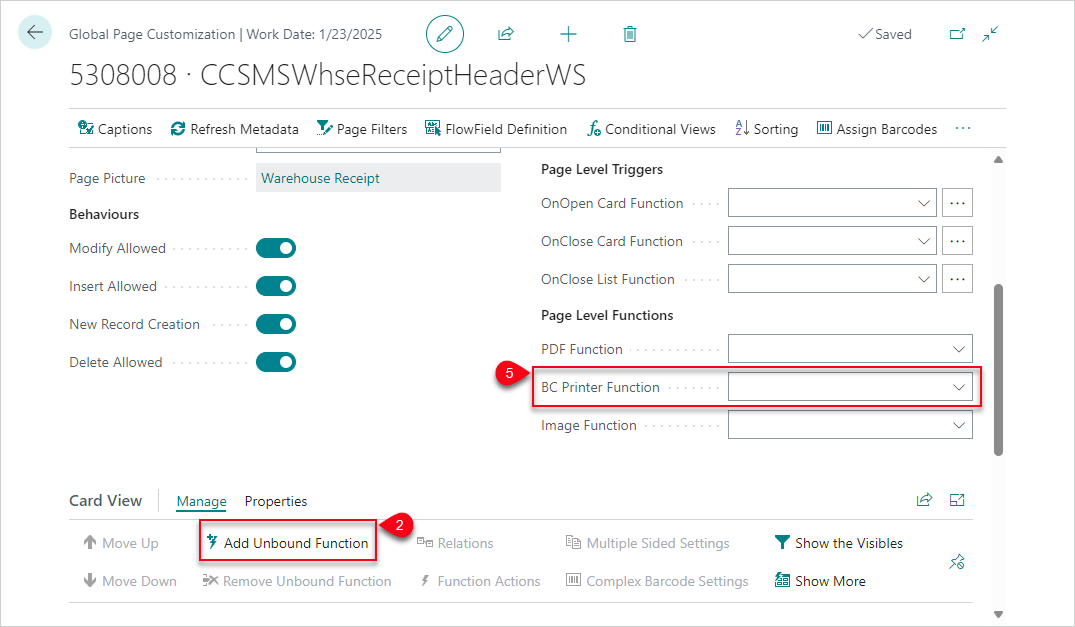
After opening the CCSMSWhseReceiptHeaderWS page customization, the first step is to add an unbound function to the page. This must be done for a BC printer function to work with the custom report functionality.
- Open the CCSMSWhseReceiptHeaderWS Global Page Customization (Object ID 5308008).
- In the Card View FastTab, choose the Add Unbound Function action.
- In the Function Browser page, select CCSMSServiceFunctionsWS_UniversalPrint.
- Choose the OK button.
- In the General FastTab, set this function in the BC Printer Function field (within the Page Level Functions field group).
Add Custom Reports
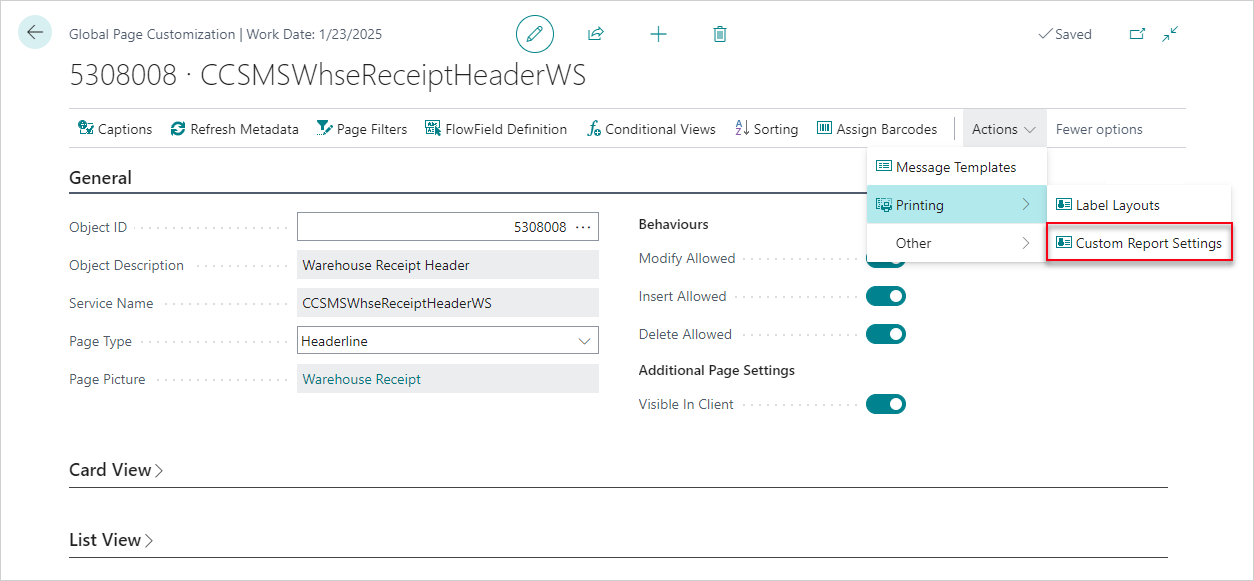
Now the Warehouse Receipt and Posted Warehouse Receipt reports are defined. On the Actions menu, choose Printing > Custom Report Settings.
Warehouse Receipt Report
First add the Warehouse Receipt report.
- In the Report ID field, enter 7316. This will fill in some fields, such as First Data Table ID and Report Caption.
- It is a good practice to use a meaningful name for the report in the Description field; in this case, the default Warehouse Receipt is sufficient.
- In the Query Type field, choose First and then leave the Query Amount field set to 1. This ensures that the first record based on the specified filters will be used when generating the report in this case.
- Select the Default checkbox to make this the default report. This setting automatically selects the Visible checkbox.
- Leave the Number of Copies Type and the Number of Copies fields as they are because only one copy of this document is needed.
- To ensure that the report(s) are printed to a specific printer, set the Printer Variable accordingly.
The last step of setting up this report is to set a filter on the No. field. It is important to mention that when you want to create a custom report filter, you will always set filters on the report's First Data Table ID, which in this case means 7316, the Warehouse Receipt Header. If you are going to filter based on a field, this typically means that the value is coming from the service page, in this case "WhseReceiptHeader".
- In the Custom Report Filters FastTab, enter No. in the Field Name field.
- In the Filter Type field, choose Field.
- In the Filter field, enter No (without the period (.)).
This set up means the system will set a filter on table 7316 table's No. field with the value of the current Warehouse Receipt from COSMO Mobile Solution.
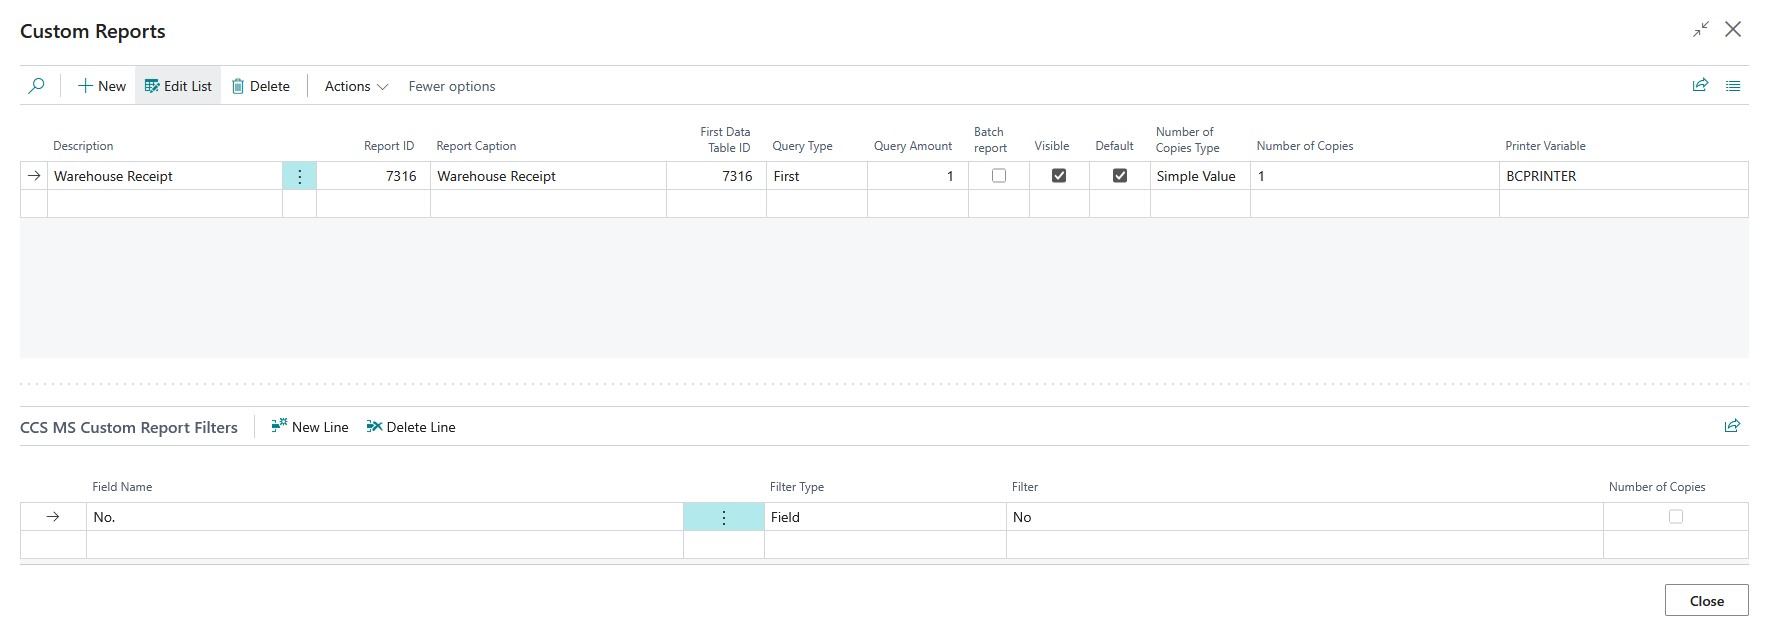
If you have followed the above instructions, your custom report setting should look like this:
Posted Warehouse Receipt Report
Now add the Posted Warehouse Receipt report. The process is the same as described for the Warehouse Receipt report so the steps are shortened.
- In the Report ID field, enter 7308 and leave the Description field set as Warehouse Posted Receipt.
- In the Query Type field, choose Last and then leave the Query Amount field set to 1. This ensures that the last record based on the specified filters will be used when generating the report.
- Select the Visible checkbox.
- Leave the Number of Copies Type and the Number of Copies fields as they are because only one copy of this document is needed.
- To ensure that the report(s) are printed to a specific printer, set the Printer Variable accordingly.
- In the Custom Report Filters FastTab, enter Whse. Receipt No. in the Field Name field.
- In the Filter Type field, choose Field.
- In the Filter field, enter No (without the period (.)).
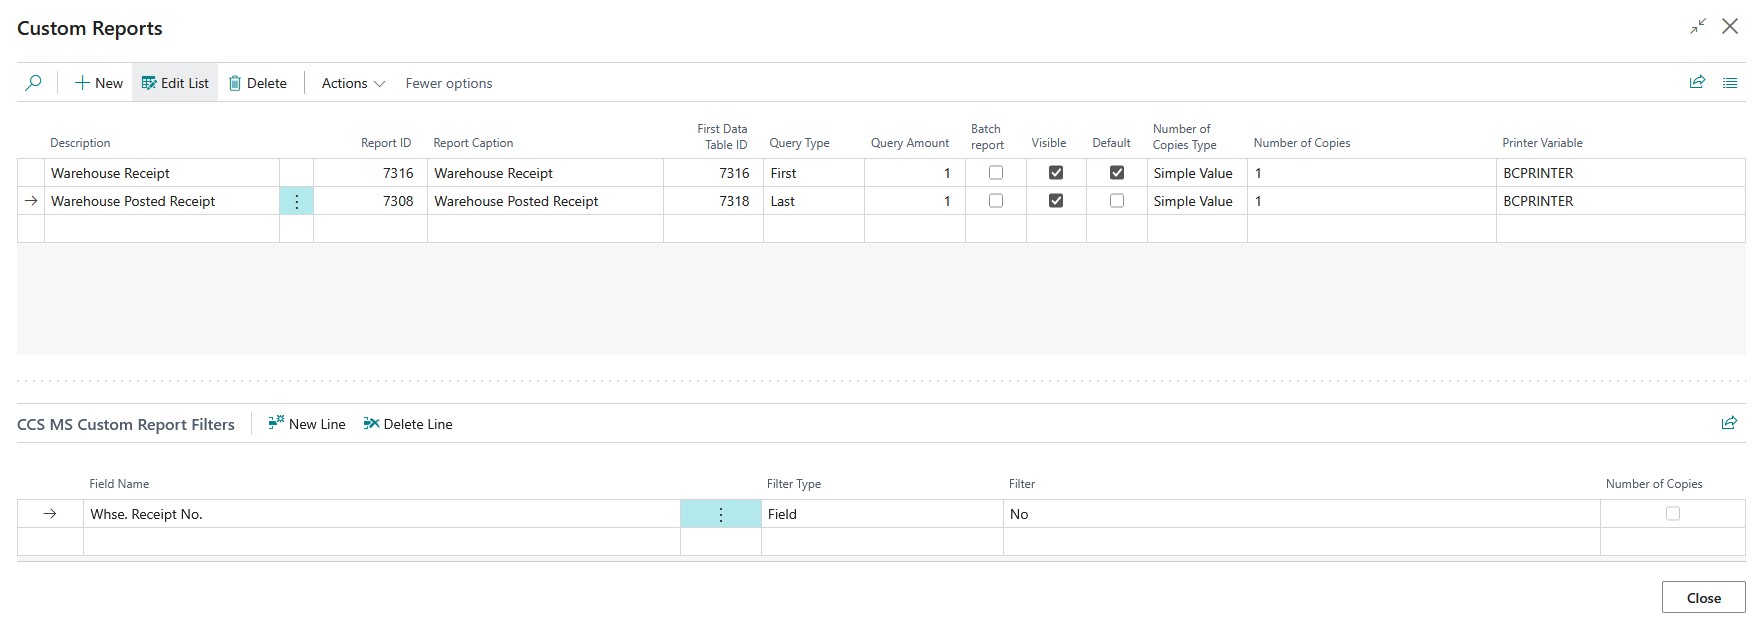
If you have followed the above instructions, your custom report setting should look like this:
Settings in Mobile Application
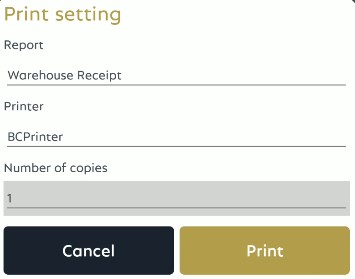
At this point, when choosing the Report print button in the mobile application, the default report will be printed from BC. Since the posted report was set to be visible, if the user long taps on the Report print button, a page will open that allows the user to change the target printer, select a report, or change the number of copies. Changing the report will automatically update the printer to the corresponding value configured on the Custom Reports page.
Important
The number of copies can only be edited when there is a request page filter set as Number of Copies among the report filters.
Set Automatic Printing after Posting
For this example, the posted receipt needs to be automatically printed after choosing the Post button on the page.
- Go back to the Global Page Customization page.
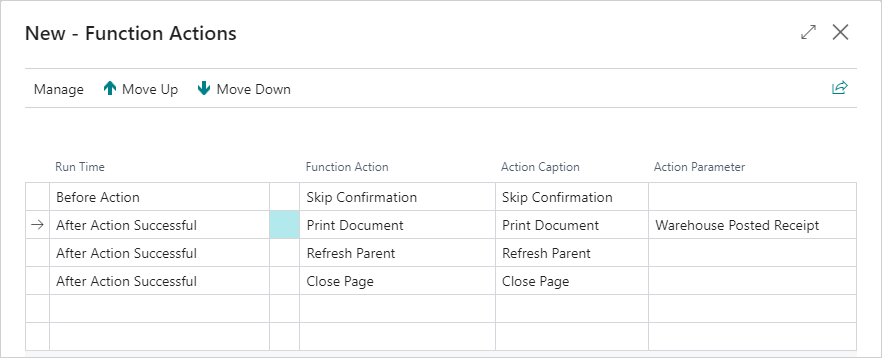
- In the Card View FastTab, choose the WhseReceiptPostReceipt line within the Function List group, and then choose the Function Actions action on the Manage menu.
- In the Run Time field, choose After Action Successful.
- In the Function Action field, choose Print Document.
- In the Action Parameter field, choose Warehouse Posted Receipt.
With the setups in this example, users can print on demand the receipt document and the posted receipt, and when the receipt is posted, the posted document is printed.
This example demonstrates the process of configuring label printing within COSMO Mobile Solution.
The goal is to print labels from the Item list with different layouts based on conditions and to be able to automatically print a label after a custom function.
Add a Printer
In the first step, a printer needs to be added for label printing done through the network.
- In the Printers page, choose the New action.
- In the Description field, enter a unique identifier.
- In the Printer Type field, choose Label Printer.
- In the Connection Type field, choose TCP/IP.
- In the Address field, enter the address of the printer.

Enable Printing for Users
The next step is to configure the COSMO Mobile Solution users to access the new printer.
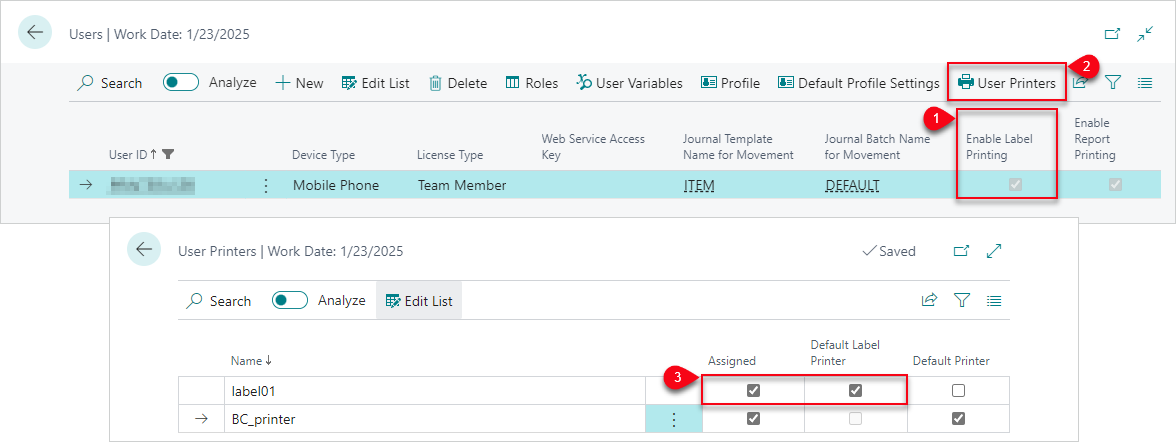
- In the Users page, select the Enable Report Printing checkbox for the user.
- Choose the User Printers action.
- Select the Assigned and Default Printer checkboxes for the new printer.
With this setup, report printing is enabled for the user and they can use the new printer can be used.
Set Up Label Layouts in Page Configuration
In this step, the label layouts are set up for the Items page customization, CCMSItemsWS.
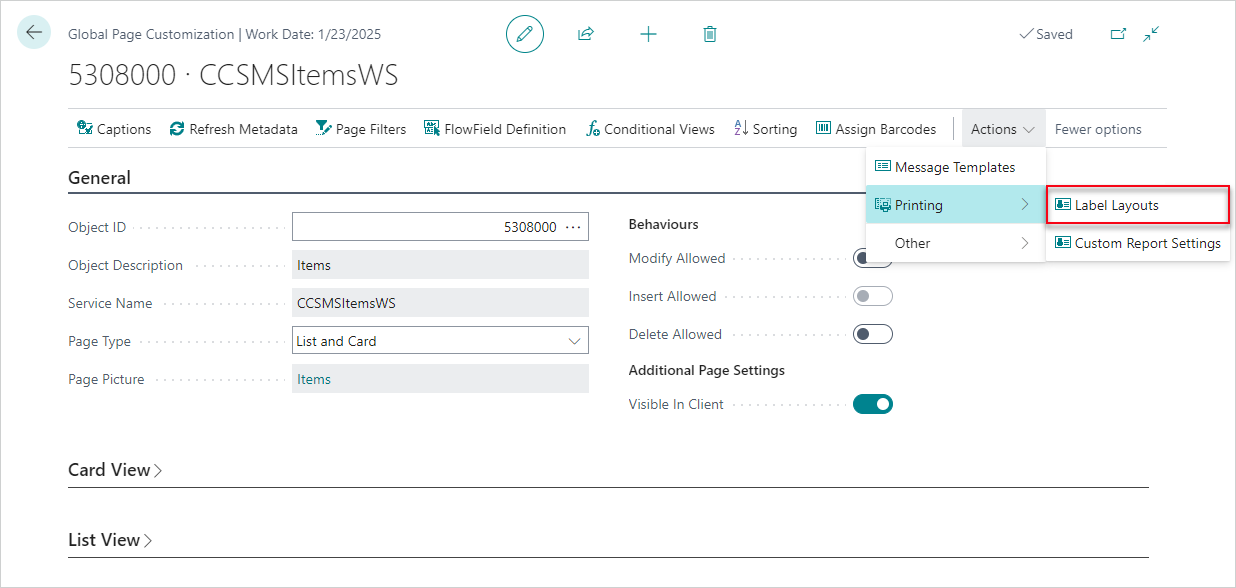
After opening the CCSMSItemsWS page customization, the first
step is to open the Label Layouts page by choosing Printing > Label Layouts from the Actions menu.
The layouts can be defined in ZPL programming language, which is a fairly simple language.
For details about ZPL language, see the official documentation: https://developer.zebra.com/products/printers/zpl.
For interactive label designing, see: https://labelary.com/.
Create Label Layouts
For this example, a very simple layout will be used for demonstration purposes:
^XA
^CF0,30
^FO220,115^FD{{No.Caption}}: {{No}}^FS
^PQ3
^XZ
This layout consists of the Item No's caption and the value of the field. "PQ" stands for print quantity, which means the default print quantity for this label will be 3.
Add Label Layouts
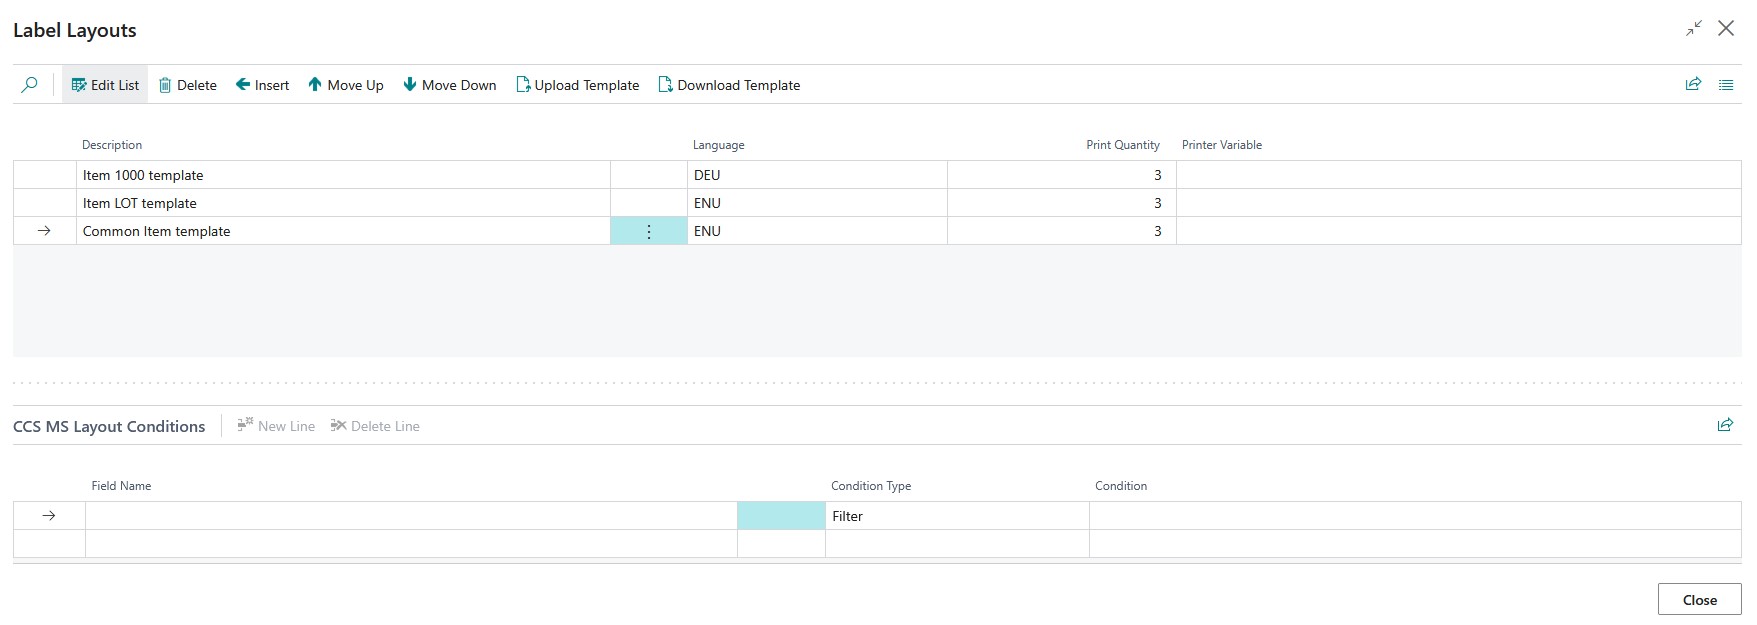
Now, three label layouts are created for the Items page.
- Choose the Insert action three times to create three blank label layouts.
- Enter the following Description names:
- Item 1000 template
- Item LOT template
- Common Item template
- Choose whether to specify a Printer Variable. If the Default Label Printer is sufficient, leave the Printer Variable field empty.
Upload Templates
The next step is to upload a template to each of the labels, adjustments can be made for the different layouts.
Item 1000 template is set to German, this means the caption part of the Item's No will be printed in German if the translation is available.
The template for the Item LOT template layout is changed to have an additional line of code before uploading it:
^FO220,115^FDLot Item^FS
Tip
To quickly create the templates for this example, choose the Download Template action and save the template locally. Open the template, paste in the first layout code above, and save it. Save another template with the additional code for the Item LOT template layout.
- Choose the Item 1000 template label layout, and then choose the Upload Template action to load the template with the base layout code.
- In the Language Code field, choose DEU.
- Choose the Item LOT template label layout, and then choose the Upload Template action to load the template with the adjusted layout code.
- Choose the Common item template label layout, and then choose the Upload Template action to load the template with the base layout code.
Create Conditions
Now conditions are defined so that when the Print Label button is pressed on the Item with number 1000, a specific layout will be printed. Same for the LOT template: if the item is lot tracked, it should have its own LOT label printed out.
If multiple conditions can be evaluated to "true", the first one is going to apply, which means if Item 1000 is also LOT tracked, the Item 1000 template will be printed.
- Choose the Item 1000 template label layout line and enter the following in the Layout Conditions FastTab:
- Field Name: No
- Condition Type: Filter
- Condition: 1000
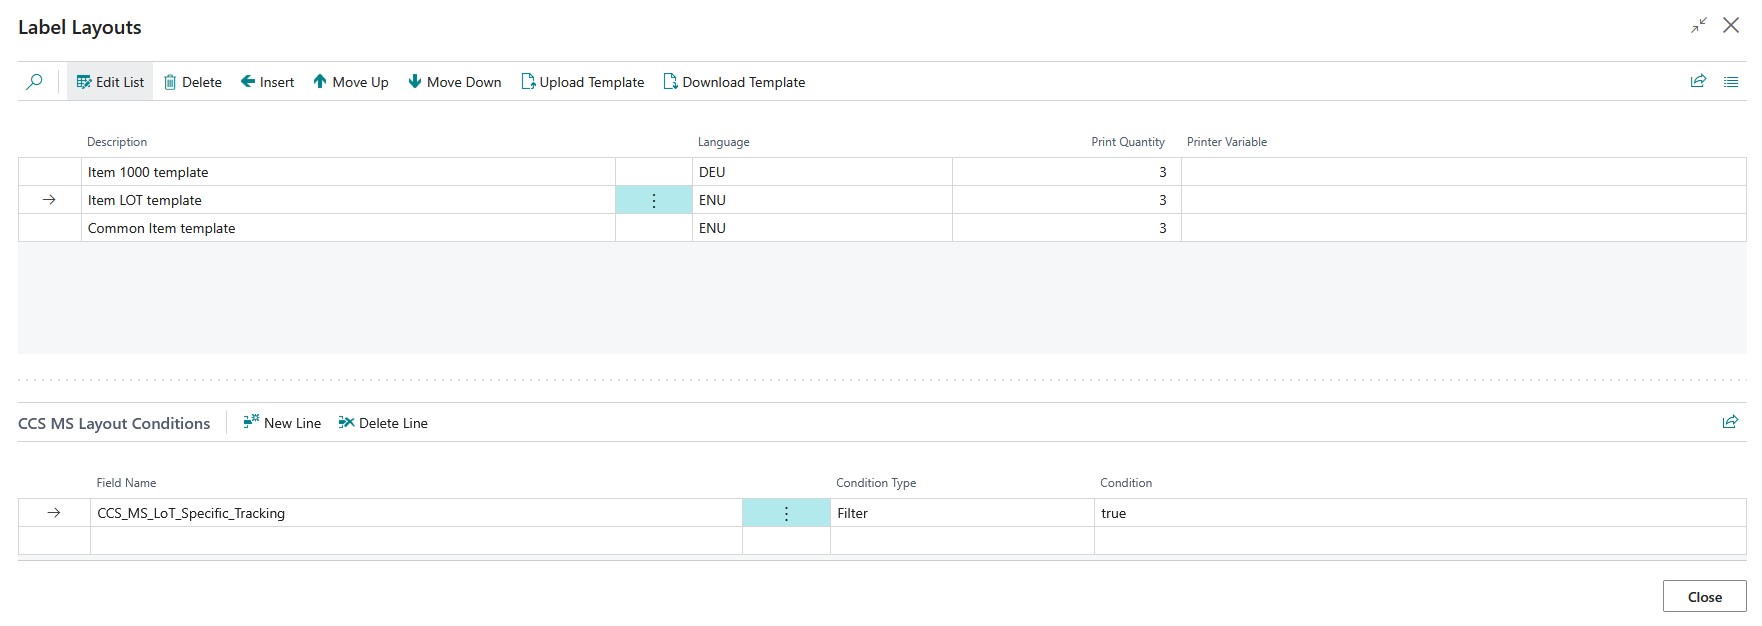
- Choose the Item LOT template label layout line and enter the following in the Layout Conditions FastTab:
- Field Name: CCS_MS_LoT_Specific_Tracking
- Condition Type: Filter
- Condition: true
- No conditions are needed for the Common Item template label layout.
If you have followed the above instructions, your custom report setting should look similar to this:
Settings in Mobile Application
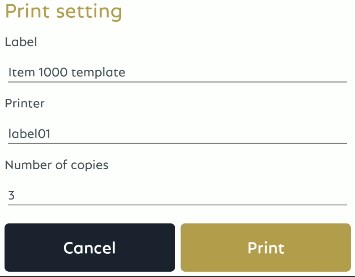
At this point, when choosing the Label print button in the mobile application, a label will be printed to the default printer (based on user settings). If the user long taps on the Label print button, a page will open that allows the user to change the label layout, the target printer or the number of copies. Changing the label layout will automatically update the printer to the corresponding value configured on the Label Layouts page.
Set Automatic Label Printing
To be able to print a label automatically, a function action must be created.
- Go back to the Global Page Customization page for CCSMSItemsWS.
- In the Card View FastTab, choose the CustomFunction1 line within the Function List group, and then choose the Function Actions action on the Manage menu.
- In the Run Time field, choose After Action Successful.
- In the Function Action field, choose Print Label.
- (Optional) Specify the exact layout to be printed from the drop-down list in the Action Parameter field.
After this change, the label will be automatically printed when the configured function runs.

Feedback
Submit feedback for this page .


