Azure App Registration
- How do I register a Web Type Azure App in a SaaS environment?
- How do I register a Mobile Type Azure App in a SaaS environment?
- How do I register a Web Type Azure App in an on-premises environment?
- How do I register a Mobile Type Azure App in an on-premises environment?
- How do I fill the fields of the OAuth Settings page properly?
Tip
Summary: This guide provides detailed instructions on how to register Azure applications for use with OAuth authentication in both SaaS and on-premises environments. It covers the process for registering both Web and Mobile type applications, highlighting key differences and steps for each environment.
To use your SaaS or on-premises (OnPrem) environment with OAuth authentication, set up your Azure app registration and COSMO Mobile Solution (Business Central extension) as described in this topic.
Note
The app registration can be done using the Microsoft Entra admin center or Azure Portal. This content demonstrates how to do it in the Azure Portal but the process is generally the same in the Microsoft Entra admin center.
App Registration Types
COSMO Mobile Solution supports two types of app registration: Web and Mobile. Both can be used in SaaS and OnPrem, both have advantages and disadvantages as described below.
The Web type app registration:
- Requires a client secret, which has an expiration date.
- Ignores the MFA location checks, which can be useful when the Intermediate Layer or Business Central is running in a non-trusted location while the user is in a trusted location.
The Mobile type app registration:
- Does not require a client secret.
- Requires the MFA location checks to be passed, which can be an issue when the Intermediate Layer or Business Central is running in a non-trusted location while the user in in a trusted location.
The different registration types based on the SaaS/OnPrem environments are designated in the separate tabs below.
To register a Web type application in a SaaS environment, follow the steps listed below.
Choose the  icon, enter Mobile Solution Settings and choose the related link.
Ensure that the OAuth without Client Secret toggle is turned off.
Choose the OAuth Settings action to open the OAuth Settings page. Keep this page open during the app registration process.
Open a new tab in your browser and go to Microsoft Azure portal and log in with your admin account.
Enter App registrations in the search bar.
Choose New registration.

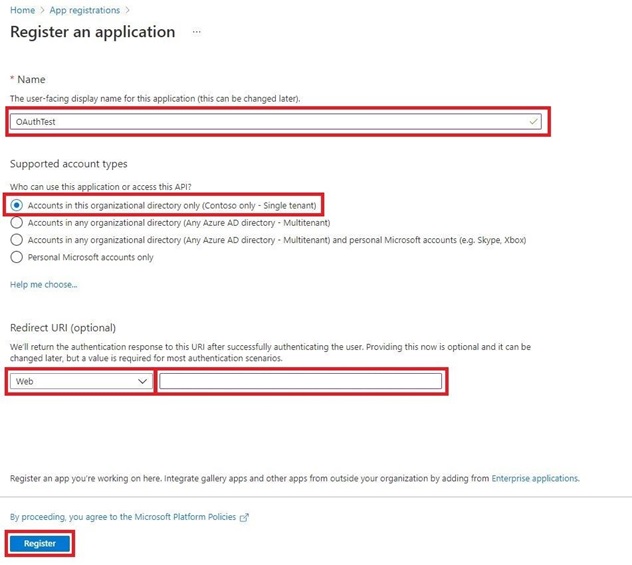
Fill in the required data and then choose the Register button:
- Name: it can be anything, e.g., OAuthTest.
- Supported account types: the first option is set by default; however, it can be selected regarding your company settings.
- Redirect URI (optional): leave it blank, it will be set later.
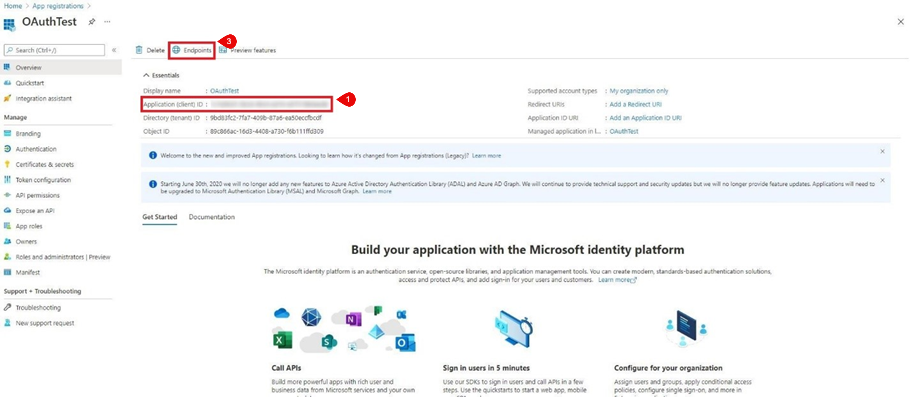
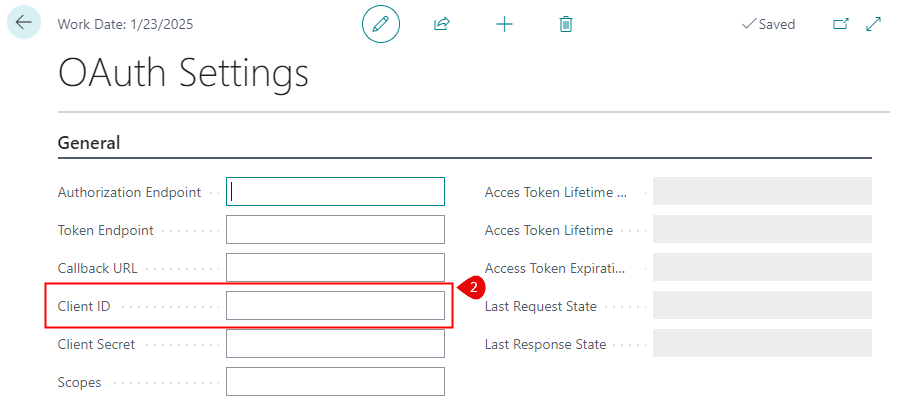
Next, you'll be redirected to your App registrations window. Copy the Application (client) ID value (1), open the OAuth Settings page in Business Central and paste it in the Client ID field (2). Go back to Microsoft Azure and choose Endpoints (3).
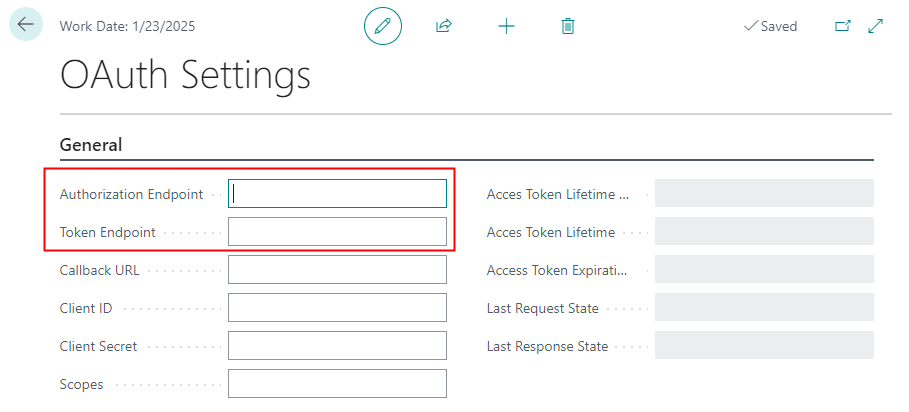
In the Endpoints window:
- copy the following endpoint values:

- open the OAuth Settings page in Business Central and paste them in the Authorization Endpoint and Token Endpoint fields.
Go back to Microsoft Azure. In the navigation pane, choose Authentication and then choose Add a platform.
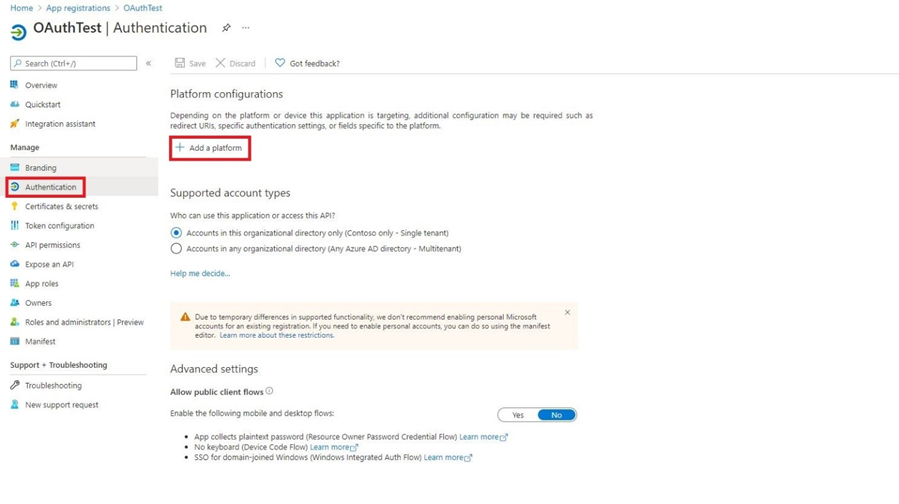
In the Configure platforms window, choose the Web application.
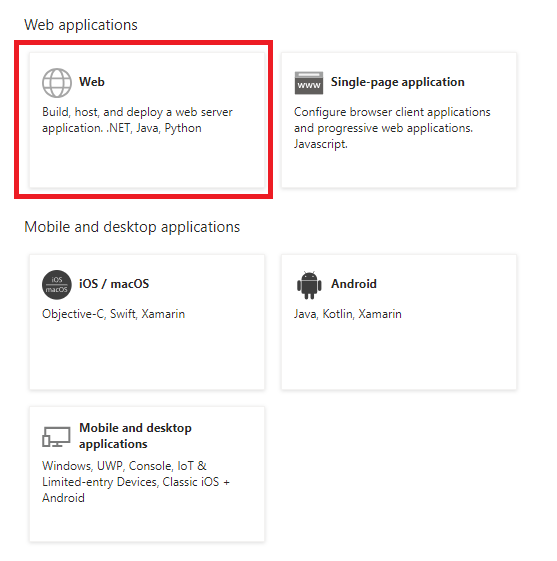
After selecting Web, the Configure Web window opens. Enter http://localhost in the Redirect URIs field, then choose the Configure button.
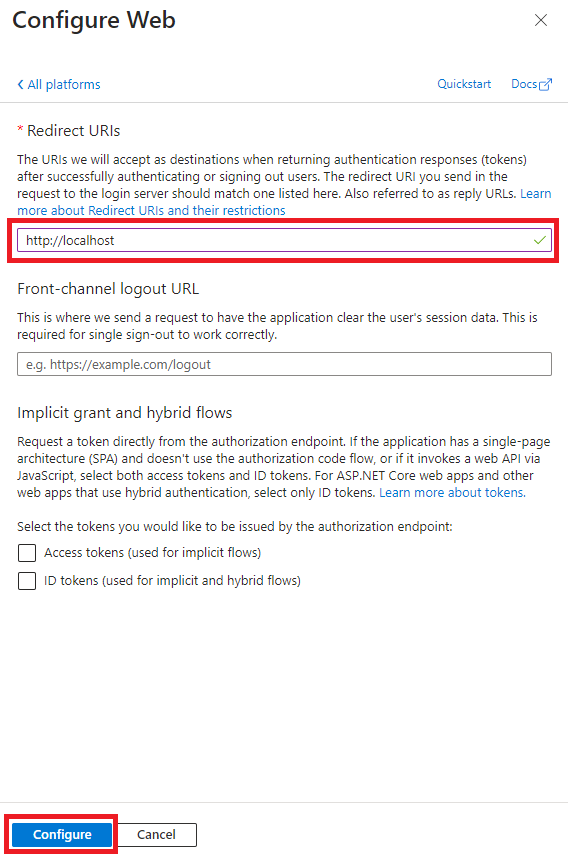
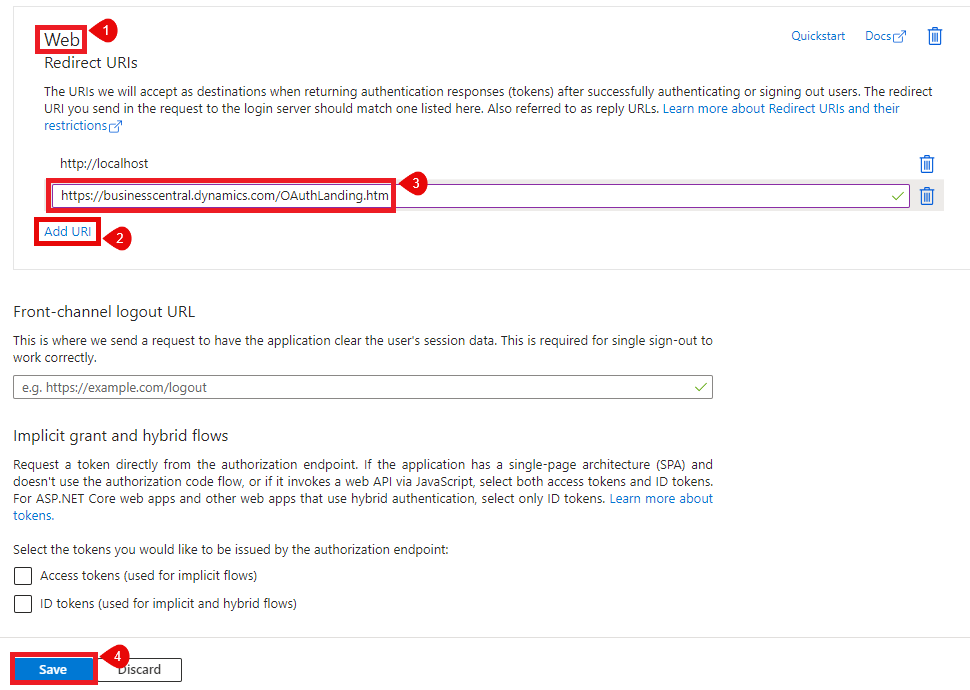
Go back to the Authentication tab. In the Web section (which shows your previously added localhost URI), choose Add URI. Copy and paste your Business Central communication URI: https://businesscentral.dynamics.com/OAuthLanding.htm
Choose the Save button.
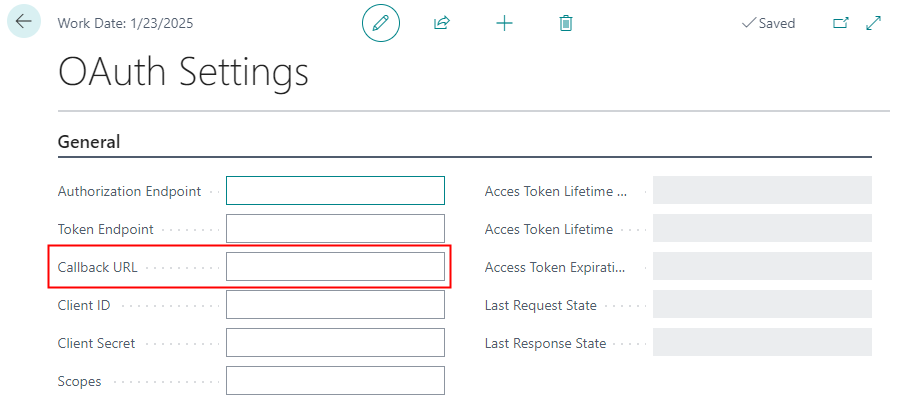
Open the OAuth Settings page in Business Central and paste it in the Callback URL field.
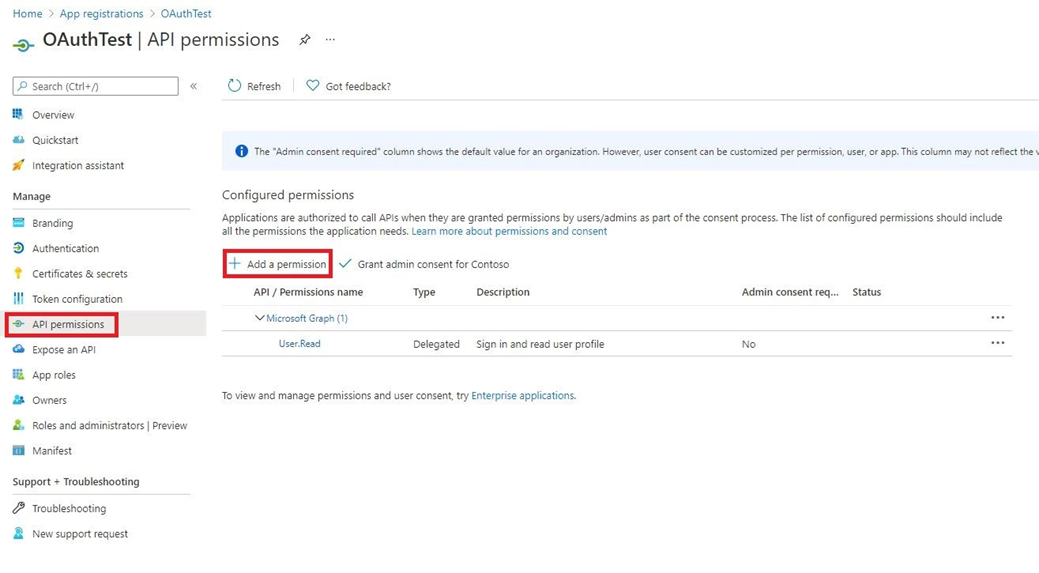
Go back to Microsoft Azure. In the navigation pane, choose API permissions and then choose Add a permission.
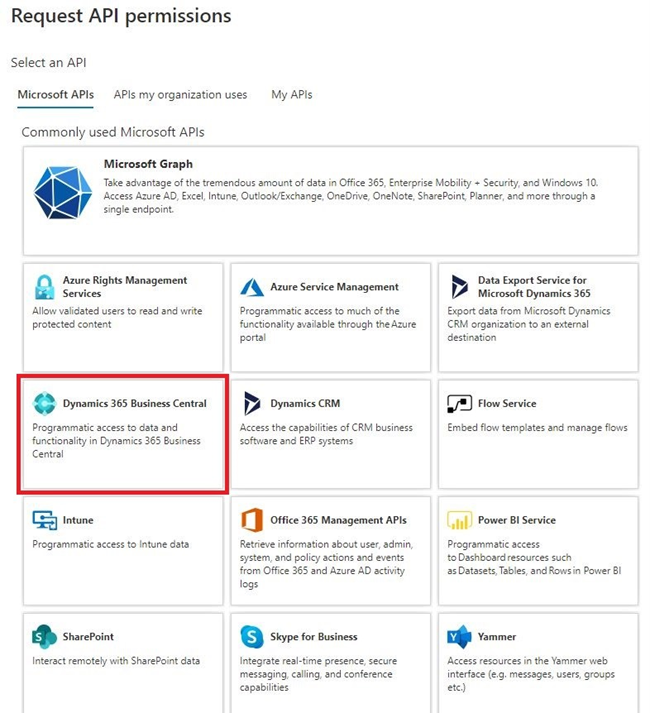
In the Request API permissions window, choose the Dynamics 365 Business Central API.
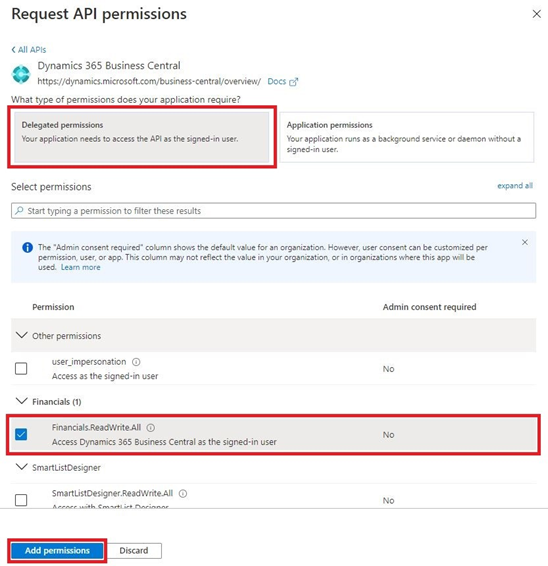
Select Delegated permissions as the permission type, check the Financial.ReadWrite.All option under the Financials drop-down, and then click Add permissions. After adding, ensure you grant admin consent for both User.Read and Financial.ReadWrite.All permissions by choosing the Grant admin consent for... action among the listed permissions.
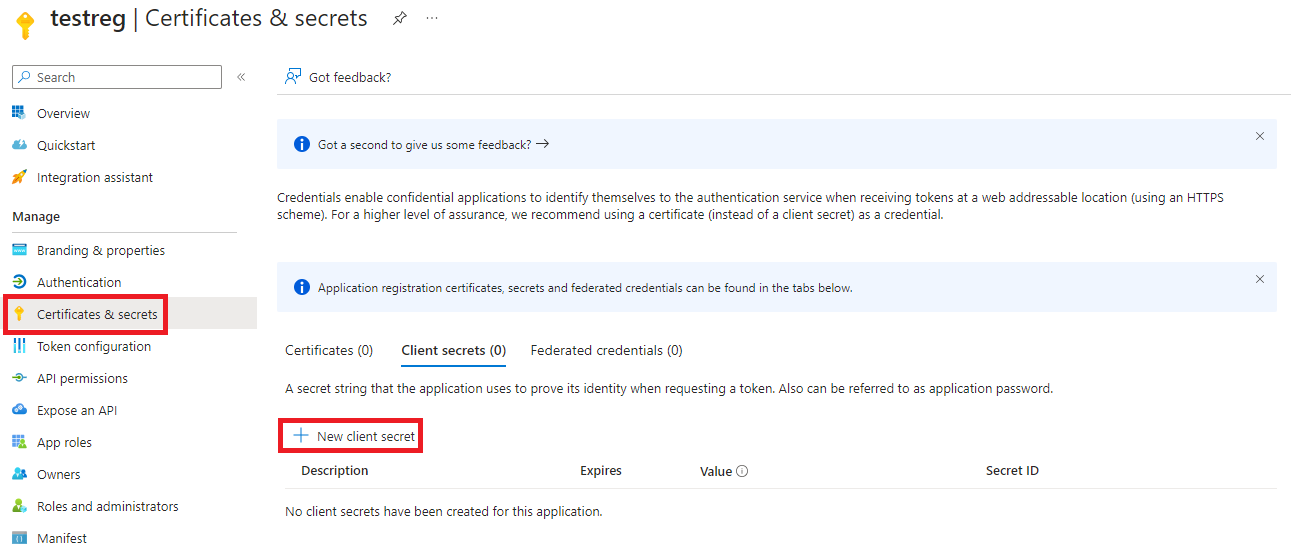
In the navigation pane, choose Certificates & secrets and then choose New client secret.
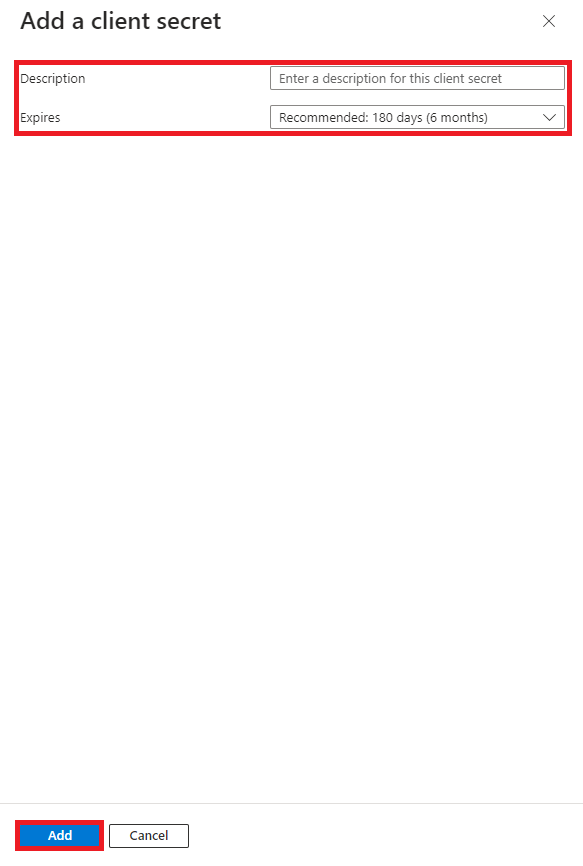
In the Add a client secret window, enter a description of the client secret, set the expiration date, and then choose the Add button.
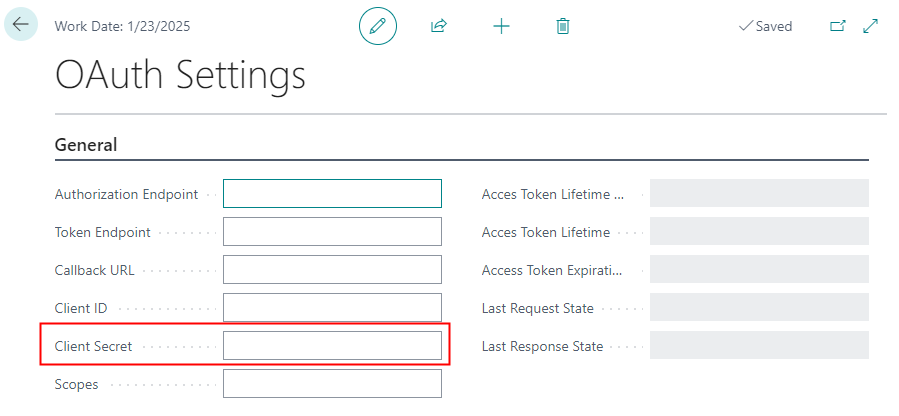
Copy the client secret value, open the OAuth Settings page in Business Central, and paste it in the Client Secret field. Once the secret is created, its value will no longer be accessible after the page is closed in Microsoft Azure.

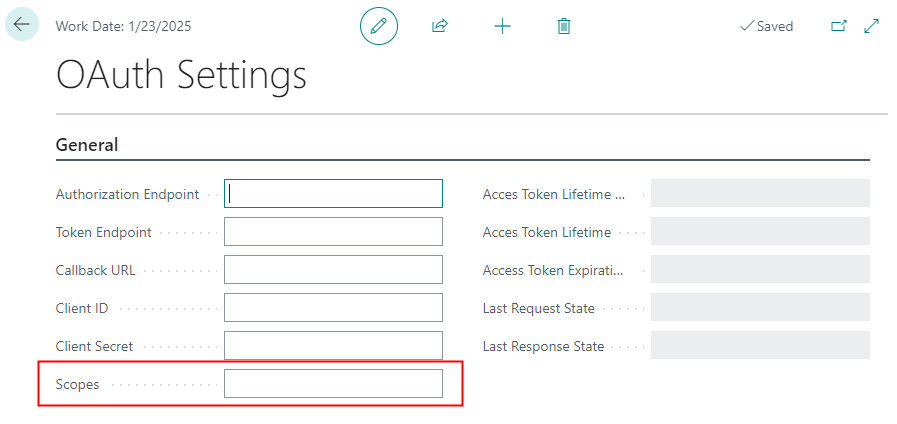
In the OAuth Settings page, paste the following scope value in the Scopes field: https://api.businesscentral.dynamics.com/Financials.ReadWrite.All offline_access
Ensure that the " offline_access" section of the URL is included in the copied value (with a space before "offline").
In case of a non-production environment, choose the  icon, enter Extension Management and choose the related link.
Locate and open COSMO Mobile Solution and then turn on the Allow HttpClient Requests toggle in the Extension Settings page.

To register a Mobile type application in a SaaS environment, follow the steps listed below.
Choose the  icon, enter Mobile Solution Settings and choose the related link.
Ensure that the OAuth without Client Secret toggle is turned on.
Choose the OAuth Settings action to open the OAuth Settings page. Keep this page open during the app registration process.
Open a new tab in your browser and go to Microsoft Azure portal and log in with your admin account.
Enter App registrations in the search bar.
Choose New registration.

Fill in the required data and then choose the Register button:
- Name: it can be anything, e.g., OAuthTest.
- Supported account types: the first option is set by default; however, it can be selected regarding your company settings.
- Redirect URI (optional): leave it blank, it will be set later.

Next, you'll be redirected to your App registrations window. Copy the Application (client) ID value (1), open the OAuth Settings page in Business Central and paste it in the Client ID field (2). Go back to Microsoft Azure and choose Endpoints (3).


In the Endpoints window:
- copy the following endpoint values:

- open the OAuth Settings page in Business Central and paste them in the Authorization Endpoint and Token Endpoint fields.

Go back to Microsoft Azure. In the navigation pane, choose Authentication and then choose Add a platform.

In the Configure platforms window, choose the Mobile and desktop applications application.
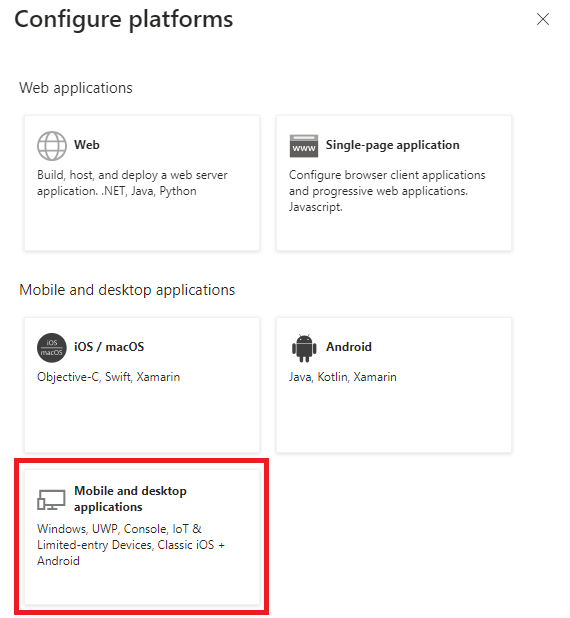
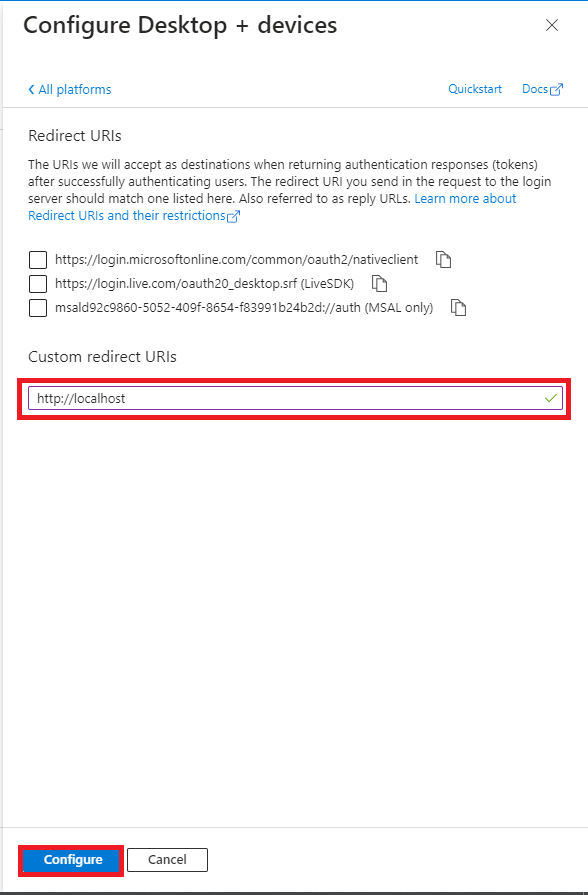
After selecting Mobile and desktop applications, the Configure Desktop + devices window opens. Enter http://localhost in the Custom redirect URIs field, then choose the Configure button.
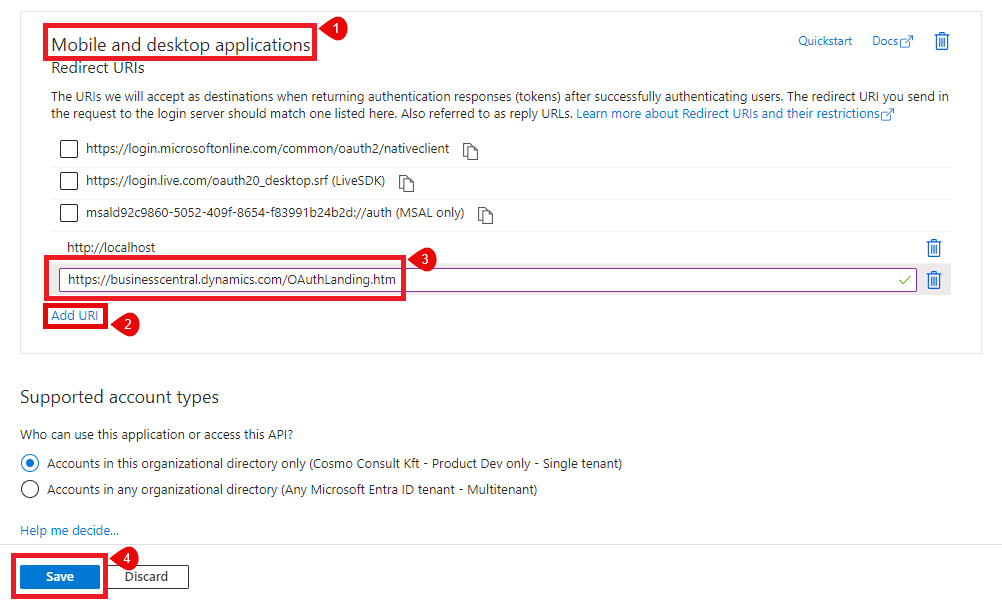
Go back to the Authentication tab. In the Mobile and desktop applications section (which shows your previously added localhost URI), choose Add URI. Enter your Business Central communication URI: https://businesscentral.dynamics.com/OAuthLanding.htm
Choose the Save button.
Open the OAuth Settings page in Business Central and paste it in the Callback URL field.

Go back to Microsoft Azure. In the navigation pane, choose API permissions and then choose Add a permission.

In the Request API permissions window, choose the Dynamics 365 Business Central API.

Select Delegated permissions as the permission type, check the Financial.ReadWrite.All option under the Financials drop-down, and then click Add permissions. After adding, ensure you grant admin consent for both User.Read and Financial.ReadWrite.All permissions by choosing the Grant admin consent for... action among the listed permissions.

Open the OAuth Settings page in Business Central and paste the following scope value in the Scopes field:
https://api.businesscentral.dynamics.com/Financials.ReadWrite.All offline_access
Ensure that the " offline_access" section of the URL is included in the copied value (with a space before "offline").

In case of a non-production environment, choose the  icon, enter Extension Management and choose the related link.
Locate and open COSMO Mobile Solution and then turn on the Allow HttpClient Requests toggle in the Extension Settings page.

To register a Web type application in an on-premises environment, follow the steps listed below.
Choose the  icon, enter Mobile Solution Settings and choose the related link.
Ensure that the OAuth without Client Secret toggle is turned off.
Choose the OAuth Settings action to open the OAuth Settings page. Keep this page open during the app registration process.
Go to Microsoft Azure portal and log in with your admin account.
Enter App registrations in the search bar.
Choose New registration.

Fill in the required data and then choose the Register button:
- Name: it can be anything, e.g., MobSolTest.
- Supported account types: choose the first option if the Business Central server is in the same domain as your Azure App Registration, or the second option if they are in different domains.
- Redirect URI (optional): leave it blank, it will be set later.

Next, you'll be redirected to your App registrations window. Copy the Application (client) ID value (1), open the OAuth Settings page in Business Central and paste it in the Client ID field (2). Go back to Microsoft Azure and choose Endpoints (3).


In the Endpoints window:
- copy the following endpoint values:

- open the OAuth Settings page in Business Central and paste them in the Authorization Endpoint and Token Endpoint fields.

Go back to Microsoft Azure. In the navigation pane, choose Authentication and then choose Add a platform.

In the Configure platforms window, choose the Web application.

After selecting Web, the Configure Web window opens. Enter http://localhost in the Redirect URIs field and then choose the Configure button.

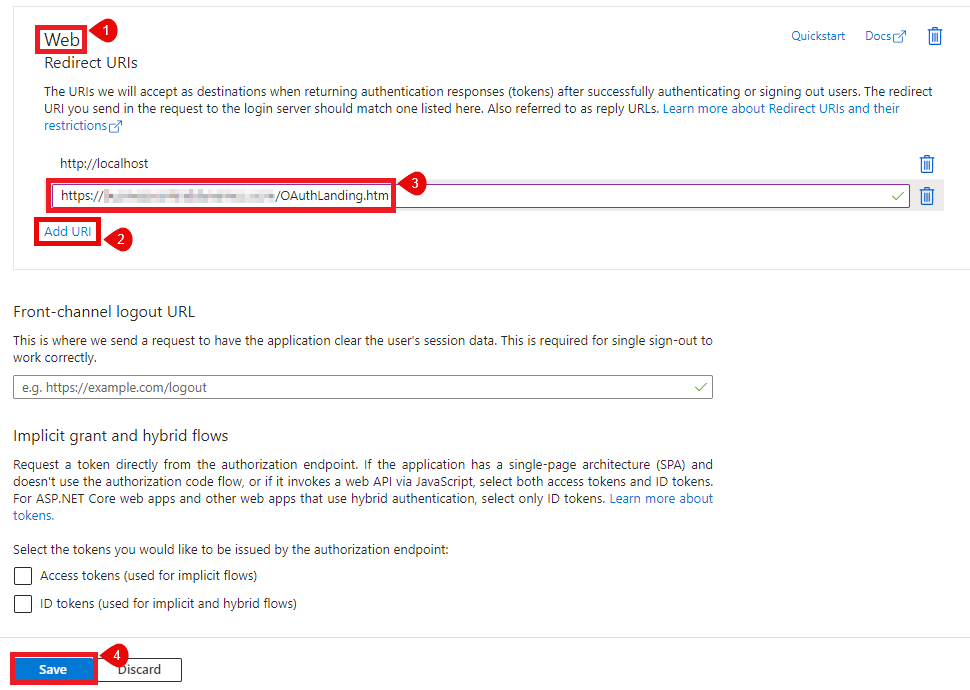
Go back to the Authentication tab. In the Web section (which shows your previously added localhost URI), choose Add URI. Copy and paste your Business Central communication URI, based on the following structure: https://'server name'/'YourEnvironment Name'/OAuthLanding.htm
Choose the Save button.
Open the OAuth Settings page in Business Central and paste it in the Callback URL field.

Go back to Microsoft Azure. In the navigation pane, choose Expose an API and then set your Application ID URI. Copy its value to the valid audiences in the Business Central instance settings. For information about configuring Business Central on-premises web server instances, see the configuration guide in the Microsoft Documentation.
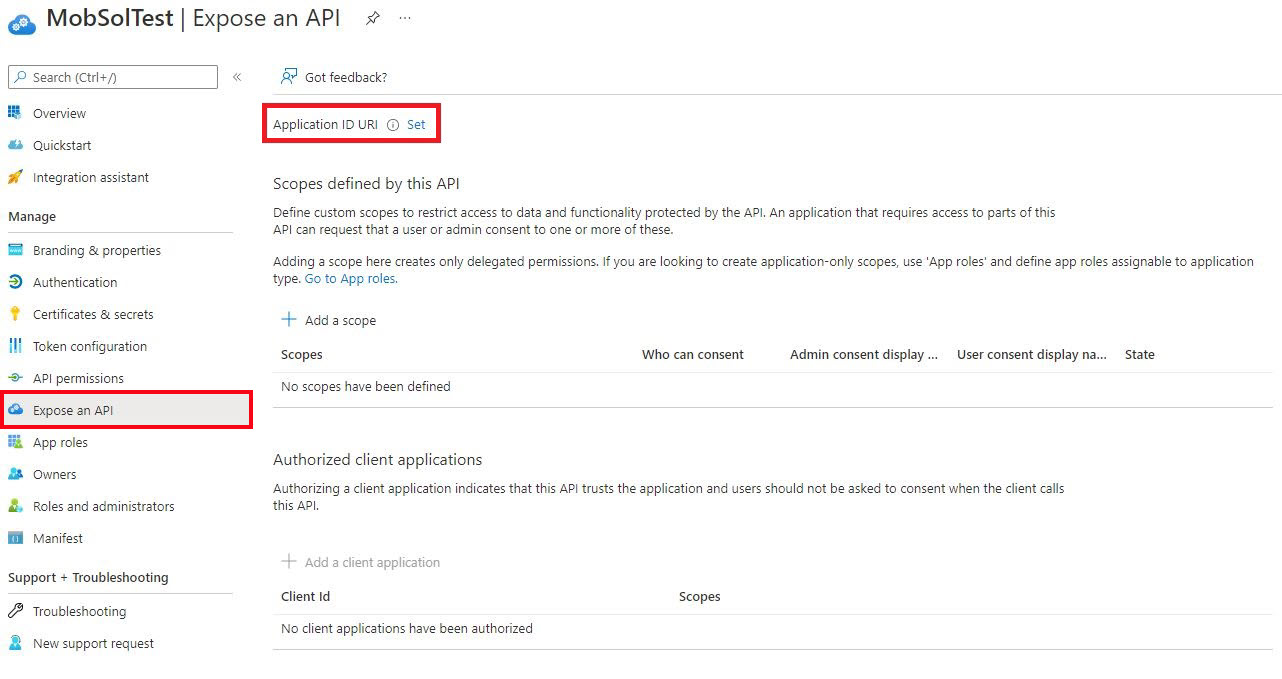
A new window opens which contains your Application (client) ID starting with an api:// prefix. Leave it as it is by default and choose the Save button.

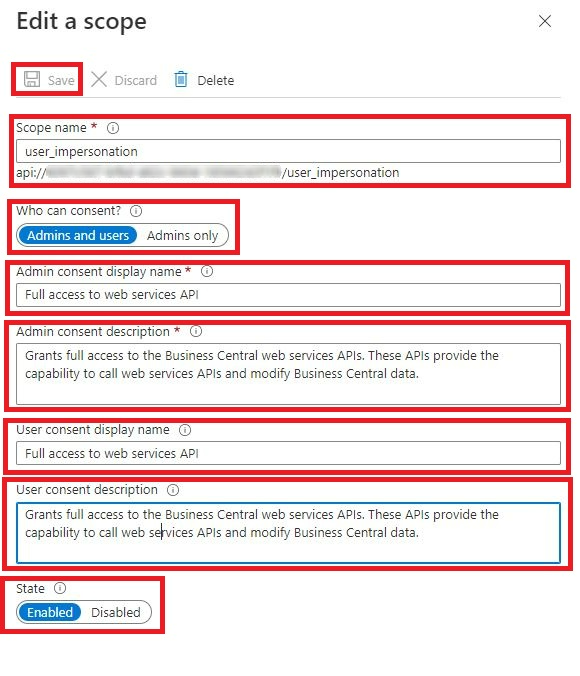
Choose Add a scope.
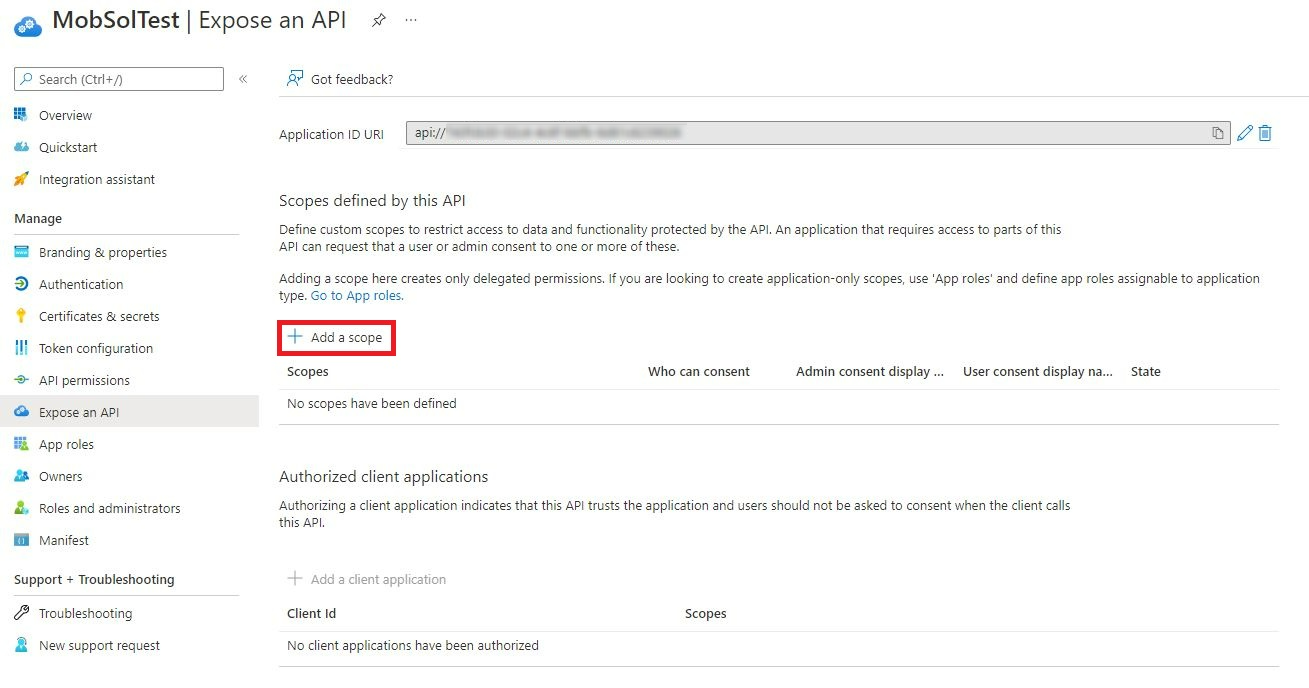
In the Edit a scope window, set the following values, and then choose the Save button:
- Scope name: user_impersonation
- Who can consent: Admins and users
- Admin consent display name: set any value (e.g., Full access to web services API)
- Admin consent description: set any value (e.g., Grants full access to the Business Central web services APIs. These APIs provide the ability to call web services APIs and modify Business Central data.)
- User consent display name: set any value (e.g., Full access to web services API)
- User consent description: set any value (e.g., Grants full access to the Business Central web services APIs. These APIs provide the ability to call web services APIs and modify Business Central data.)
- State: Enabled
Open the OAuth Settings page in Business Central and paste the following scope value in the Scopes field: api://'yourClientId'/user_impersonation offline_access
Use the Application (client) ID value as 'yourClientID'. Ensure that the " offline_access" section of the URL is included in the copied value (with a space before "offline").

Go back to Microsoft Azure. In the navigation pane, choose Certificates & secrets and then choose New client secret.

In the Add a client secret window, enter a description of the client secret, and set the expiration date, and then choose the Add button.

Copy the client secret value, open the OAuth Settings page in Business Central, and paste it in the Client Secret field. Once the secret is created, its value will no longer be accessible after the page is closed in Microsoft Azure.


In case of a non-production environment, choose the  icon, enter Extension Management and choose the related link.
Locate and open COSMO Mobile Solution and then turn on the Allow HttpClient Requests toggle in the Extension Settings page.

To register a Mobile type application in an on-premises environment, follow the steps listed below.
Choose the  icon, enter Mobile Solution Settings and choose the related link.
Ensure that the OAuth without Client Secret toggle is turned on.
Choose the OAuth Settings action to open the OAuth Settings page. Keep this page open during the app registration process.
Go to Microsoft Azure portal and log in with your admin account.
Enter App registrations in the search bar.
Choose New registration.

Fill in the required data and then choose the Register button:
- Name: it can be anything, e.g., MobSolTest.
- Supported account types: choose the first option if the Business Central server is in the same domain as your Azure App Registration, or the second option if they are in different domains.
- Redirect URI (optional): leave it blank, it will be set later.

Next, you'll be redirected to your App registrations window. Copy the Application (client) ID value (1), open the OAuth Settings page in Business Central and paste it in the Client ID field (2). Go back to Microsoft Azure and choose Endpoints (3).


In the Endpoints window:
- copy the following endpoint values:

- open the OAuth Settings page in Business Central and paste them in the Authorization Endpoint and Token Endpoint fields.

In the OAuth Settings page, paste the following scope value in the Scopes field: api://'yourClientId'/user_impersonation offline_access
Use the Application (client) ID value as 'yourClientID'. Ensure that the " offline_access" section of the URL is included in the copied value (with a space before "offline").

Go back to Microsoft Azure. In the navigation pane, choose Authentication and then choose Add a platform.

In the Configure platforms window, choose the Mobile and desktop applications application.

After selecting Mobile and desktop applications, the Configure Desktop + devices window opens. Enter http://localhost in the Custom redirect URIs field and then choose the Configure button.

Go back to the Authentication tab. In the Mobile and desktop applications section (which shows your previously added localhost URI), choose Add URI. Enter your Business Central communication URI, based on the following structure: https://'server name'/'YourEnvironment Name'/OAuthLanding.htm
Choose the Save button.
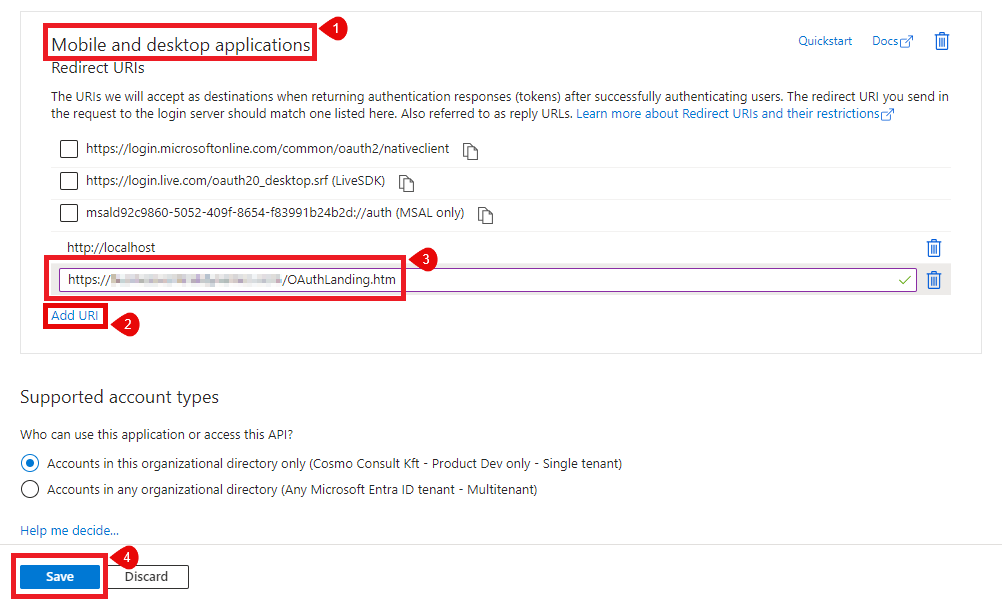
Open the OAuth Settings page in Business Central and paste it in the Callback URL field.

Go back to Microsoft Azure. In the navigation pane, choose Expose an API and then set your Application ID URI. Copy its value to the valid audiences in the Business Central instance settings. For information about configuring Business Central on-premises web server instances, see the configuration guide in the Microsoft Documentation.

A new window opens which contains your Application (client) ID starting with an api:// prefix. Leave it as it is by default and choose the Save button.

Choose Add a scope.

In the Edit a scope window, set the following values, and then choose the Save button:
- Scope name: user_impersonation
- Who can consent: Admins and users
- Admin consent display name: set any value (e.g., Full access to web services API)
- Admin consent description: set any value (e.g., Grants full access to the Business Central web services APIs. These APIs provide the ability to call web services APIs and modify Business Central data.)
- User consent display name: set any value (e.g., Full access to web services API)
- User consent description: set any value (e.g., Grants full access to the Business Central web services APIs. These APIs provide the ability to call web services APIs and modify Business Central data.)
- State: Enabled

In case of a non-production environment, open Business Central, choose the  icon, enter Extension Management and choose the related link.
Locate and open COSMO Mobile Solution and then turn on the Allow HttpClient Requests toggle in the Extension Settings page.

Feedback
Submit feedback for this page .
 icon, enter Mobile Solution Settings and choose the related link.


 icon, enter Extension Management and choose the related link.


