Intermediate Layer Installation Options
- What are the different options available for operating an Intermediate Layer?
- Where can I find the publicly available Intermediate Layer hosted by COSMO CONSULT?
- How do I install an Intermediate Layer in a SaaS environment?
- How do I install an Intermediate Layer in an on-premises environment?
Tip
Summary: This guide explains how to install the Intermediate Layer in both SaaS (cloud) and on-premises environments. For SaaS deployment, the Intermediate Layer can be hosted by COSMO CONSULT or in a private cloud environment. It uses Microsoft Azure services like CosmosDB, Azure Key Vault, and a Docker container running inside a Web App. The process involves setting up these services and configuring environment variables. For on-premises deployment, the Intermediate Layer is installed as a Windows Service.
Typically an installation is only performed once and is not executed by the user, but an administrator. The installation differs between SaaS (cloud) and on-premises environments.
SaaS Deployment
There are two scenarios for a SaaS deployment:
the COSMO CONSULT hosted scenario is used in cases where a company entrusts COSMO CONSULT with the operation of the Intermediate Layer and COSMO CONSULT performs the installation.
the Self-Cloud hosted scenario is used in cases where a company wants to host the Intermediate Layer in the cloud itself and take responsibility for its operation.
In both scenarios, there are additional costs associated with the chosen hosting option.
On-premises
Install the intermediate layer on a server as a Windows Service. This installation method is suitable for customers who prefer to host the intermediate layer privately within their infrastructure. There are no additional costs involved, apart from server maintenance and staffing.
Installation Processes
The details of the SaaS and On-Premises (OnPrem) installation processes are designated in the separate tabs below.
For strictly demonstration and test purposes, COSMO CONSULT provides a publicly available intermediate layer.
This guide will go through the installation steps for the intermediate layer in an Azure environment. The intermediate layer is an app service-based application that runs a docker container inside. For the persistent data storage it uses CosmosDB. Additionally, it uses an Azure storage account for storing the logs if needed.
Requirements
- Microsoft Azure subscription (or other cloud service subscription with container run capability. Microsoft Azure is highly recommended).
- Ability to create resource groups, container instances, Azure KeyVault instances and Azure COSMOSDB instances.
Installation Steps
Create a new resource group in the Azure portal. This resource group will contain all the resources needed for the intermediate layer.
Create a new CosmosDB for NoSQL database.
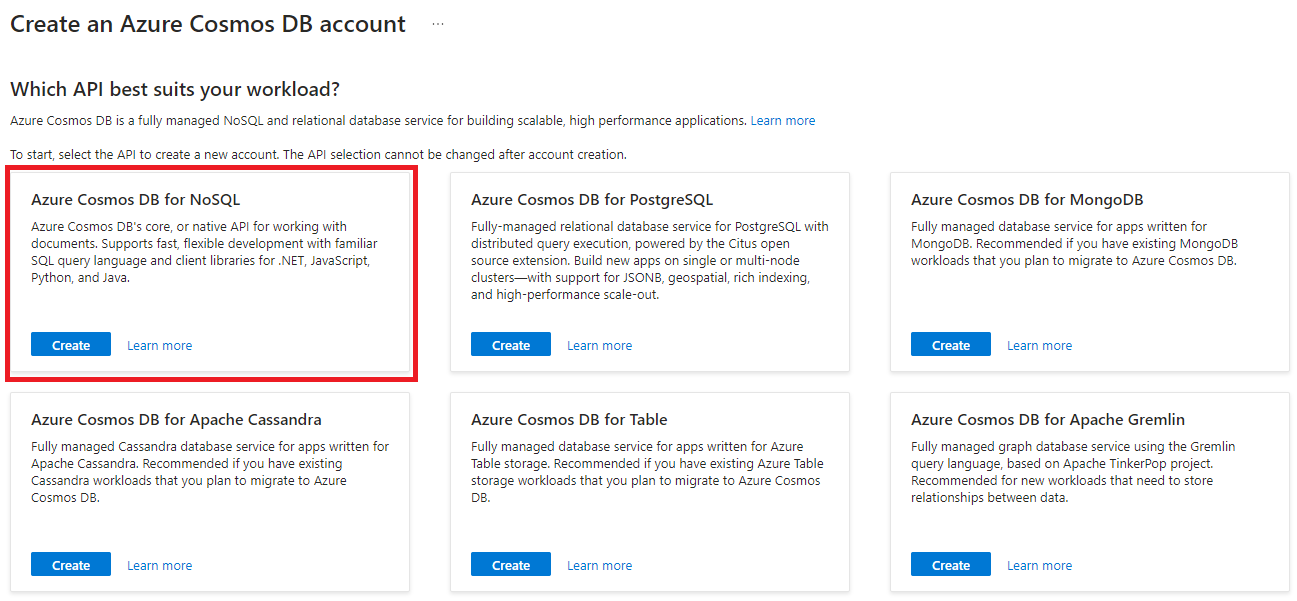
Select your Resource Group and then fill in the Account Name. Select a Location close to you and then set the Capacity mode as Serverless.

On the Global Distribution tab, set the Geo-Redundancy and Multi-region Writes to Disable.

Make no changes to the Networking tab.
On the Backup Policy tab, choose the relevant Backup storage redundancy. We use Locally-redundant backup storage as default.
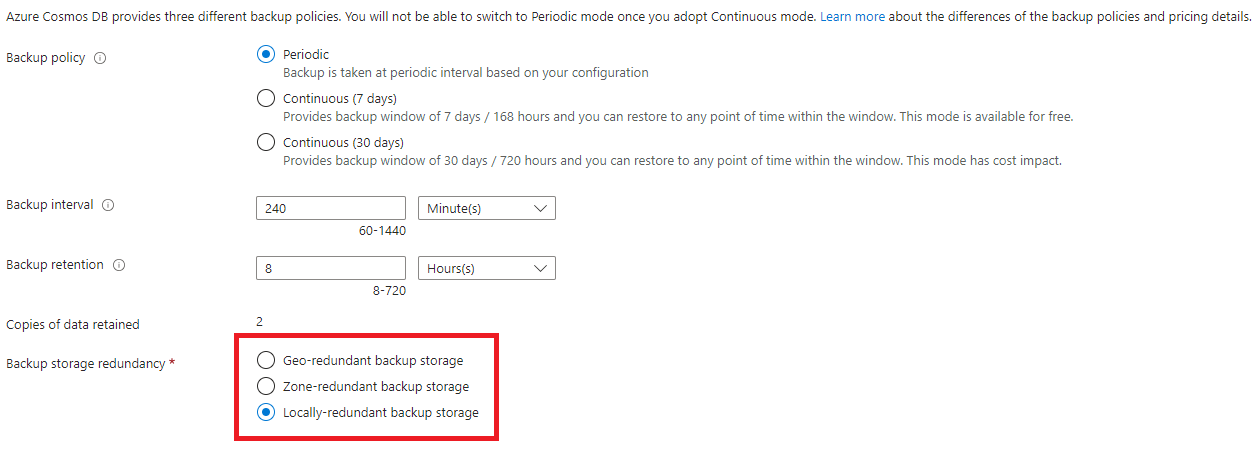
Go to the Review + create tab and then choose the Create button.
While it's creating, create a new Azure Key Vault.
On the Basics tab, select your Resource group, fill in the Key vault name and select your Region.
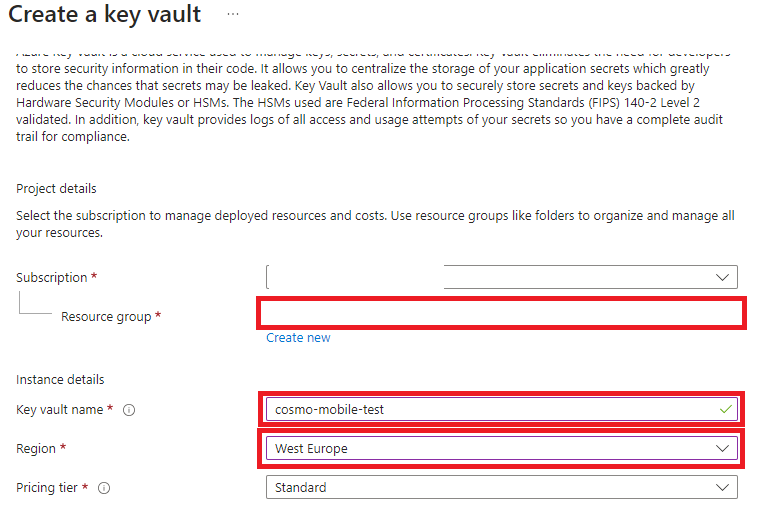
On the Access configuration tab, select Vault access policy as the Permission model.

Go to the Review + create tab and choose the Create button.
Go back to the newly created CosmosDB and choose Keys in the navigation pane. Copy the Primary Connection String.
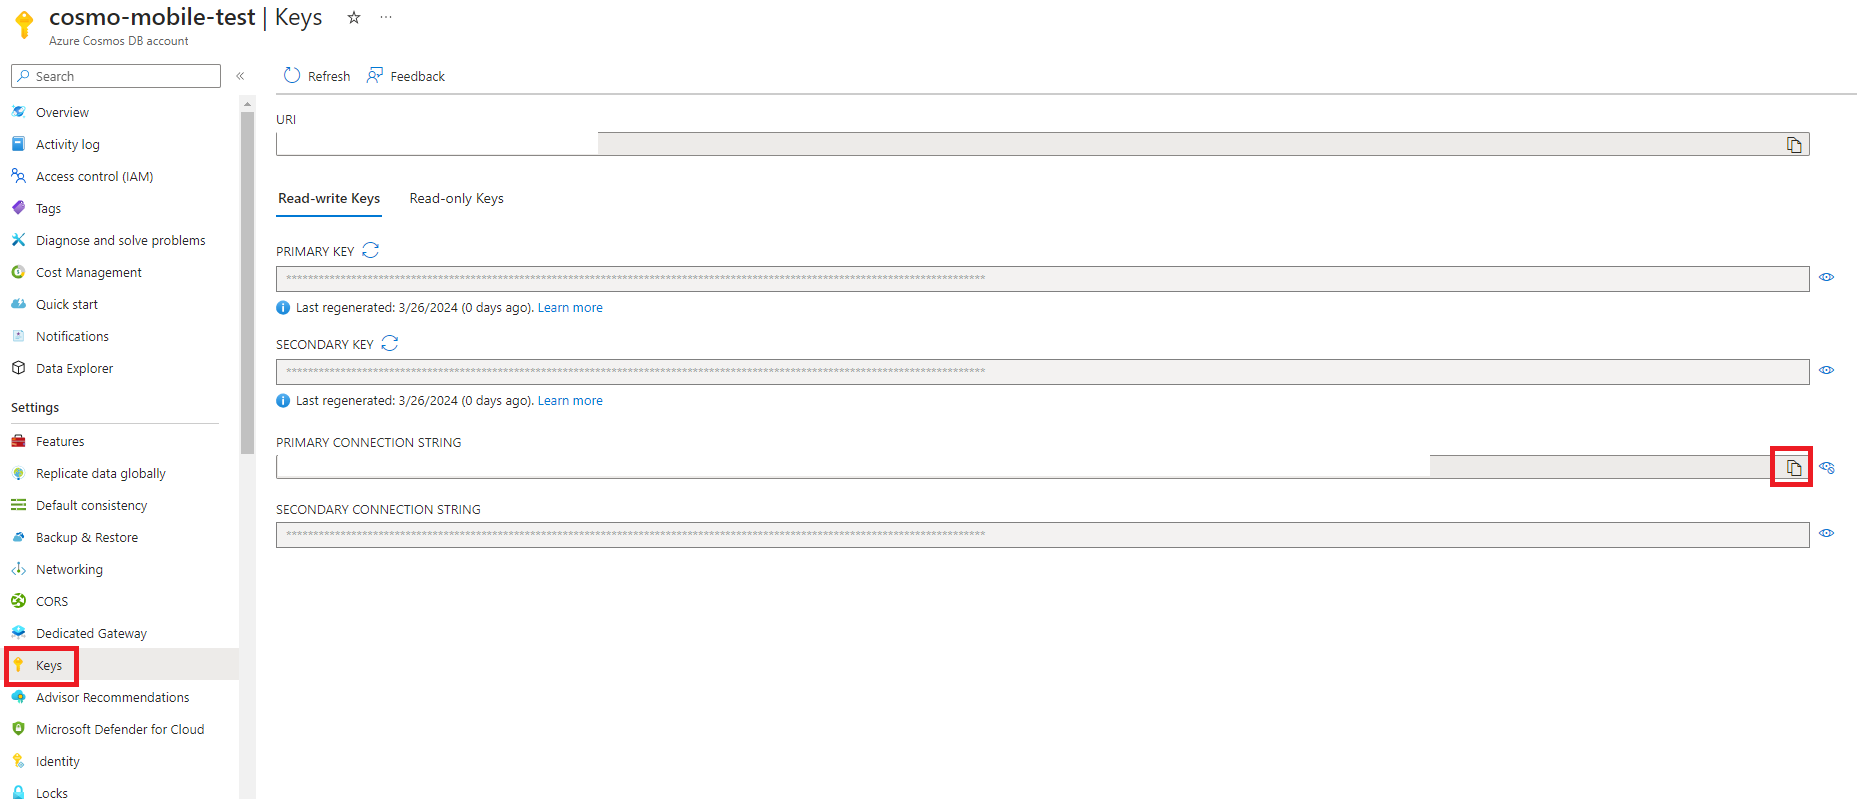
Go to the newly created Key Vault, choose Secrets in the navigation pane, and then choose Generate/Import.

Fill in the Name and paste the copied Primary Connection String (from step 12) to the Secret value field. Choose the Create button.
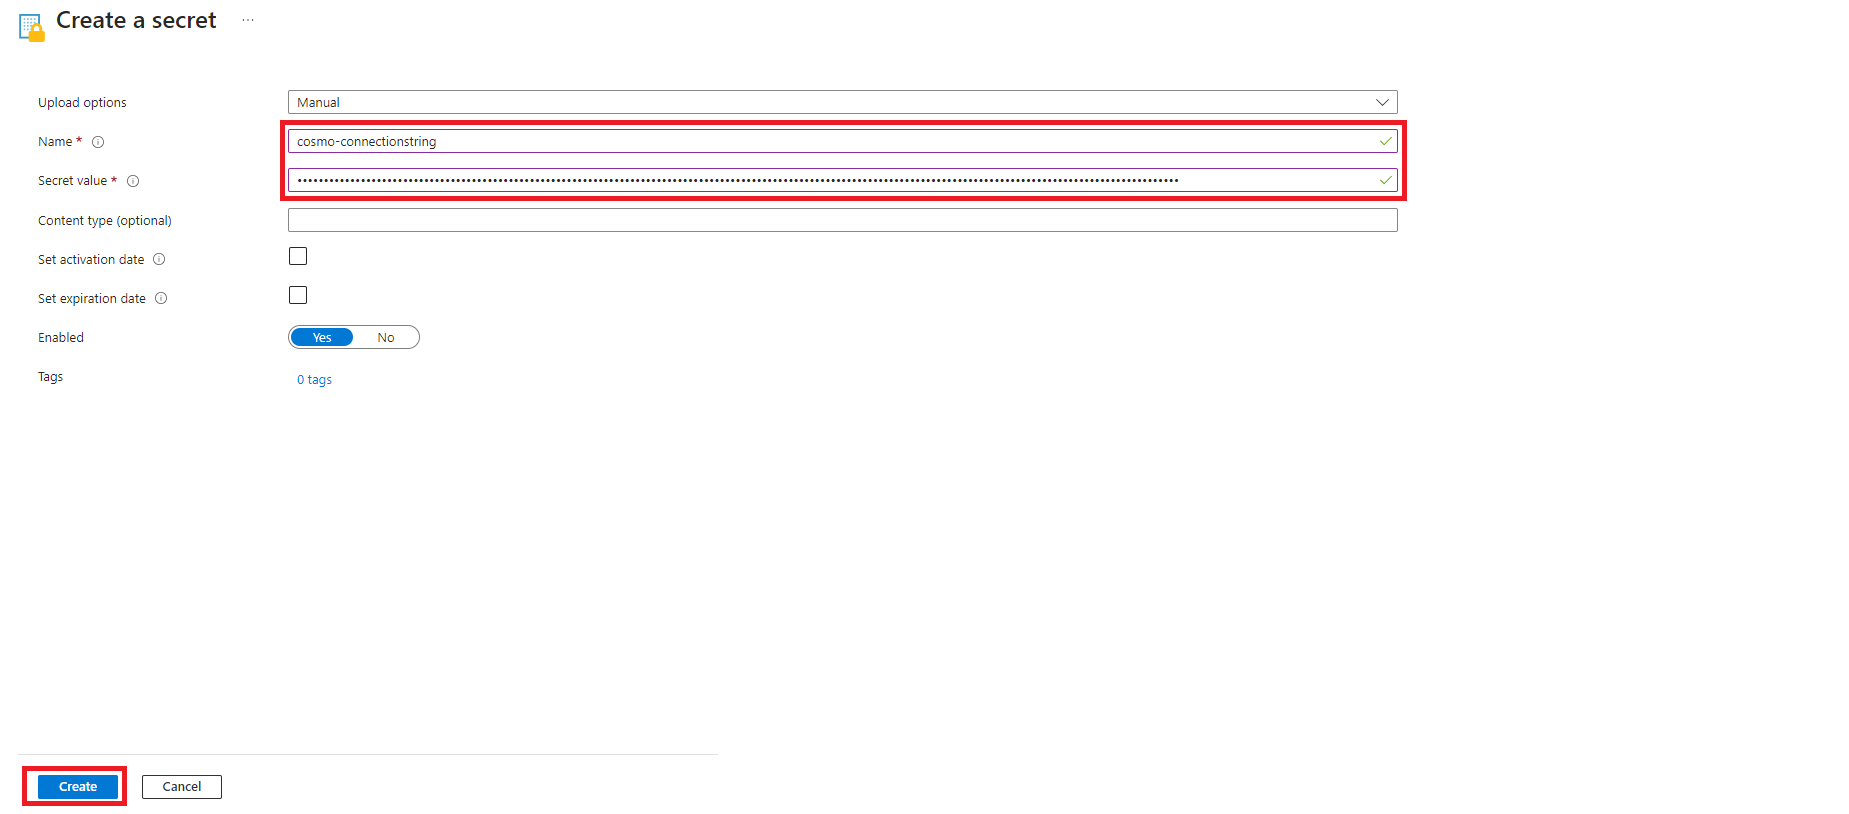
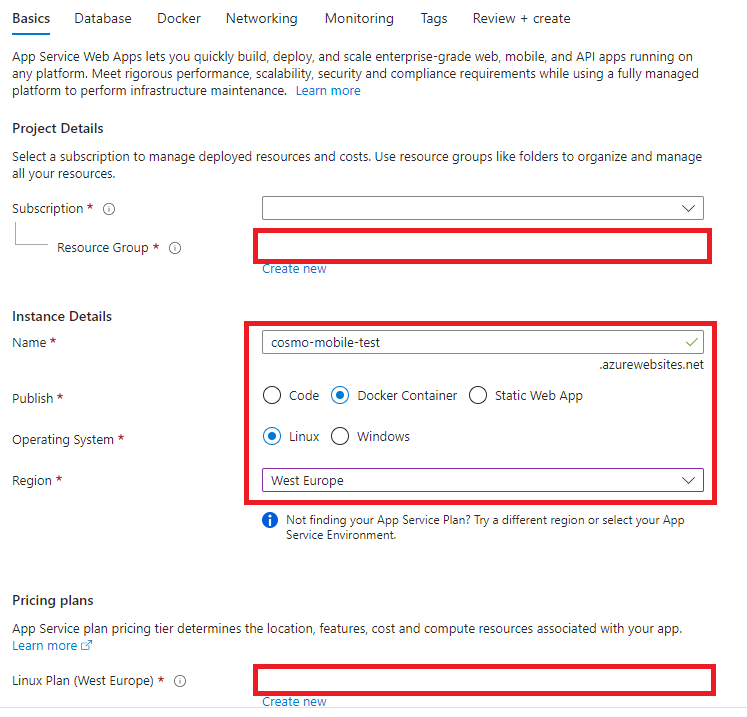
Now, create a new Web App. On the Basics tab, select your Resource Group, fill in the App Name, select Docker Container as Publish, select Linux as the Operating System, and then select your Region. Lastly, select a Linux app service plan if you have one, if not create a new B1 plan.
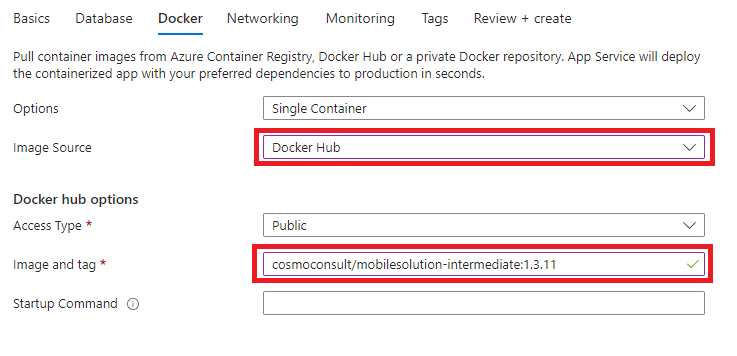
On the Docker tab, select Docker Hub as the Image Source and then fill in the Image and tag field. The image can be found on the Docker Hub. To know which one to use, check the latest public version on COSMO Docs or ask your COSMO consultant.
Go to the Review + create tab and then choose the Create button.
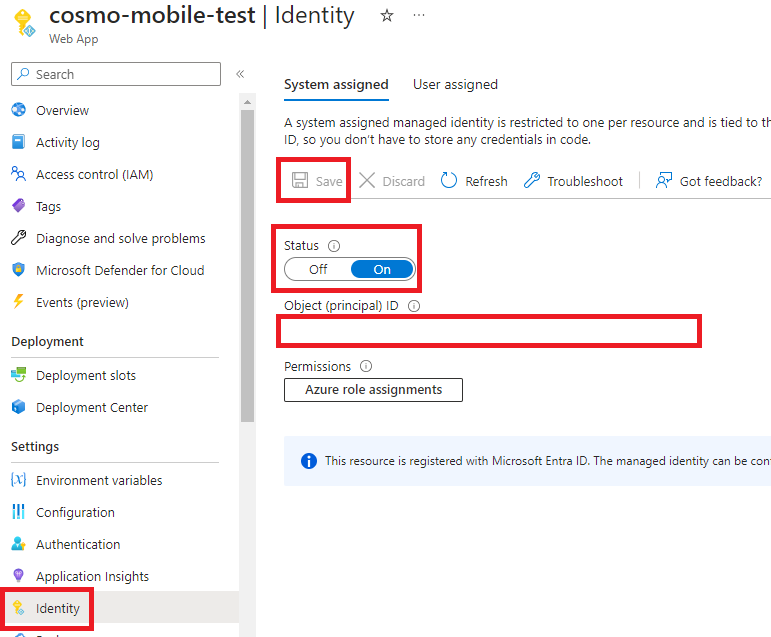
Go to the newly created Web App, and then select Identity in the navigation pane. In the System assigned tab, turn on the Status. Choose Save and then copy the value in the Object (principle) ID field.
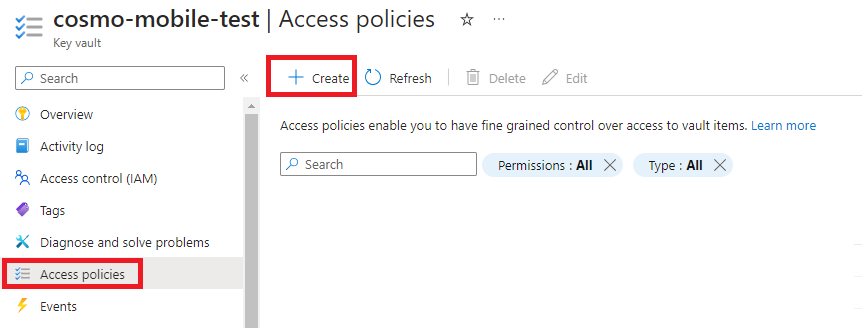
Go to the Key Vault that you created earlier, choose Access policies in the navigation pane, and then choose Create to add an access policy.
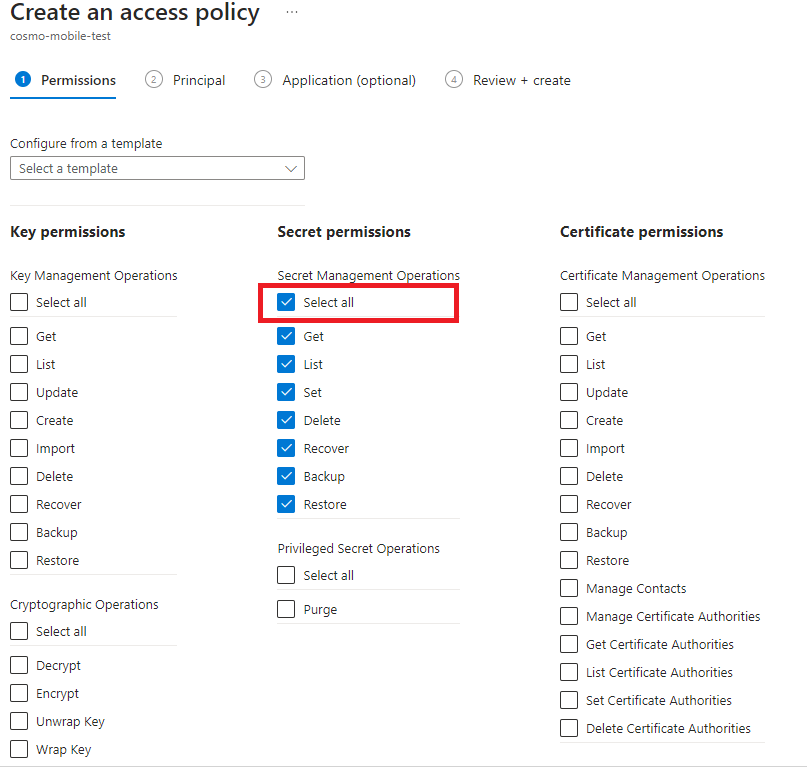
On the Permissions tab, choose the Select all checkbox under the Secret permissions group.
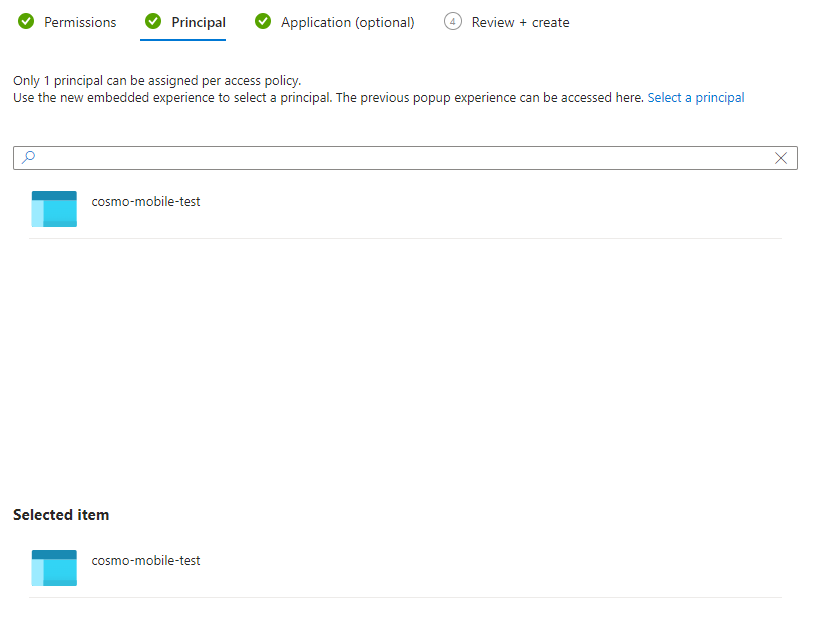
On the Principal tab, search for and then choose the Object ID you copied earlier.
Go to the Review + create tab and then choose the Create button.
Copy the following code block to a notepad or a text editor on your computer and replace the <created-secret-name> and <created-keyvault-url> with the actual values.
The Key Vault URL can be found on the Overview tab of the Key Vault.
[
  {
    "name": "CCMS_AzureKeyVaultCosmosSecretKey",
    "value": "<created-secret-name>",
    "slotSetting": false
  },
  {
    "name": "CCMS_AzureKeyVaultEndpoint",
    "value": "<created-keyvault-url>",
    "slotSetting": false
  },
  {
    "name": "CCMS_CosmosDatabaseName",
    "value": "MobileSolution_Staging",
    "slotSetting": false
  },
  {
    "name": "CCMS_HttpPort",
    "value": "80",
    "slotSetting": false
  },
  {
    "name": "CCMS_IsHttpEnabled",
    "value": "true",
    "slotSetting": false
  },
  {
    "name": "CCMS_IsOnPremInstallation",
    "value": "false",
    "slotSetting": false
  },
  {
    "name": "CCMS_ServerInstanceCacheLifetime",
    "value": "10080",
    "slotSetting": false
  },
  {
    "name": "CCMS_UseHTTPSRedirection",
    "value": "false",
    "slotSetting": false
  },
  {
    "name": "CCMS_UseSwagger",
    "value": "false",
    "slotSetting": false
  },
  {
    "name": "WEBSITES_ENABLE_APP_SERVICE_STORAGE",
    "value": "false",
    "slotSetting": false
  },
  {
    "name": "DOCKER_REGISTRY_SERVER_URL",
    "value": "https://index.docker.io/v1",
    "slotSetting": false
  }
]
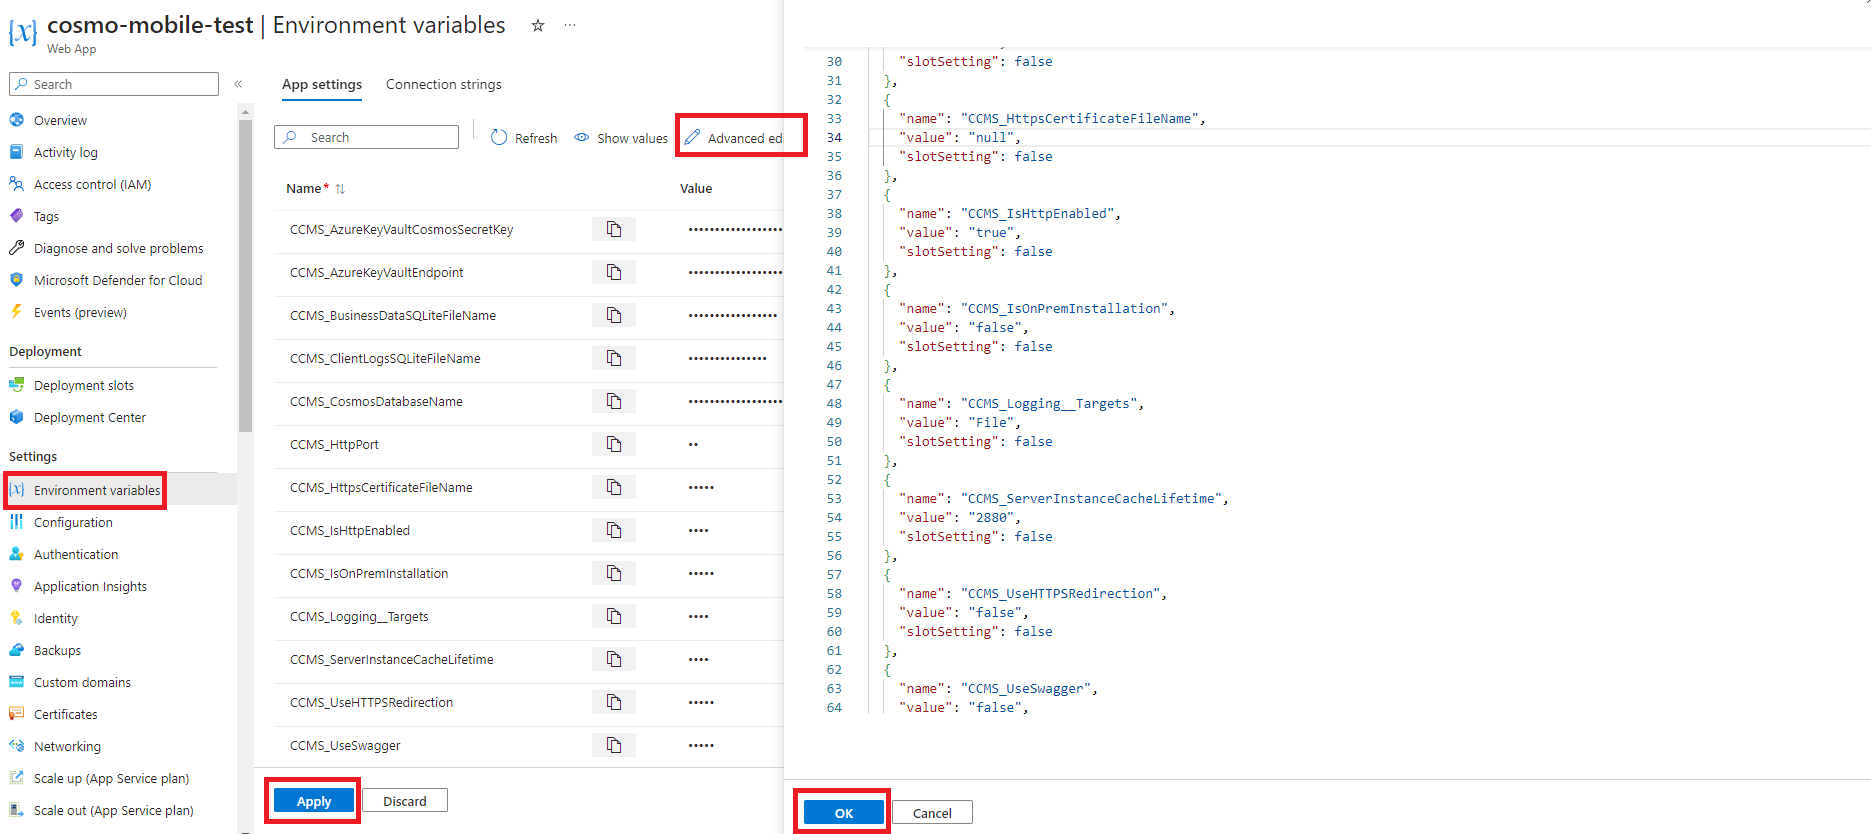
Go to the Web App that you created earlier and select Environment variables in the navigation pane. Choose Advanced edit and then paste the code block you modified in the previous step. Click the OK button and then the Apply button.
Go to the Overview tab of the Web App, choose Stop on the action bar, wait 1-2 minutes, and then choose Start on the action bar. This will restart the Web App with the new environment variables.
Copy the URL of the Web App (called Default Domain on the Overview page), paste it to your browser, and add
/core/versionsuffix to it. This will show you the version of the intermediate layer you just created.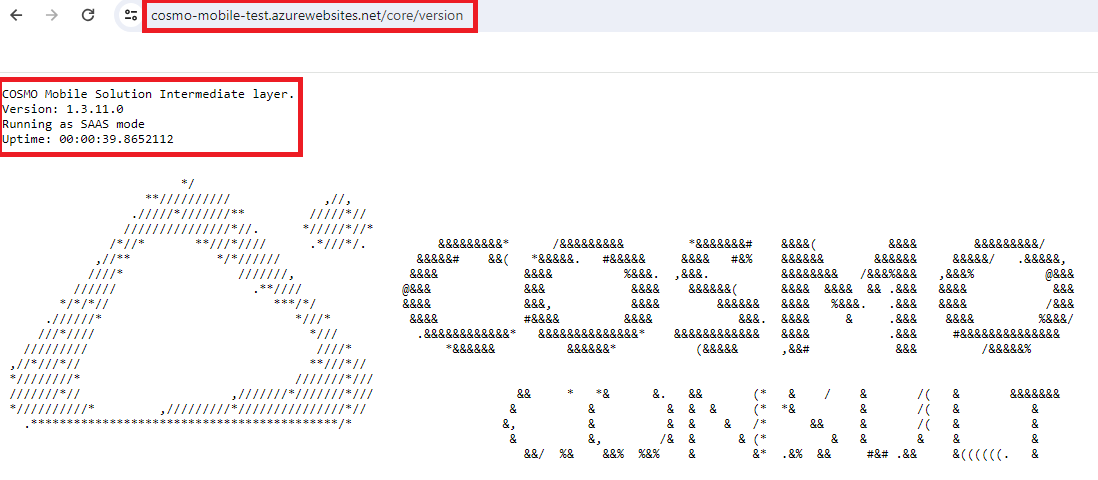
If you see the version, then you have successfully created the intermediate layer in the Azure environment.
Logging Options
Select at least one of the following options for logging:
Basic Logging
This is the default logging option. The logs are stored in the app service itself. The logs are accessed from the Log stream tab of the Monitoring section in the Web App.
To set up basic logging
Go to the Web App and select App Service logs in the navigation pane.
Turn on the Application logging.
Enter 100 as Quota (MB) and set the Retention Period (Days) to 3.
Choose Save.
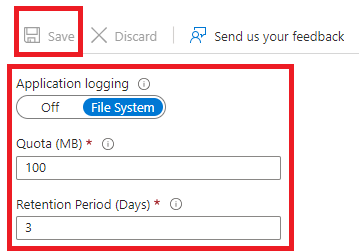
To later read the logs, choose Log Stream in the navigation pane (the stream updates every minute).
Alternatively, you can read the files via the Azure CLI tools. You can use the following command to download the logs: az webapp log download --name <name of the app service> --resource-group <name of the resource group>
The downloaded zip includes a LogFiles folder and the _default_docker.log suffixed file should contain the Intermediate layer logs.
Long Term Logging
It's possible to add a storage account to the Web App for storing the logs, which is useful if you want to keep the logs for a longer period of time.
To set up long term logging
Create a new Storage Account in the Azure portal.
On the Basics tab, select your Resource group, fill in the Storage account name, select your Region, and choose the relevant Redundancy. We use Locally-redundant storage (LRS) as default.
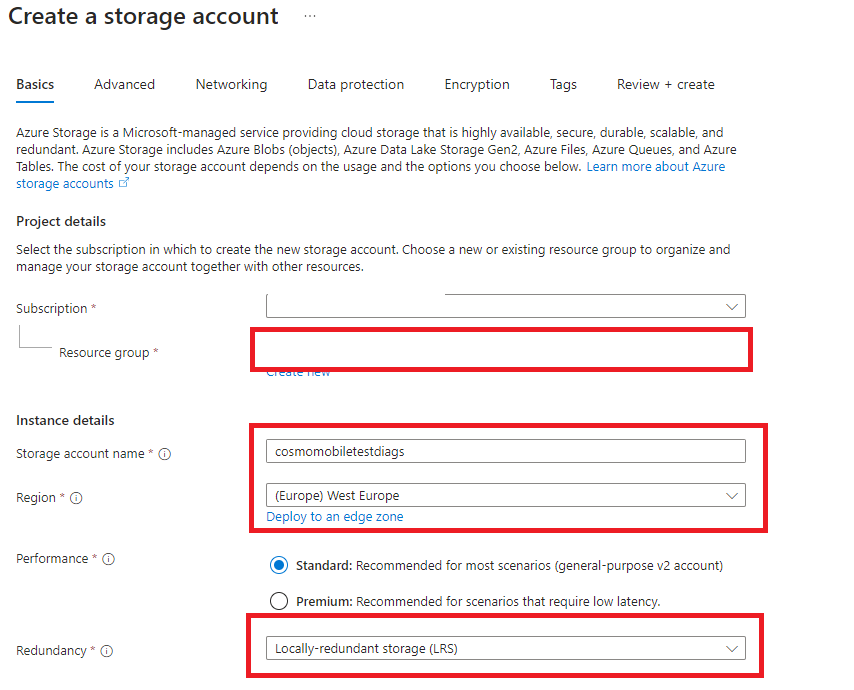
Go to the Review + create tab and then choose the Create button.
Go to the newly created Storage Account, select File shares in the navigation pane, and then choose File share.
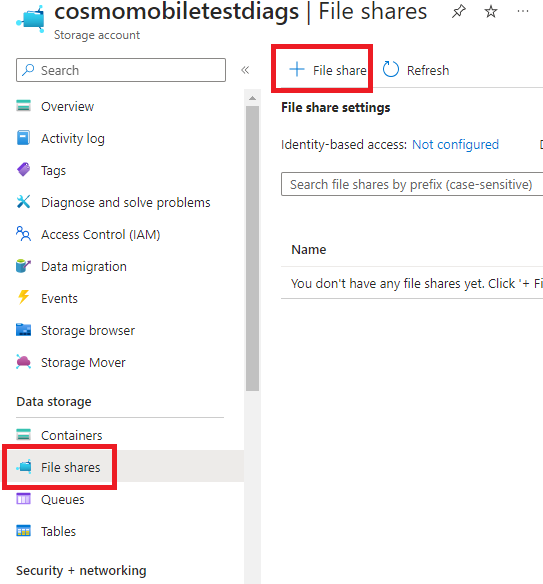
Fill in the Name, go to the Backup tab, and then disable the backup.
Go to the Review + create tab and choose the Create button.
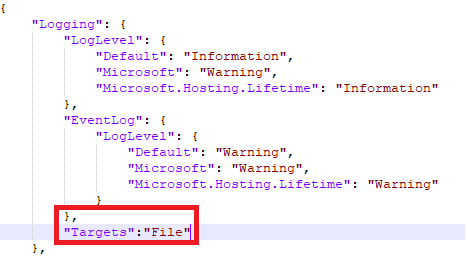
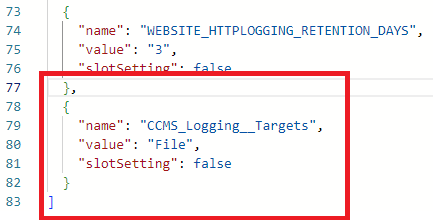
Go to the Web App that you created earlier and select Environment variables in the navigation pane. Choose Advanced edit on the action bar and then paste in the following code block, making sure to include the comma (,). Click the OK button and then the Apply button.
,
  {
    "name": "CCMS_Logging__Targets",
    "value": "File",
    "slotSetting": false
  }
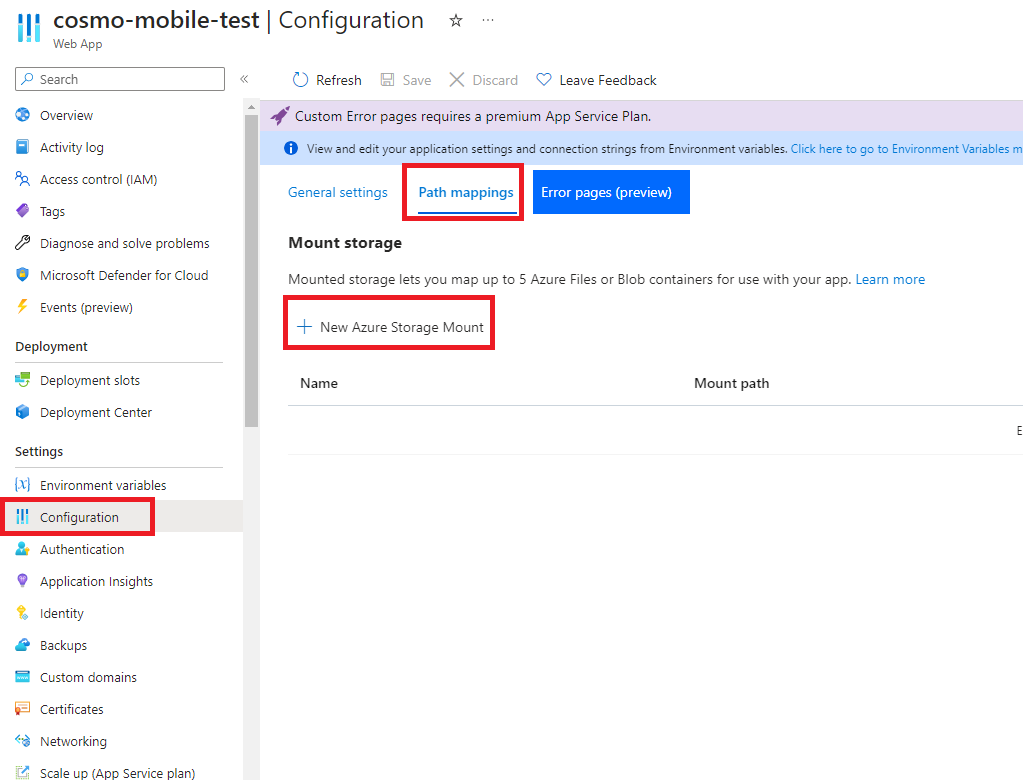
In the navigation pane, choose Configuration and then choose the Path mappings tab. Choose New Azure Storage Mount.
Fill in the Name field, choose Advanced as the Configuration options, enter a name in the Storage accounts field, choose Azure Files as the Storage type, set the Protocol to SMB, enter the previously created Share name, and set the Mount Path to
/app/_AppLogs_. Choose the OK button and then choose Save.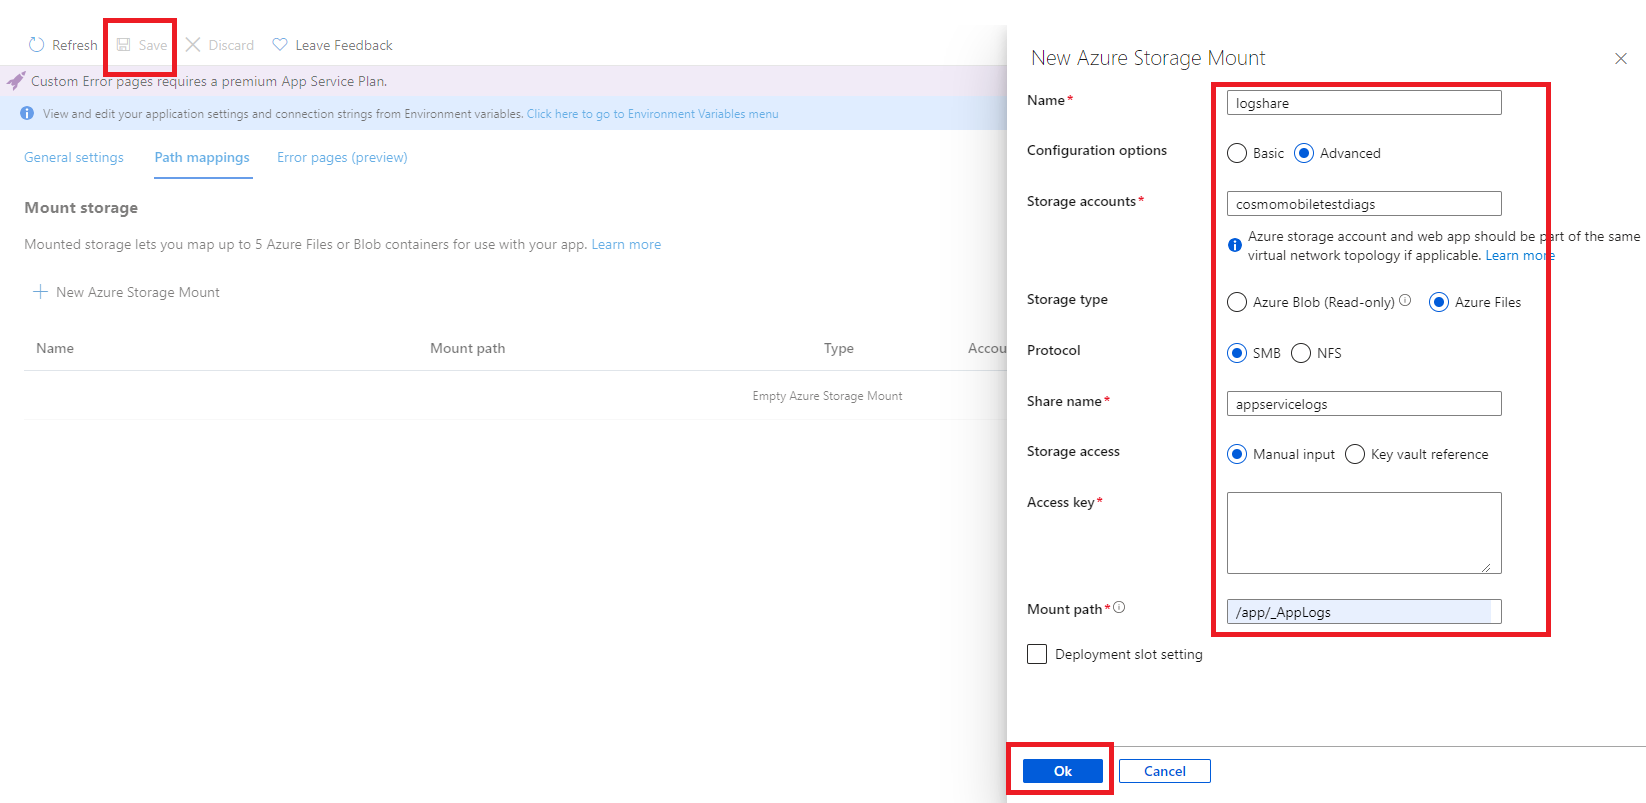
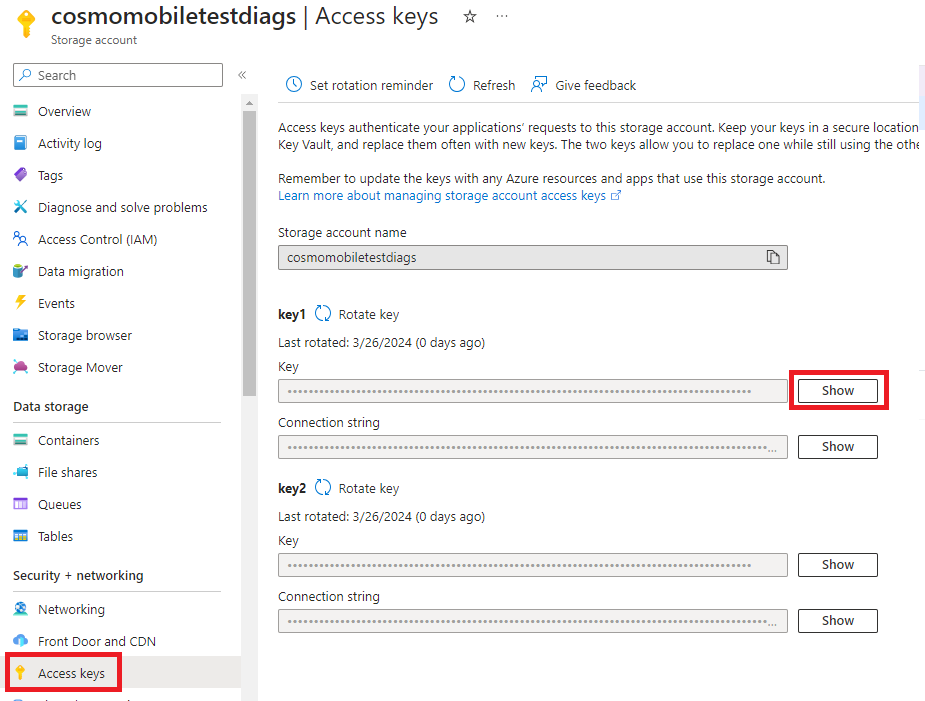
Open the previously created storage account on another tab, and then choose Access keys in the navigation pane. Below key1, choose the Show button at the end of the Key field, and then copy the value.
 ]
]Fill in the Access key and then choose the OK button and then choose Save on the action bar.
Go to the Overview tab of the Web App, choose Stop on the action bar, wait 1-2 minutes, and then choose Start on the action bar. This will restart the Web App with and the Intermediate Layer will start with logging.
Description of Environment Variables
The following table describes the environment variables that are used in the intermediate layer and can be used to configure the IL behaviors. All should be prefixed with "CCMS_" and should be added to the Web App as environment variables.
| Value Name | Function | Used for Azure Installation |
|---|---|---|
| IsOnPremInstallation | Intermediate layer will use the local database instead of Azure when it is set to "true". | ✔️ |
| IsHttpEnabled | Enables the HTTP protocol. | ✔️ |
| HttpPort | Sets the port for the HTTP traffic. | ✔️ |
| ServerInstanceCacheLifetime | Changes for how much time the server identifier will be cached, value must be set in minutes. -1 means it will cache for "infinite", the default is 7 days. | ✔️ |
| CosmosDatabaseName | Name of the database if it is in Azure. Recommendation: Keep as provided above. |
✔️ |
| AzureKeyVaultEndpoint | Endpoint URL of the key vault if the key vault is used to store the certificate file. | ✔️ |
| AzureKeyVaultCosmosSecretKey | Connection string for the CosmosDB. | ✔️ |
| UseHTTPSRedirection | If enabled, all HTTP traffic will be forwarded to HTTPS. For app services, set it to "false". | ✔️ |
| Logging__Targets (Optional) | By default, not part of the above mentioned values but can be added. The supported values are "File", "Debug" and "File,Debug". Enables the logger to write logs into File and/or Debug console. | ✔️ |
| UseSwagger | Used for development and/or debug only. Leave it set to "false". | ✔️ |
| AllowRemoteLogging | Enables remote logging to the development team, which can facilitate faster issue resolution. | ✔️ |
| RemoteLoggingTraceRate | Specifies the trace rate for remote logging. The value must be between "0" (no logging) and "1" (all logs are sent to remote storage). The recommended value is "0.2". | ✔️ |
| IsHttpsEnabled | Enables the HTTPS protocol. For app services, set it to "false". | ❌ |
| HttpsCertificateThumbprint | Thumbprint of the certificate, which is when HTTPS is enabled. It must be installed in the LocalMachine/My certificate store and the Service owner should have access to the certificates. | ❌ |
| HttpsPort | Sets the port for the HTTPS traffic. | ❌ |
| BusinessDataSQLiteFileName | Name of the database where the Server IDs will be saved. | ❌ |
| Obsolete |
❌ | |
| Obsolete |
❌ | |
| Obsolete |
❌ | |
| Obsolete |
❌ |
Remote Logging
This feature enables the transmission of logs to the COSMO CONSULT development team to facilitate faster issue resolution. To activate remote logging, set the AllowRemoteLogging environment variable to "true" in the appsettings.Production.json file or within the Azure Web App environment variables. Additionally, the RemoteLoggingTraceRate variable can be configured to send performance metrics, which may assist in optimizing the performance of the Intermediate Layer in future releases.
Status Check
You can verify the status of the intermediate layer by accessing the <IL URL>/core/version endpoint. This endpoint provides information about the current version of the intermediate layer, the supported schema versions, and the service uptime.
Feedback
Submit feedback for this page .

