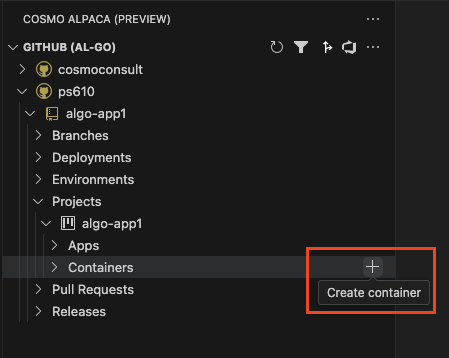
To develop, test or debug your app, you want to create a Business Central container. You can easily achieve that from within Visual Studio Code by following these steps:
In the Visual Studio Code extension click on the + icon on the Containers node under the Project of your Repository.
Enter a name for your new container.
Wait until the container was created and is shown in the list. If someone else already used a similar container, this just takes a few seconds. Else this might take up to 20 minutes the first time.
After your container was created, the color of the icon shows the status of the container. The red icon indicates that the container is starting. As soon as the icon turns blue, the container is ready to access it.
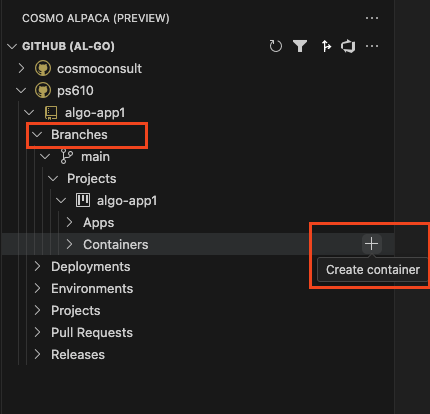
Create a container with configuration from a specific branch
To test out a change in either the alpaca.json without affecting other users, you can create a container and use the configuration from a specific branch:
In the Visual Studio Code extension click on the + icon on the Containers node under the Branches and the Project of your Repository.
Enter a name for your new container and hit Enter.
Select a specific container configuration when creating a new container
WIP
In the Visual Studio Code extension right click on the Containers node under the Repository of your App and choose Create container.
Enter a name for your new container.
Wait until the container was created and is shown in the list. If someone else already used a similar container, this just takes a few seconds. Else this might take up to 20 minutes the first time.
After your container was created, the color of the icon shows the status of the container. The red icon indicates that the container is starting. As soon as the icon turns blue, the container is ready to access it.
Create a container with configuration from a specific branch
To test out a change in either the cosmo.json or your custom scripts without affecting other users, you can create a container and use the configuration and custom scripts from a specific branch:
In the Visual Studio Code extension right click on a branch with your changes under the Repository of your App and choose Create container with configuration from this branch.
Enter a name for your new container and hit Enter.
Select a specific BC artifact configuration when creating a new container
If you have multiple BC artifact configurations set up in your cosmo.json file, you might want to create a container using one of those configurations other than the default, which is "current". You can do so fo by following these steps:
In the Visual Studio Code extension right click on the Containers node under the Repository of your App and choose Create container with artifact selection
Enter a name for your new container.
Wait until the container was created and is shown in the list. If someone else already used a similar container, this just takes a few seconds. Else this might take up to 20 minutes the first time.
After your container was created, the color of the icon shows the status of the container. The red icon indicates that the container is starting. As soon as the icon turns blue, the container is ready to access it.
Select arbitrary BC artifact version and country when creating a new container
If you want to quickly create a container for a specific version and country without adding a new configuratoin to your cosmo.json you can do so by following these steps:
In the Visual Studio Code extension right click on the Containers node under the Repository of your App and choose Create container with version & country selection
Enter a name for your new container.
Enter the version for your new container. The default version from the "current" configuration is pre-filled.
Enter the country for your new container. The default country from the "current" configuration is pre-filled.
Wait until the container was created and is shown in the list. If someone else already used a similar container, this just takes a few seconds. Else this might take up to 20 minutes the first time.
After your container was created, the color of the icon shows the status of the container. The red icon indicates that the container is starting. As soon as the icon turns blue, the container is ready to access it.