Create Test Plans Using the QA Agent (Preview)
This topic explains how to upload analysis certificates, monitor agent processing, review extracted data in the import buffer, and create test plans from the results.
For an overview of the feature and how the agent works, see Test Plan Creation Agent.
Note
This feature is published as a Preview and may change in future versions.
Prerequisites
The Test Plan Creation Agent is activated and you are listed as an authorized user. You are using the Quality Manager role in My Settings. The upload dialog and import buffer are only accessible from this role center.
For setup instructions, see Set Up the Test Plan Creation Agent.
Upload an Analysis File
In the role center, choose the Test Plan Upload for AI Agent action on the Test Planning menu.
The Test Plan Upload for AI Agent dialog opens.
In the Selected File field, choose the AssistButton to browse and select an analysis file. Supported formats are PDF, DOCX, and XLSX; the maximum file size is 50 MB.
Confirm or change the Target Language field. The agent uses this language to translate descriptive texts extracted from the document.
Choose the OK button.
An agent task is created and the import process starts asynchronously. The agent reads the file and extracts manufacturer name, item description, manufacturer item number, lot numbers (internal and external), and validity dates into the import buffer.
Choose the OK button to close the confirmation message.
Monitor Agent Processing
The agent works in the background to process uploaded analysis files so you can continue working without interruption.
You can track the progress of a submitted task in two ways:
QA Agent icon
 – Choose the agent icon in the top-right toolbar to open a live message feed. A notification badge appears on the icon when the agent requires your input.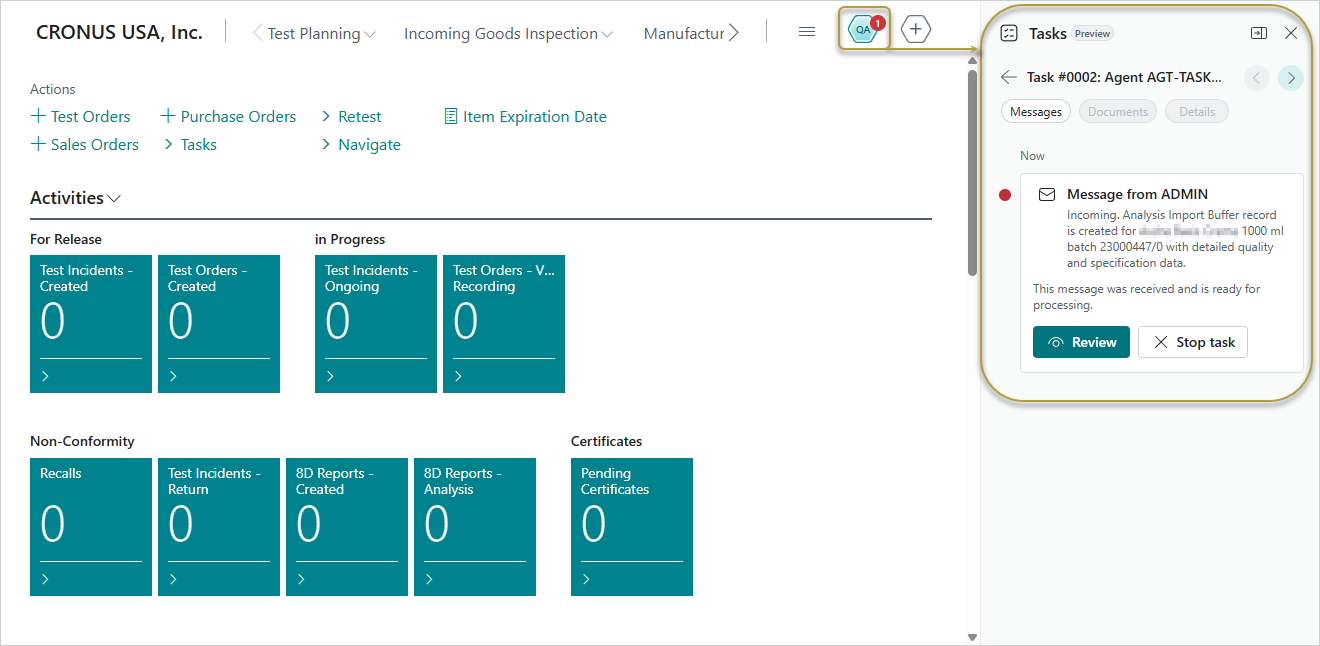
Agent Tasks – Choose Agent Tasks using the Tell Me feature to see the full list of submitted tasks and their current status.
Agent Tasks Page
The Agent Tasks page shows one row per submitted task.
| Field | Description |
|---|---|
| Task ID | Unique identifier for the task. Choose to open the task detail in the Tasks pane. |
| Title | Specifies the internal label assigned to the task. |
| Last Updated | Specifies the date and timestamp of the last update for the task. |
| Last Log Entry ID | Unique identifier for the last log entry created for this task. |
| Status | Indicates the current stage of the agent task itself. This is independent from the import buffer status. The options are: - Paused: agent processing has paused, usually while waiting for your response to a message. - Running: the agent is processing the uploaded document. - Completed: the agent has finished its work and communicated the results; this does not necessarily mean that a test plan has been created. - Stopped by User: a user has stopped the task. NOTE: May update at different times than Needs Attention. A task can remain Paused after its final message; see Final Outgoing Message. |
| Needs Attention | Indicates that a message or review requires your response. NOTE: May update at different times than Status. |
| Created at | Specifies the date and timestamp of when the task was created. |
| Steps Done | Specifies the number of processing steps completed. Choose to open the Agent Task Log page with step details. |
| Created by | Specifies the user who created the task. |
| Agent | Indicates the agent the task relates to; shows Test Plan Creation Agent. |
| Copilot Credits | Indicates the AI credits consumed by the task. Choose the value to open the Agent consumption overview page for more details. For more information, see Billing. |
The Agent Tasks page also includes actions for viewing messages and log entries as well as other standard actions.
When the Agent Needs Input
If the agent encounters a value it cannot resolve automatically, it sends a review request in the task message feed.
When a review is required:
Choose the QA Agent icon in the top-right toolbar to open the Tasks pane, select the message that needs attention, and then choose the Review button.
Tip
The message page opens with a standard Business Central agent message with a Review task button at the top of the page. This is not part of the COSMO Quality Assurance process and can be ignored.
Read the agent's question and then choose the Continue button in the task pane.
The agent continues processing once you respond.
First Incoming Message
The first incoming message is for the agent, indicating that it needs to create the Analysis Import Buffer record from the uploaded document (in the Message FastTab).
The Attachments FastTab shows the uploaded file, which allows you to confirm that the right file was selected:
- If it is the correct file, choose the Continue button on the task message in the task pane to continue processing the file.
- If it is the wrong file, choose the ellipsis on the task message and then choose Stop task.
Restart the process with the correct file.
Final Outgoing Message
The final outgoing message indicates that the agent has completed processing the uploaded document and created the Analysis Import Buffer record. It could contain a summary of the imported data or messages requiring your attention.
Choose the Continue button in the task pane to acknowledge the completion message.
Note
Acknowledging the final message does not always update the task Status to Completed on the Agent Tasks page; the task can remain Paused even though the import buffer has been created. If this happens, open the Agent Tasks page, choose the Show more options icon on the task line, and then choose Resume. This lets the agent confirm that the import buffer has been created and the results communicated, which sets the task Status to Completed.
Review and Process Imported Data
When the agent completes processing, the extracted data is available in the Agent Analysis Import Buffer page.
In the role center, choose the Agent Analysis Import Buffer action on the Test Planning menu.
The list of import buffer records opens.Open the relevant import record to view the Agent Analysis Import Buffer Card (Preview) page.
Tip
The page opens with a standard Business Central agent message with a Review button at the top of the page. This is not part of the COSMO Quality Assurance process and can be ignored.
Review the fields in the General FastTab, which contain certificate-level information:
Field What to check Manufacturer Verify against existing records. Use the Create Manufacturer action or activate it in the Create Test Plan process if the record does not yet exist. Manufacturer Item No. The item number as printed on the document. Use the Create / Assign Item action or activate it in the Create Test Plan process if the record does not yet exist. Item Description Correct the description if it was extracted inaccurately. Use the Create / Assign Item action or activate it in the Create Test Plan process if the record does not yet exist. Lot No. (Internal / External) Leave empty if not stated on the document. Valid from / Valid to Leave empty if not specified. Review the fields in the Analysis Import Lines FastTab, where each line corresponds to one test property extracted from the document:
Field What to check Property No. Short code for the test property (maximum 20 characters), translated by the agent into the target language. Property No. Description Full name of the test property in the target language. Unit of Measure / Description Unit code and full unit name. Lower / Upper Limit Specification limits from the certificate. Measured Value Actual test result extracted from the certificate. Execute Test / Output Internal / Output External All default to selected. Clear as needed. Use the following actions to resolve missing master data and prepare the record for test plan creation:
Menu/FastTab Action Description Home Assign Agent Task Assigns an existing agent task to the buffer by selecting it from a list. Available on the card only when no agent task is already linked to the record. Link Current Agent Task Links the buffer to the agent task that is active in the current session. Available on the card only when no agent task is already linked to the record. Create Manufacturer Creates a manufacturer record using the imported manufacturer name.
This can also be done via the Create Test Plan process.Create / Assign Item Creates a new item or assigns an existing item based on the imported values.
This can also be done via the Create Test Plan process.Create Test Plan Opens the Create Test Plan dialog and then creates a test property set and a test plan from the import data. Reopen Changes a completed import record back to Open so that header data and lines can be edited again. Available on the card only. Analysis Import Lines Card Opens the Agent Analysis Import Line Buffer Card (Preview) page with details for the selected line. Create Test Properties Registers missing test properties from the import lines as master data. Existing properties are shown in green; missing ones are in standard black and have the Create Property No. checkbox selected. Create Units of Measure Creates missing units of measure from the import lines. Existing units of measure are shown in green; missing are shown in standard black and have the Create Unit of Measure checkbox selected.
This can also be done via the Create Test Plan process.New Line / Delete Line Standard line creation and deletion actions.
Create Test Plan Dialog
When you choose the Create Test Plan action, the Create Test Plan (Preview) dialog opens and checks that all required master data is in place.
If the manufacturer, item/item description, or unit of measures have not been created, you can turn on the Create Manufacturer, Create / Assign Item, or Create Units of Measure toggles.
When all prerequisites are met, the dialog confirms this with a green message.
You can optionally create additional Test Plan Assignment entries before confirming:
- Create Purchase Order Assignment – Creates a Test Plan Assignment entry with Source Type = Purchase Order for the item and the new test plan.
- Create Purchase Receipt Assignment – Creates a Test Plan Assignment entry with Source Type = Purchase Receipt for the item and the new test plan.
Choose the OK button to proceed.
When you confirm, a matching test property set is created or reused, a test plan is created and linked to the import record, and the import buffer status changes to Completed.
A Test Plan Assignment entry with Source Type = Inventory is created automatically for the item, in addition to the optional assignments you may have created.
Open the new Test Plan from the Test Plan Code field in the General FastTab.
Import Buffer Status
The Status field on the Agent Analysis Import Buffer Card (Preview) reflects where the record is in the workflow.
| Status | Meaning |
|---|---|
| Open | The import record is ready for review and processing. |
| Completed | A test plan has been created and linked to the import record. |
| Error | Processing failed. Review the record and correct any issues before retrying. |
You can create a test plan only when the status is Open or Error. Use the Reopen action to return a Completed record to Open if you need to make corrections.
See Also
Test Plans
Test Plan Assignment on Items and Item Variants
Feedback
Submit feedback for this page .