Set Up the Test Plan Creation Agent (Preview)
This topic describes how to activate and configure the Test Plan Creation Agent in COSMO Quality Assurance, manage user access, and handle the agent when Copilot Credits are depleted.
For an overview of what the agent does and how it works, see Test Plan Creation Agent.
Before You Begin
Ensure the following conditions are met before running the setup:
- Billing is configured – The agent consumes Copilot Credits each time it processes a document. A billing model must be set up in the Business Central admin center before the agent can run. For more information, see Billing.
- Permissions – You must have permission to open the Quality Assurance Setup page and run actions on it.
- Quality Manager role – Users who will upload files and work with the import buffer must use the Quality Manager role. The relevant pages and actions in the role center are only available under this role. Users can verify or change their role in My Settings.
Activate and Configure the Agent
Setup runs from the Quality Assurance Setup page. You only need to do this once. If the agent instruction file is updated in a future version, running Set Up Agent again updates the existing agent without creating a duplicate entry.
Choose the
 icon, entering Quality Assurance Setup, and then choosing the related link.
On the AI Agent FastTab, configure the following fields:
Field Description Agent Analysis Import Nos. Number series for import buffer records created by the agent. Agent Task Nos. Number series for agent tasks created when a file is uploaded. Agent Import Language Default language into which the agent translates descriptive texts. If not set, the user's language settings are used as a fallback. For a full description of all fields on this FastTab, see Quality Assurance Setup.
On the Actions menu, choose Functions > Set Up Agent.
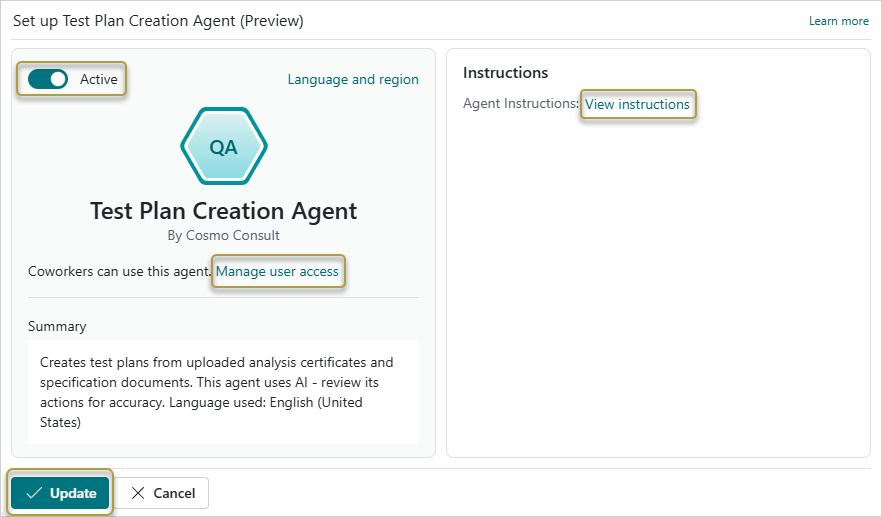
The Set up Test Plan Creation Agent (Preview) page opens.Turn on the Active toggle to make the agent available to users.
Choose Manage user access to specify which users can interact with or configure the agent. For more information, see Manage User Access.
Optionally, choose View instructions to review the instruction file the agent uses to extract data from documents.
Choose the Update button to save your settings.
The setup assigns the required permission sets to the agent's user account and links the CCS QA Quality Manager profile to that account.
Manage User Access
You can control which users can interact with the agent tasks and the import buffer as well as which users can change its configuration. Access is managed from the Set up Test Plan Creation Agent (Preview) page.
- On the Actions menu in the Quality Assurance Setup page, choose Functions > Set Up Agent.
- Choose Manage user access.
- On the user access page, add users as needed:
- To add a user, select an empty line, choose the User Name field, and select the user from the list.
- To allow a user to change the agent configuration, select the Can Configure checkbox for that user. This can also be controlled through Business Central's "Configure All Agents" permission set.
- To remove a user, select the row and delete it.
- Choose Update to save.
Note
Users must also have the Quality Manager role active in My Settings to access the upload dialog and import buffer in the role center.
Confirm Agent Permissions
For new or existing installations on version 10.0.362433.0, permissions must be checked for the new agent.
Note
If you are on version 10.0.357387.0 or earlier, you must upgrade to the latest version to use the Test Plan Creation Agent functionality.
Check Agent Permissions
- Open the Agent Card page by choosing the icon, entering Agents, and then choosing the related link.
- Select the line for "CCS QA Test Plan Creation Agent" and then choose Manage > Edit.
- In the Agent Permissions FastTab, check whether the permission sets are displayed in red text.
If none of the permission sets are displayed in red, close the Agent Card page. The agent is ready to receive uploaded documents. If any permission sets are displayed in red, re-add the permission sets as described in Re-add Agent Permissions.
Re-add Agent Permissions
- Choose the Edit agent permissions action and then choose the Yes button to make the agent inactive.
- In the Edit Agent Permissions page, delete all permission sets.
- Re-add the required permission sets by manually entering the following values or using the lookup in the Permission Set field:
- D365 BASIC
- CCS QA ALL
- CCS QA TPCA ACCESS
- Choose the OK button.
- On the Agent Card page, choose the Setup action, turn on the Active toggle and then choose the Update button to reactivate the agent.
The agent is now ready to receive uploaded documents.
Tip
Once configured, you can access the Set up Test Plan Creation Agent (Preview) page from the QA Agent icon  in the top-right toolbar by hovering and then choosing the Configure button
  in the dropdown or from the Tasks pane if the QA Agent is opened.
Copilot and Agent Capabilities Page
Business Central provides a central page where administrators can review all available Copilot and agent features in the environment. The Copilot & agent capabilities page lists each feature with its current activation status – Active or Inactive – and shows how it is billed. This gives you a quick overview of what is enabled in your environment without navigating to individual setup pages.
Once the Test Plan Creation Agent has been set up, it appears in this list. You can use the page to deactivate or reactivate the agent independently of the Set up Test Plan Creation Agent (Preview) page. To open the page, use the Tell Me feature to search for Copilot & agent capabilities.
Note
Deactivating a feature on the Copilot & agent capabilities page affects all users in the environment. To control access for individual users, use the Manage user access function in the agent setup instead. For more information, see Manage User Access.
Manage Copilot Credit Balance and Agent Availability
If the available Copilot Credit balance reaches zero, the agent stops processing uploaded documents. Existing import buffer records and tasks remain available, but no new documents can be processed until the balance is restored.
Once credits are available again – either through a capacity purchase or the start of a new billing cycle – the agent resumes processing any documents that were submitted in the meantime. To control when that happens, deactivate the agent before credits become available again. Hover over the QA Agent icon, choose the Configure button, turn off the Active toggle, and then choose Update. Turn it back on when you are ready to resume.
For more information, see Manage consumption-based billing for agent capabilities in the Microsoft Learn documentation.
See Also
Test Plan Creation Agent
Create Test Plans Using the QA Agent (Preview)
Feedback
Submit feedback for this page .