Global Page Customization Actions
- How do I manage captions for page customizations, including exporting and importing translations?
- How do I refresh metadata for customized pages?
- How can I configure and apply filters to specific pages in COSMO Mobile Solution?
- How do I define flowfields and set up conditional views for dynamic page behavior?
- How can I assign sorting rules to manage record display order within customized pages?
- How do I assign barcodes and manage custom barcode functions for pages?
- How can I set up custom messages and use them in conditional views or function actions?
Tip
Summary: This topic explains how to perform key actions for global page customization in COSMO Mobile Solution. It covers managing captions, including exporting and importing translations. The process for refreshing metadata, applying page filters, and defining flowfields is detailed, along with creating conditional views for dynamic content display. Sorting rules for record display are discussed, and barcode management and assignment are outlined. Additionally, custom messages and how to implement them in conditional views or function actions are demonstrated, ensuring a comprehensive approach to page customization.
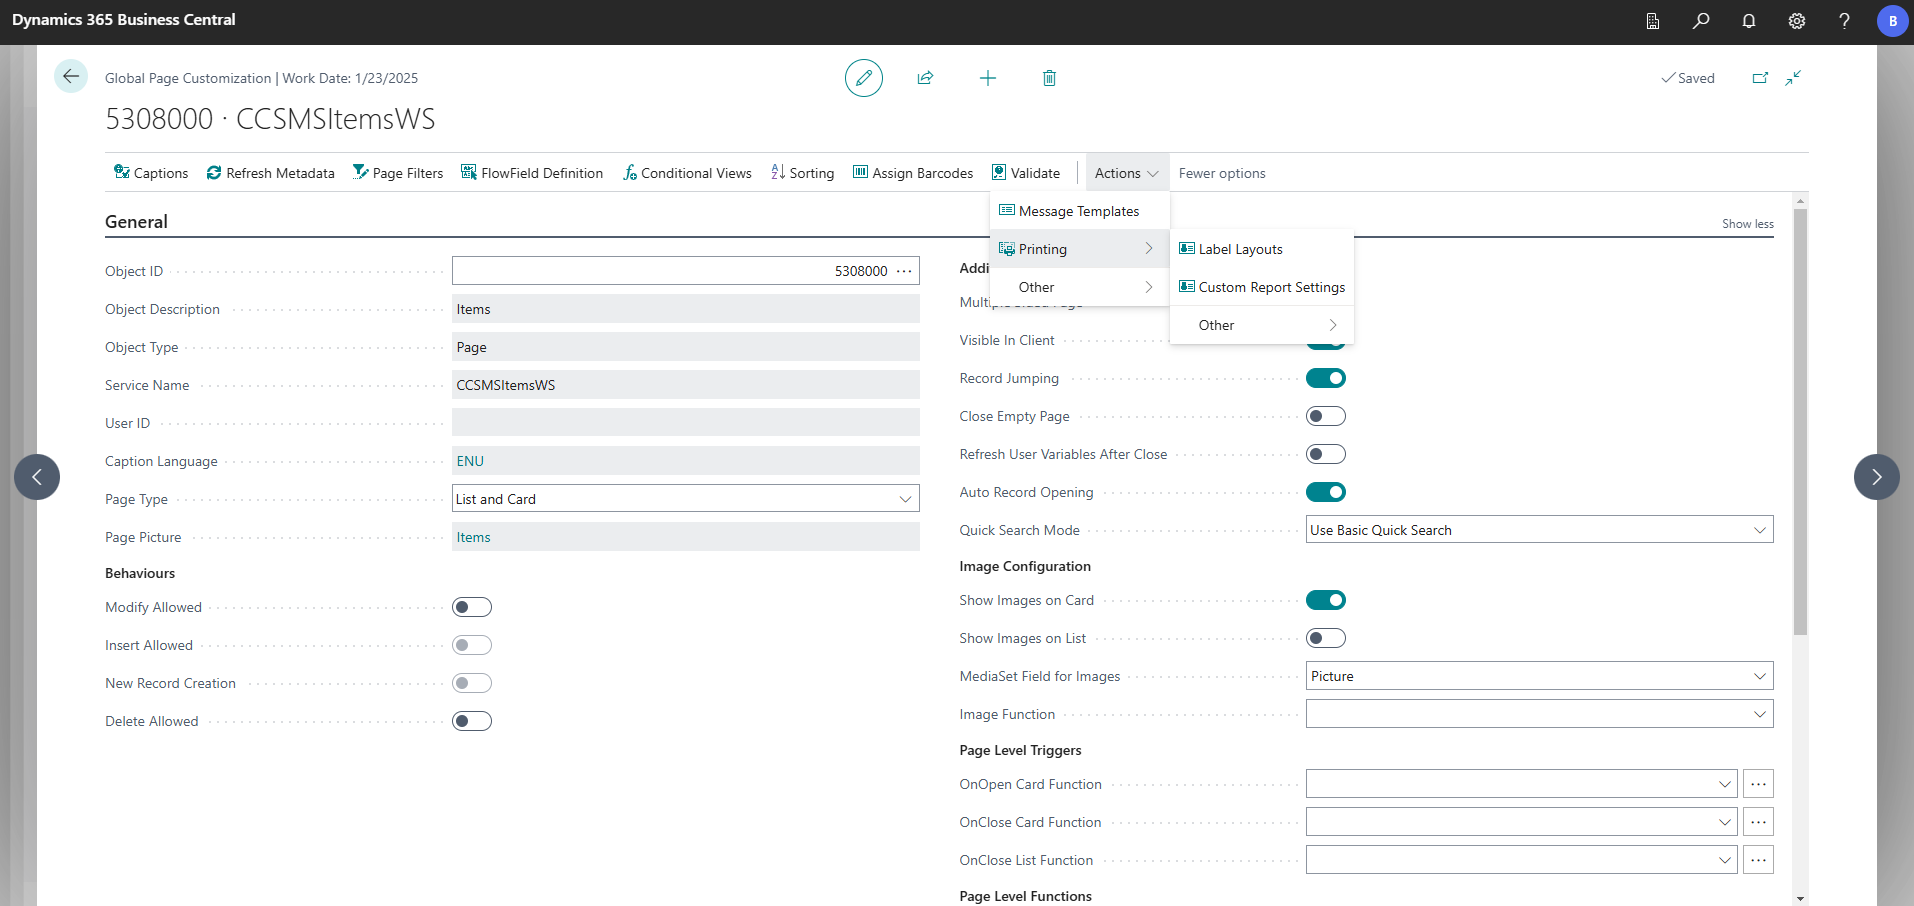
The actions on the action bar of the Global Page Customization page are described in this section.
Captions
The Captions action opens all captions of a specific page defaulting to the Caption Language specified in the General FastTab. Translations will only appear for languages configured in the Supported Languages FastTab of the Mobile Solution Settings page (Mobile Solution Center > Settings tile).
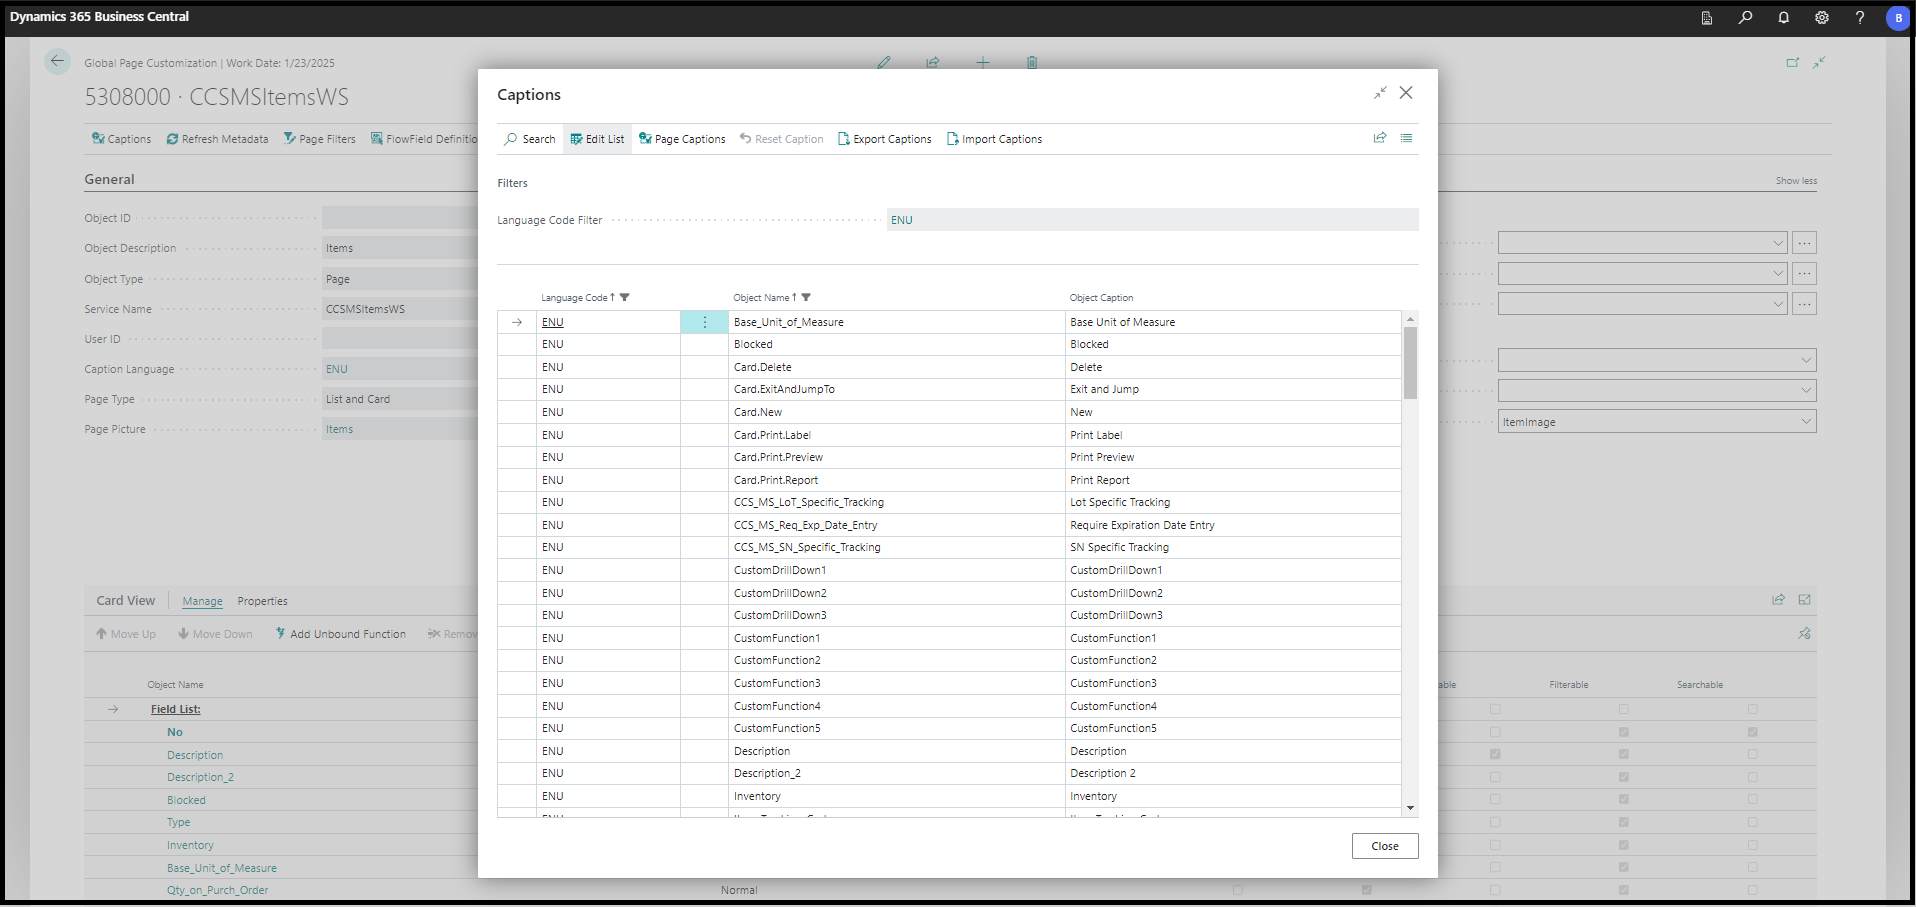
By changing the Language Code Filter, it's possible to check all translations in every supported language. The Object Caption value can be changed for all types of fields except option values (e.g., in the Item Card, the Type field can be set to Inventory or Service; neither Inventory and Service can be translated.) All caption changes needed for the supported languages are done on this page.
The Page Captions action opens a page, through which all the page captions are available in the supported languages. The process of changing captions are the same as for regular fields.
Captions, including both field and page captions, can be exported along with the entire page customization (see Configuration Export and Import) or separately as an Excel file. This approach is useful for making mass changes to field captions. When choosing the Export Captions action, the Language Browser page opens. After choosing the required language code, the captions are exported to an Excel file.
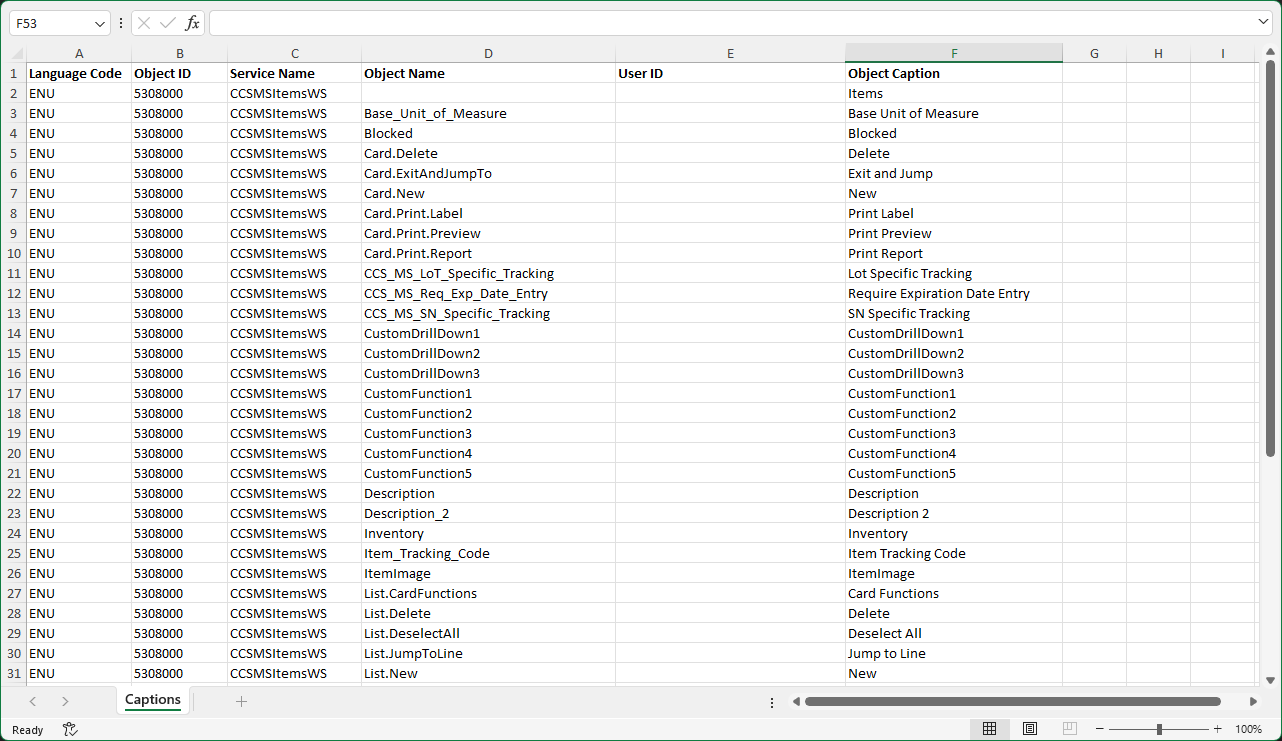
Enter all caption changes only in the Object Caption column of the Excel sheet.
Important
The column and row layout of the sheet should not be modified because it must match the layout of the caption pages during import. Additionally, the Object Caption in row 2 contains the Page Caption; if this value is modified, the Page Caption will be modified after importing the file.
If changes are made, save the Excel sheet and import it by choosing the Import Captions action.
Edited captions will appear in bold on the Captions page. Original captions come from the metadata of the object.
Refresh Metadata
The Refresh Metadata action loads any changes made to the code/metadata of the page. If a customization/development was implemented on a particular page, this action is necessary.
Note
Relogging into the mobile application or running the Refresh Schema action is also required to view changes in the mobile application.
Export
The Export function opens the Configuration Export page, pre-filtered to the selected page customizations. Only the selected objects will be included in the export process. For additional details, refer to the Configuration Export and Import section.
Page Filters
The Page Filters action opens a list of page filters. Filters set for a particular page are applied upon opening the page or serve as default/predefined values when adding a new record.
In the Page Filters page, three fields can be modified:
- Related Field Name: opens a list with all Normal type fields. This is the base of a configured filter.
- Filter Type: indicates if the filter type is Filter or Variable; used with the Filter Value field.
- Filter Value: indicates the value of the filter depending on the selected Filter Type:
- Filter: a user-defined value that can be provided in text, decimal, integer, or date format.
Filter expressions commonly used in Business Central are also available in COSMO Mobile Solution, except for parentheses:( ). For intervals, use'=<*filter value*'and'=>*filter value*'instead of'..*filter value*'and'*filter value*..'. - Variable: it's possible to set User Variables as filter values. User Variables can be configured on the Users page.
- Filter: a user-defined value that can be provided in text, decimal, integer, or date format.
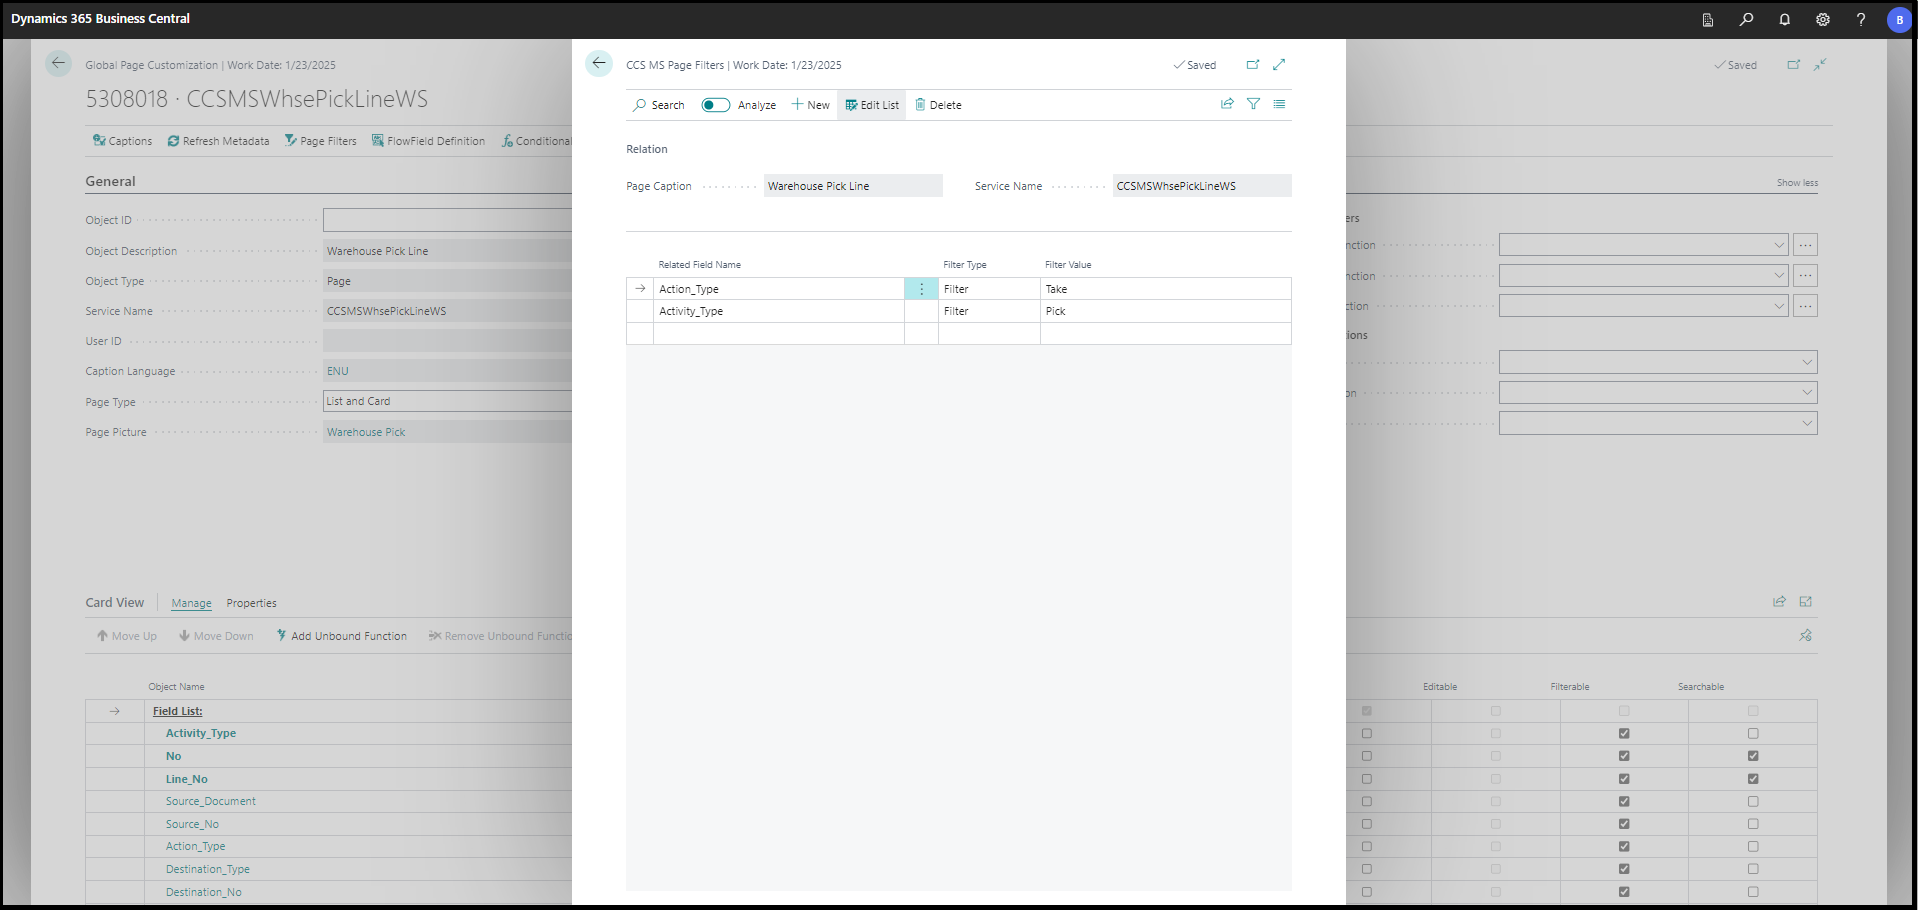
When opening the page in the mobile application, it will be filtered based on the Related Field Name and Filter Value. If a new record is added to the page, the field configured as the Related Field Name will be assigned the value of the Filter Value if it's an exact value.
Multiple filters can be applied at the same time for a certain page.
FlowField Definition
The FlowField Definition action opens a list of flowfields that are calculated within the mobile application. These settings can be useful for Conditional Views on cards (not applicable to lists). Before utilizing this feature, assess its impact on application performance.
The fields in the FlowFields page are described in the following table.
| Field | Description |
|---|---|
| Field Name | Indicates the user-defined name of the flowfield. It must be unique within each page customization and cannot match any page fields. |
| Type | Defines the calculation formula with the following options: - Lookup: retrieves an exact field value from another page - Count: counts the records on the other page - Minimum: determines the lowest value of a field on another page - Maximum: determines the highest value of a field on another page - Average: calculates the average of field values on another page - Summary: sums up the values of a field on another page. |
| Related Service Name | Specifies another page where the calculated value comes from. |
| Related Field Name | Specifies the field on another page that serves as the calculation source. If the Type field is set to Count, the Related Field Name is not used. In any other cases is must be specified. |
| Filtered | If selected, a filter has been defined for the flowfield. Flowfield filters can be accessed by selecting the FlowField Filters action on the Actions menu: - Related Field Name: specifies another page where the filter comes from. - Type: can be Filter, Field or Variable. - Filter Value: can be a user-defined value if the Type is Filter, a field of another page if the Type is Field, or a user varaible if the Type is Variable. Filter expressions commonly used in Business Central are also available in COSMO Mobile Solution, except for parentheses: ( ). For intervals, use '=<*filter value*' and '=>*filter value*' instead of '..*filter value*' and '*filter value*..'. |
Example
This example shows how a Boolean flowfield is configured for checking if picking is mandatory for a location on a warehouse shipment header.
From the Warehouse Shipment Header (object ID 5308012) global page customization, the FlowField Definition page opens with the following settings:
- The value of the Field Name field indicates the purpose of the flowfield.
- The Type field is set to Lookup because the value of a certain field is required.
- The Related Service Name is set to the Location (5308006) page, because it's possible to check if a location is mandatory for picking on the loaction card.
- The Related Field Name field is set to Require_Pick.
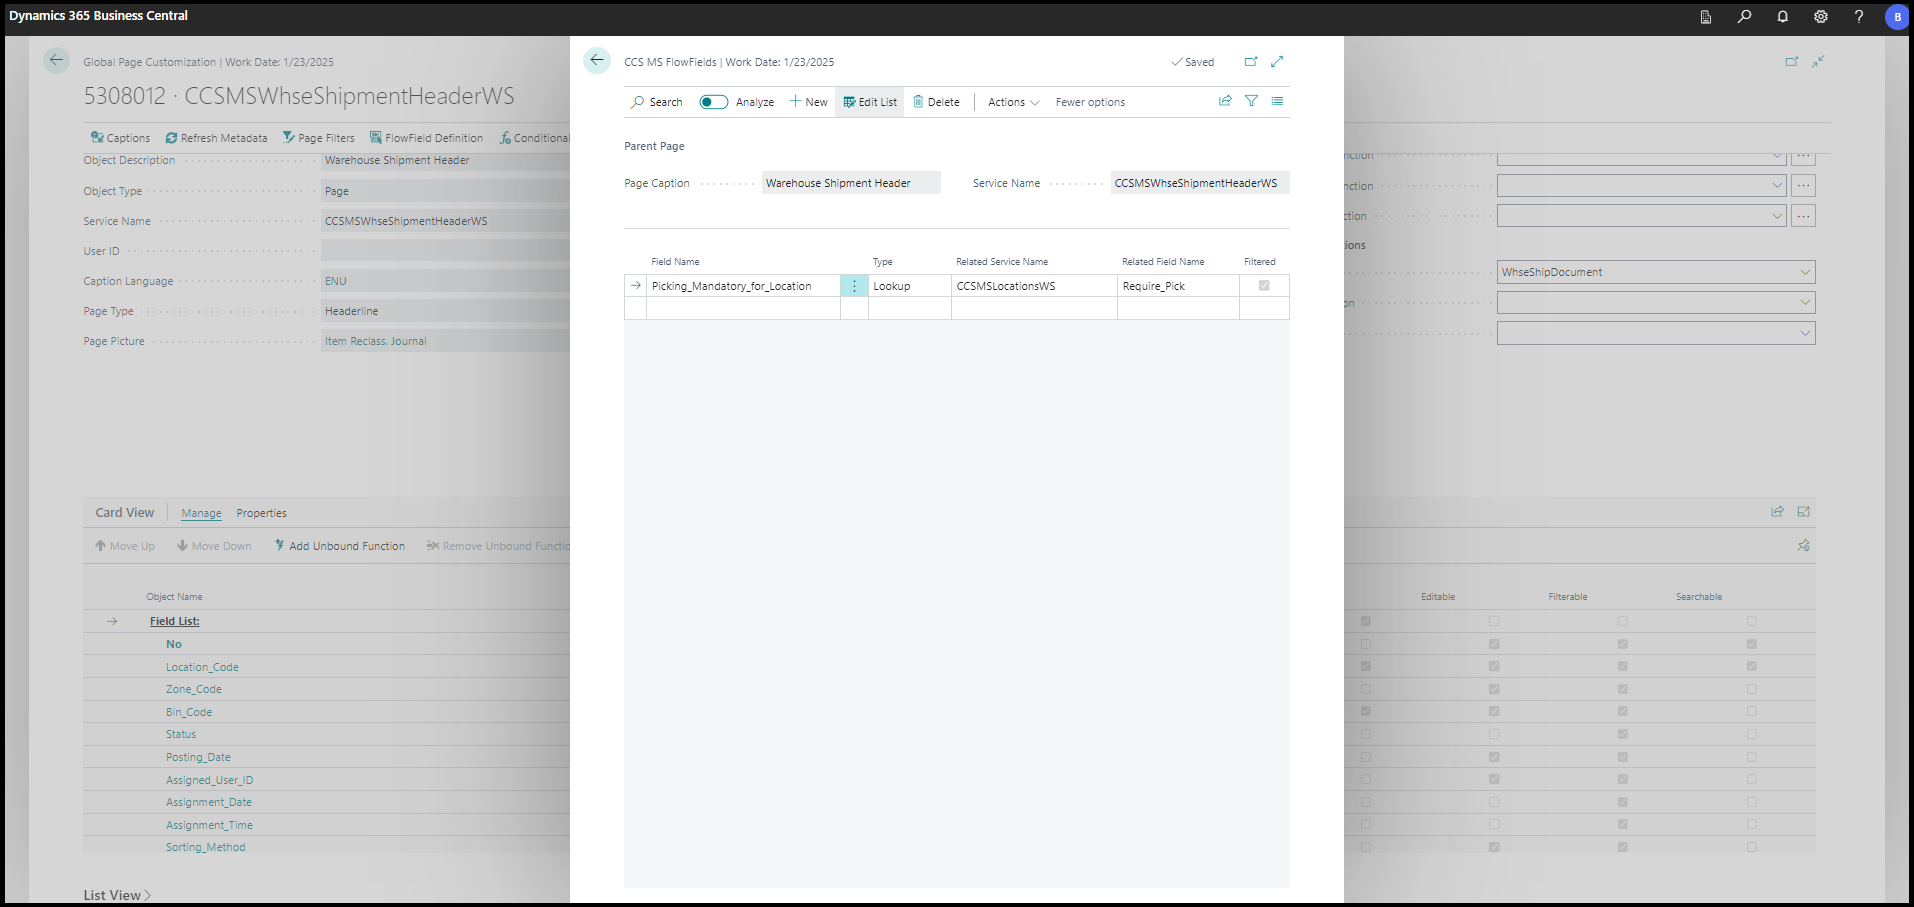
The Filtered checkbox is selected to indicate that a filter has been added because it's only required to check the picking Boolean for the location that is on a certain warehouse shipment.
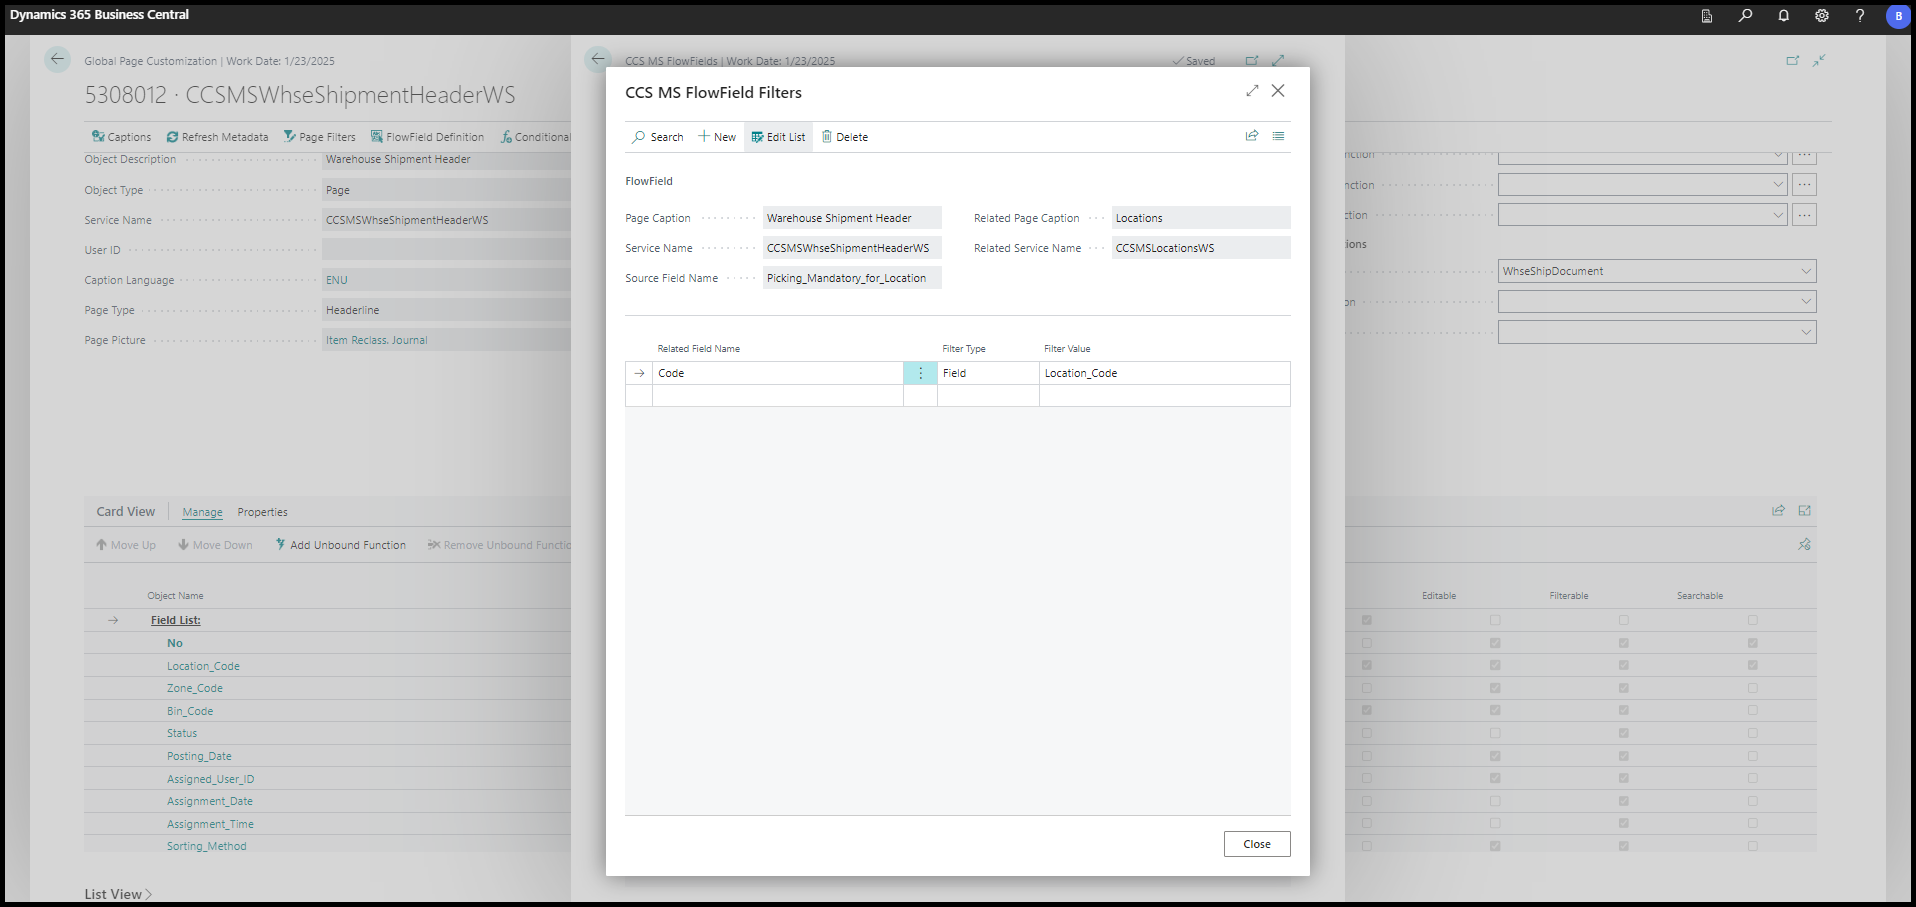
To review the filter, choose the FlowField Filters action on the Action menu.
In this case, the Related Field Name field is set to the Code field of the Location page and the Filter Type field is set to Field because two field values should be compared, and the Filter Value field is set to the Location_Code field of the Warehouse Shipment Header page.
With this filter, it's possible to check only a specific warehouse shipment header's location code, when it's required to tell on a warehouse shipment if the location code is mandatory for picking or not. The flowfield is ready to use as a conditional view (e.g., it's possible to hide certain functions in the mobile application based on the warehouse shipment records based on the value of the flowfield.)
Conditional Views
The Conditional Views action opens a list of configured conditional views. A conditional view allows for displaying specific records or the entire page differently depending on a predefined condition. It's also possible to perform certain functions based on conditions.
The Conditional Views page has three sections:
A general section that includes basic data, like source Page Caption and Service Name, which contain information about the source page. The value of the Description field is user-defined, but should be unique for a certain page. Multiple conditional views can be applied for a specific page, which are evaulated by the mobile application simultaneously. The activation of conditional views can be controlled by adjusting the Enabled field to either "true" or "false". When set to "false", the corresponding conditional view will not be evaluated. The Trigger Mode field can have two values: Always or Once. The conditional view will be triggered only once if Once is selected, if the value is Always, it will run every time, when the conditions are met. The settings will be checked every time, when the user opens the page, changes the record or creates a new record.
The CCS MS View Conditions FastTab contains the conditions defined for a conditional view. Multiple conditions can be used for a conditional view simultaneously. Conditional views are based on the Description field in the general section; select a description to access the conditional views. The Field Name is the base of the condition, it comes from the source page. The Condition Type can be Filter, Field, or Variable. It works similarly to the FlowField Filters; however, if set to Field, the Condition value can be a field from the source page only.
Filter expressions commonly used in Business Central are also available in COSMO Mobile Solution, except for parentheses:( ). For intervals, use'=<*filter value*'and'=>*filter value*'instead of'..*filter value*'and'*filter value*..'.The CCS MS Conditional Actions FastTab defines how the condition will work. Depending on the Action Type, the Action and/or Target Object field should remain empty. Each is described in the following table.
Action Type Action empty Target Object empty Description Set Read Only ✓ If a value is provided in the Target Object field (which can be a field from the source page), it becomes not-editable if the conditions are met. If the Target Object field is empty and the conditions are met, the whole page will be read-only. Hide ✓ If a value is specified in the Target Object field (which may refer to a field, function, or client action from the source page), the target will be hidden when the defined conditions are met. To also hide the corresponding field from the list view, it must be removed in the List View FastTab. Set Style If Action has a value, and Target Object doesn't (in case of a List, List and Card, or Headerline pages), the record in the list view will be colored based on the value that was selected as an action. If Action and Target Object both have a value (in case of a Card, List and Card, or Headerline pages), the field selected as a target object will get a colored background in card view, based on the color selected for the Action field. Run Function ✓ Function and Drill-Down type fields could be selected as a Target Object. If the condtions are met, the function is performed or the drill-down page will be opened. Next Card ✓ ✓ This functionality works for List and Card and Headerline pages only. It makes the mobile application open the next record in a card view if the conditions are met. Show Message ✓ The Action field can have a value of a Message Template. If the conditions are met, the custom message should pop up. Next Subpage ✓ ✓ This functionality works for Multiple Sided Pages only. If the conditions are met, the next subpage pops up in the mobile application. It's recommended to use this action with the Once setting of the Trigger Mode field. Print Document ✓ The Target Object should be chosen from the predefined reports in Custom Report Layouts. If the Target Object is empty, the default report will be printed. Print Label ✓ ✓ Printing is performed based on the predefined templates and conditions in Label Layouts. Refresh Data ✓ ✓ If the conditions are met, the page gets updated. Set Focus ✓ If the conditions are met, the provided field (in the Target Object) will be in focus in the mobile application. The selected field should be a visible AND editable field of the page. (The drop-down list will be automatically filtered, not-editable and not-visible fields won't be displayed, based on the settings of the Card View FastTab.)
Example
In the Base Configuration of COSMO Mobile Solution, there is a page customization to post consumption for production orders (Consumption, object ID 5308076). Open this page customization and then choose the Conditional Views action.
There are many conditional views on this page so a filter was applied to only show conditions for scanning lot numbers.
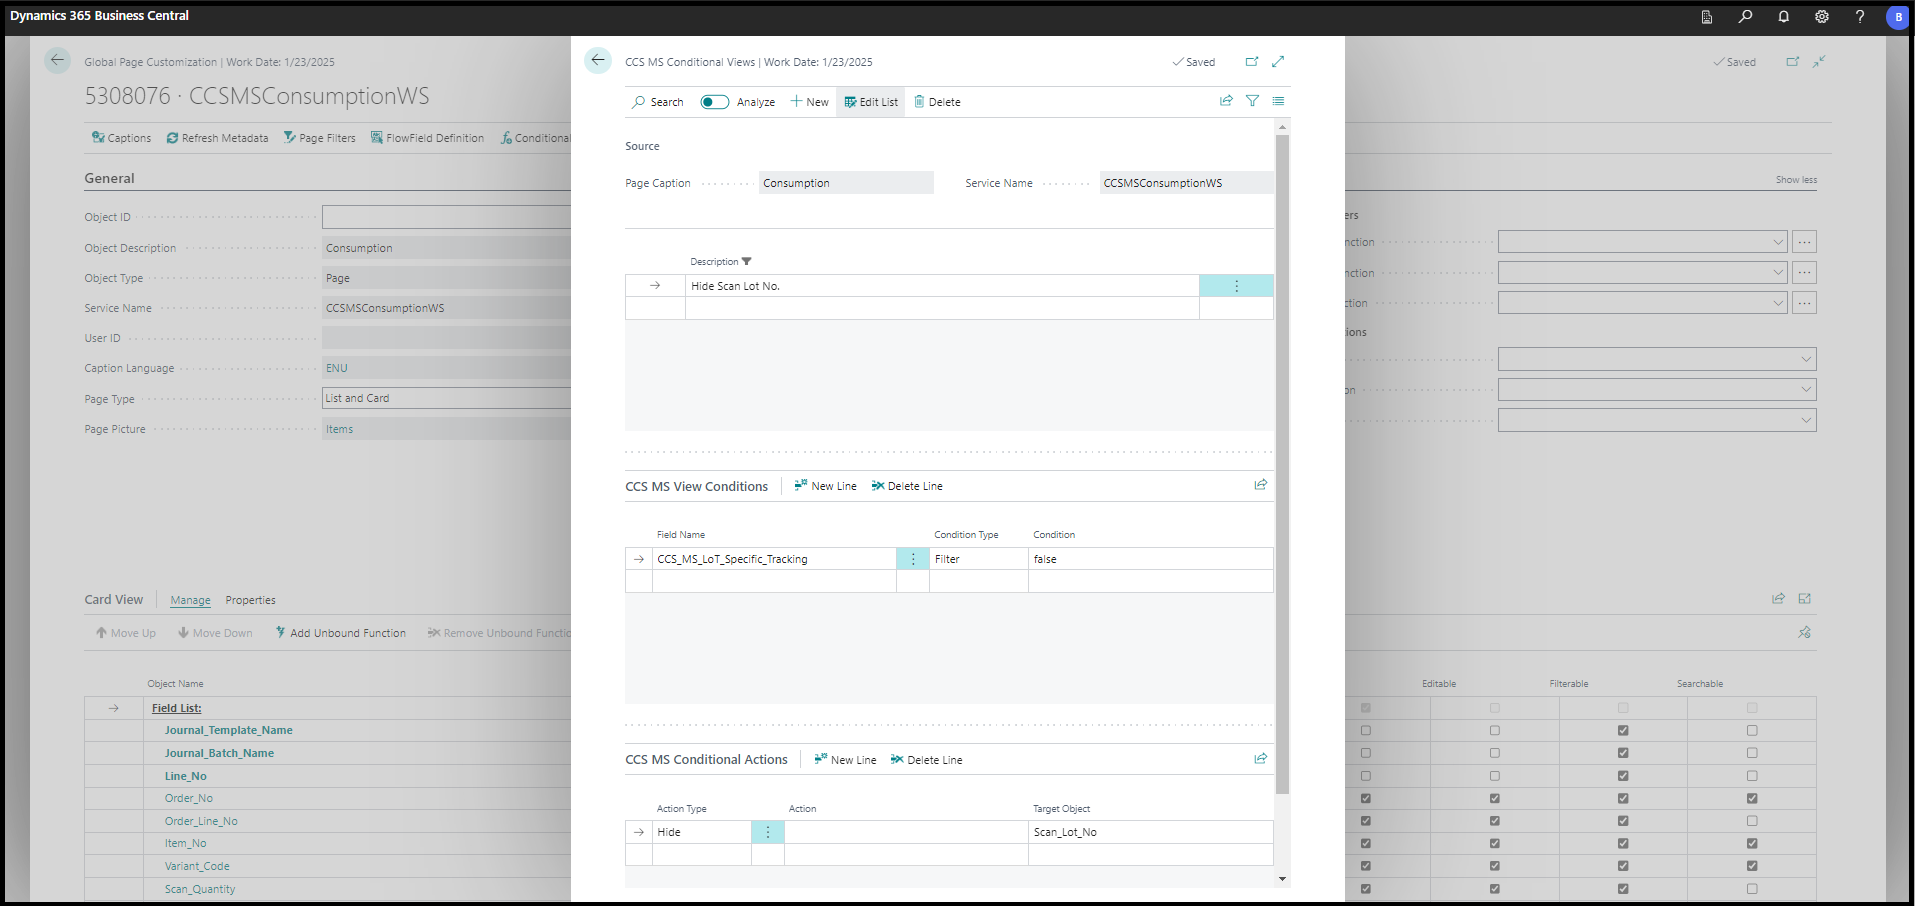
The Scan_Lot_No. field is not required if the item, used for production, is not lot tracked. The Description of the condition is unique: Hide Scan Lot. No.
As for the condition itself, the Field Name should be the CCS_MS_LoT_Specific_Tracking Boolean field from the source page (5308076). A Filter Condition Type is required in this case, because by entering false as a Condition we can check if the Boolean is "false" or not. In this case, the Action Type of the condition is Hide, the Action is empty, and the Target Object is the Scan_Lot_No field. These settings mean that if the condition is met, the field should be hidden in the mobile application when opening the page.
Sorting
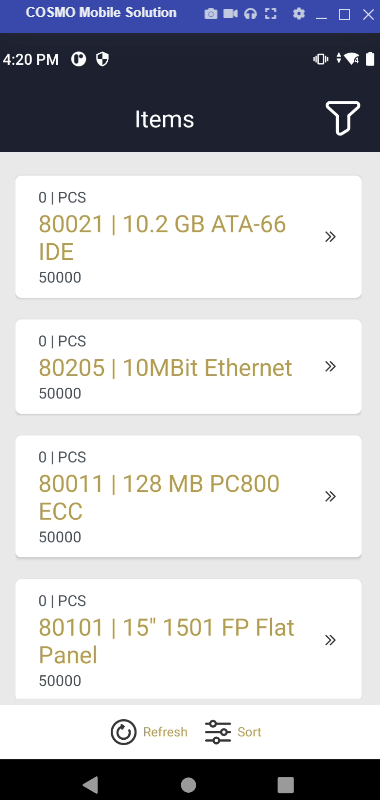
The Sorting action opens the list of sorting parameters. It's possible to configure a sorting order for a specific page that contains multiple records. By choosing the Insert Sorting Field action, new lines can be added. Sorting is based on the Object Name field. The Sorting Type can be Ascending or Descending. Records on a specific page will be displayed in the mobile application accordingly. If there are several sorting parameters provided, the application will process them line by line.
Sorting can also be set individually within the mobile application.
Example
In this example, the Items (object ID 5308000) global page customization is used. By choosing the Insert Sorting Field action, a new line was added and the No field was chosen as the Object Name. Only Normal type fields can be selected. The Sorting Type was set as Ascending, so items will be displayed based on the No field from smallest to largest.
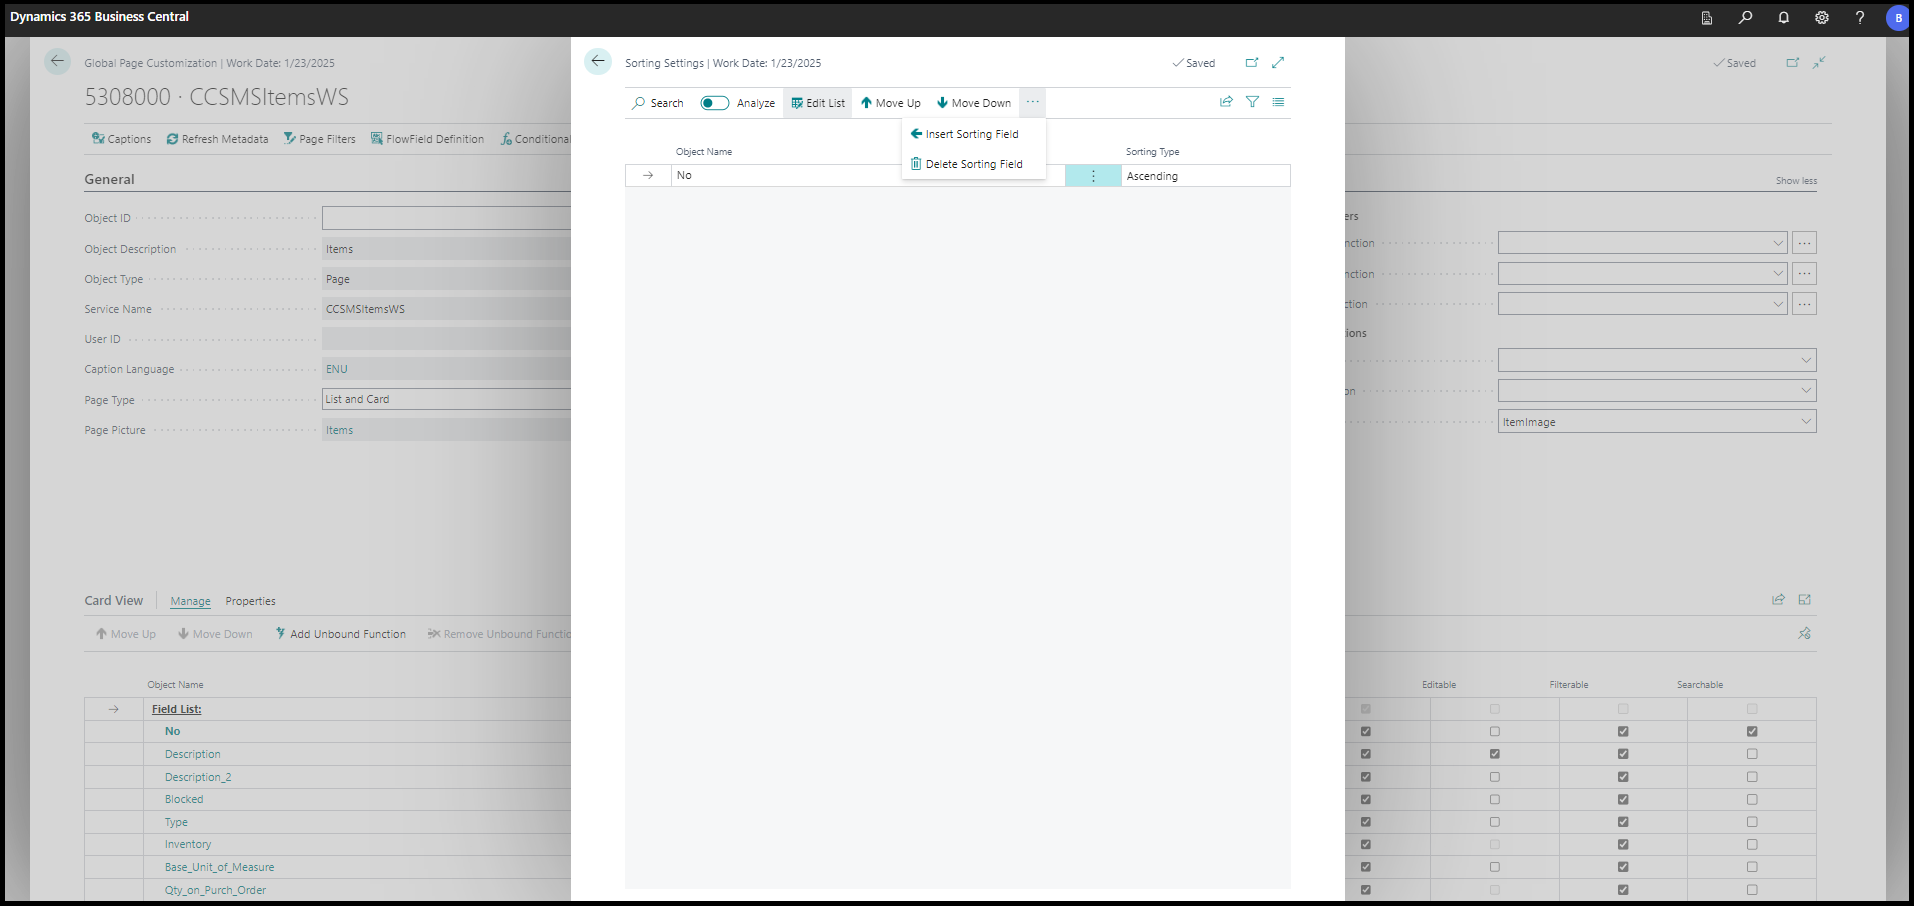
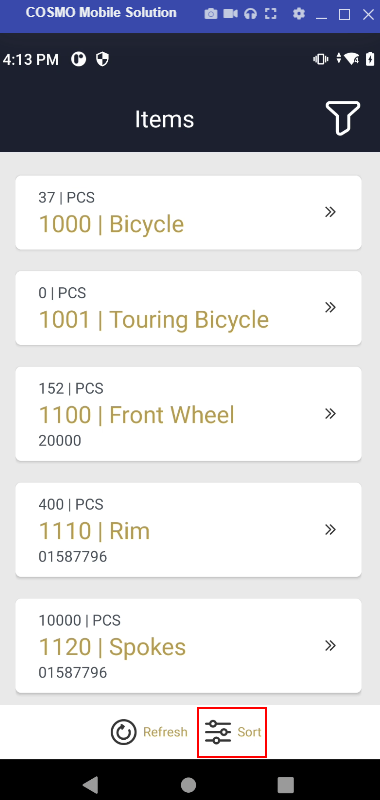
If there is at least one sorting parameter configured, a List.Sort function will be displayed in the List View FastTab of the Global Page Customization page. The Sort action should be visible on the list view of the Items page list view in the mobile application as well. Via this function button, it's possible to modify the sorting method. If the sorting method is modified by the user, it should be saved on their user correspondent user page customization, so it will be displayed with the modified sorting method the next time they open the same page.
Changing the sorting method in the application
Open the page in the mobile application, for which sorting was applied and press the Sort button in the list view. Remove the existing filter by pressing the Delete button near the previously used sorting method.
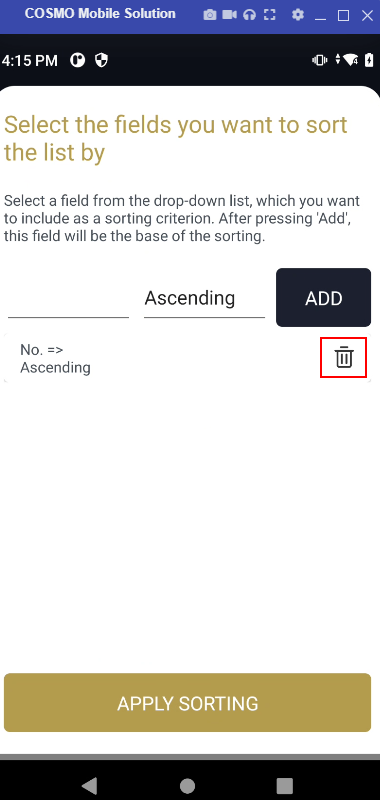
Choose the required field by tapping the empty space and opening the list near the Add to Sortings button. Set the ordering (ascending or descending) and then press the Add to Sortings button. Press the Apply Sorting button.
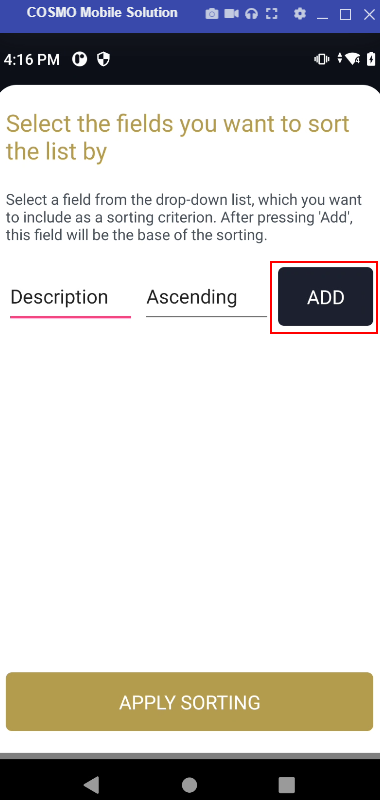
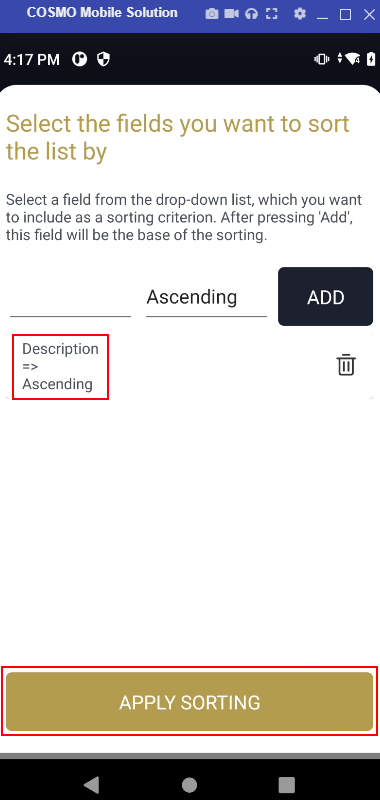
The sorting method should change with the user page customization updated accordingly.
Assign Barcodes
The Assign Barcodes action opens a list of complex barcodes, which can be set up by selecting the Barcode Setup tile on the Mobile Solution Center page.
If the Selected checkbox is selected, the barcode setup is active for the specific page. After assigning the barcode to the page, assign the fields to barcode categories by choosing the Complex Barcode Settings action in the Card View FastTab. For more information, see Barcode Functions.
Validate
Opens the Configuration Validator request page. For more information, see Configuration Validator
Message Templates
On the Actions menu, choose the Message Templates action to open a list of custom-configured messages. These messages can be utilized within conditional views as conditional actions, allowing custom messages to be displayed in the mobile application under specific conditions. They can also serve as function actions. This configuration can be done in the Card View FastTab of the Global Page Customization by selecting a function type field and then choosing the Function Actions action. In the Function Actions page, you can set a custom message to appear before or after a function is executed, even if it fails.
The Message Templates page has two sections:
- The top section contains general information, like the language code of the message template (Language Filter) or the Message Identifier, which should be unique and user-defined. The Message Template field contains the message itself.
- The bottom section is the Message Parameters FastTab. By selecting the New Parameter action, it's possible to add new fields from the source page. The line has an Order number, which is the reference number, that can be used in the message. The Source Name is the field name, and the Source Type defines what kind of value should be used in the message. It can be either Value or Caption, which decides if the caption or the value of a certain field should be referenced in the message.
Example - Create Message Template
In this example, the Items (object ID 5308000) global page customization is used.
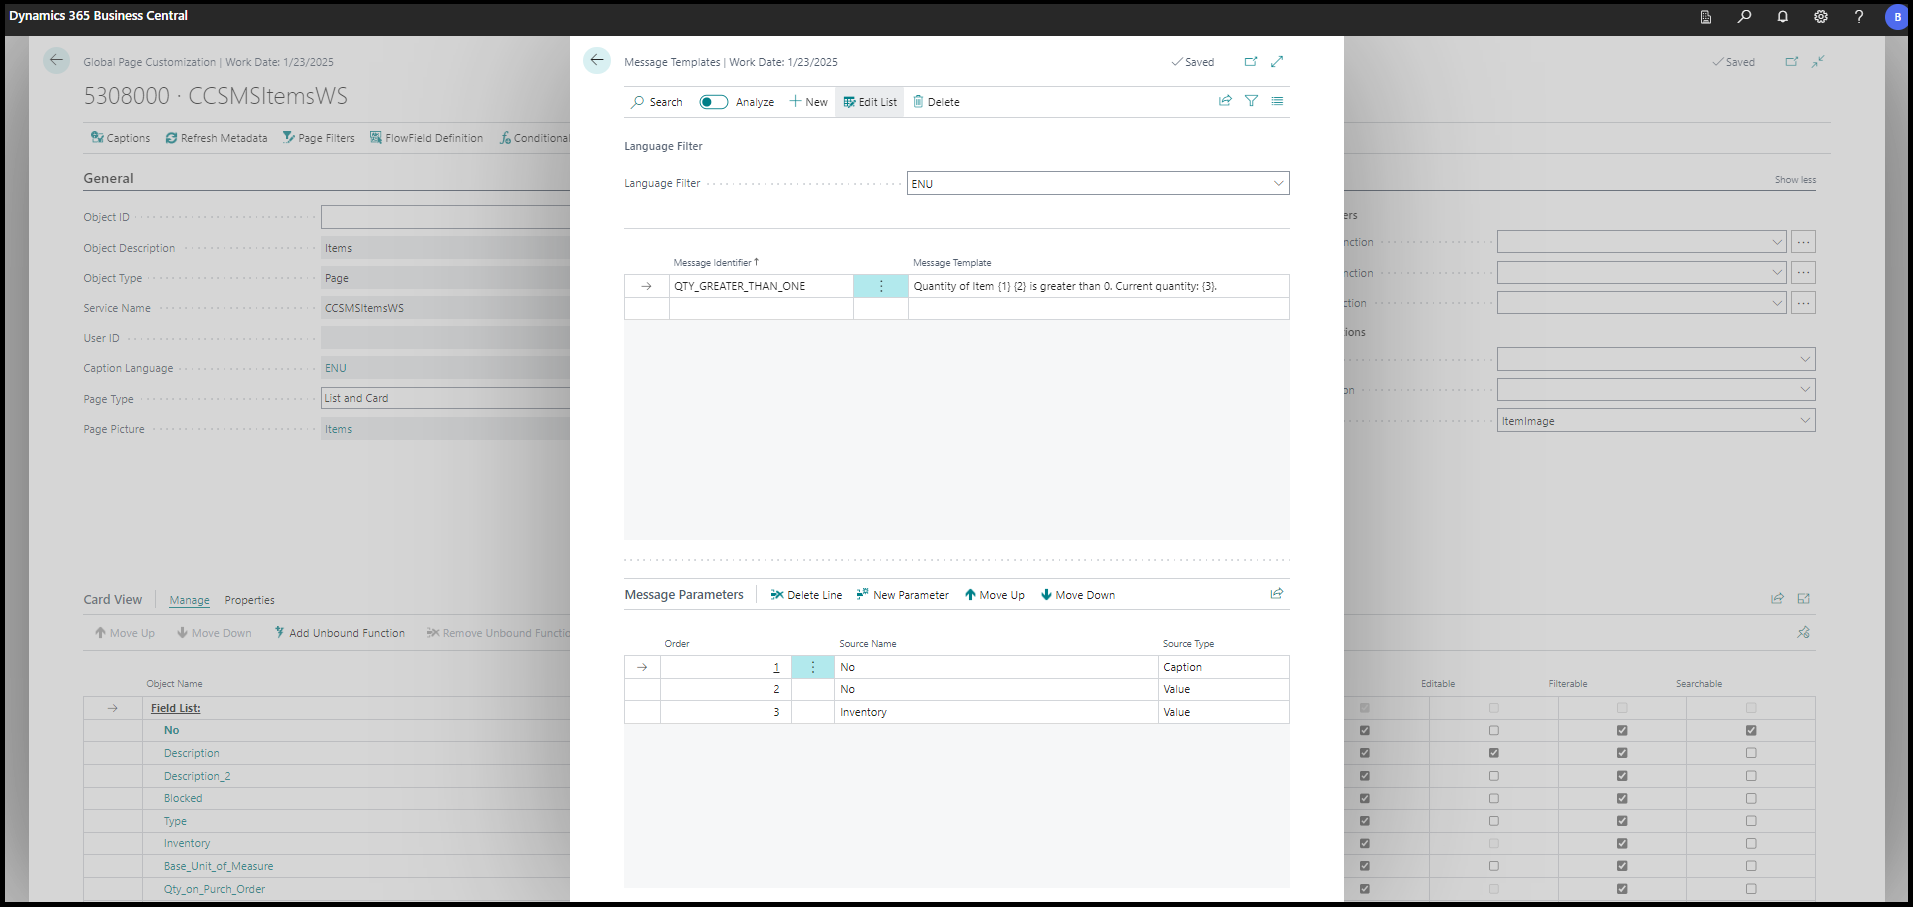
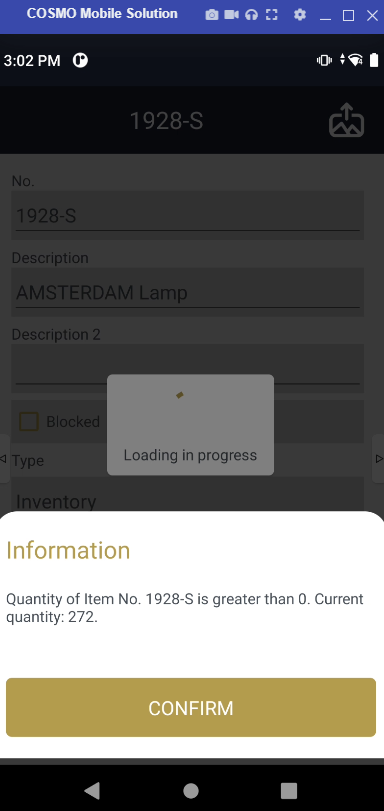
This message displays the quantity of a specific item when its inventory exceeds 0 and the card is opened. In this case, the Language Filter is ENU because the message should be displayed in English. The Message Identifier is unique, and the Message Template contains the exact message: Quantity of Item {1} {2} is greater than 0. Current quantity: {3}. This text is user-defined and the numbers refer to the Order number in the Message Parameters FastTab. There are three lines registered as parameters: two are the No field and one is the Inventory field. One No field means the caption of the field ('No.'), the other one is the value of it. The value of the Inventory field is also used.
In the Message Template field, the Order numbers are placed among '{}' signs. It's also important that the reference numbers start with 1. If messages need to be translated to other languages, the Language Filter can be changed to enter the translations. Records in other languages are created automatically, but the translation should be done by the user.
Example - Use Message as Conditional View
Once the message setup is done, it can be used as a conditional view action or a function action (before or after the function is performed). This example is for a conditional view: if the inventory is greater than 0, a message should pop up with the inventory details when opening a card.
To see the Conditional Views of the Items page customization, close the Message Template page and then choose the Conditional Views action.
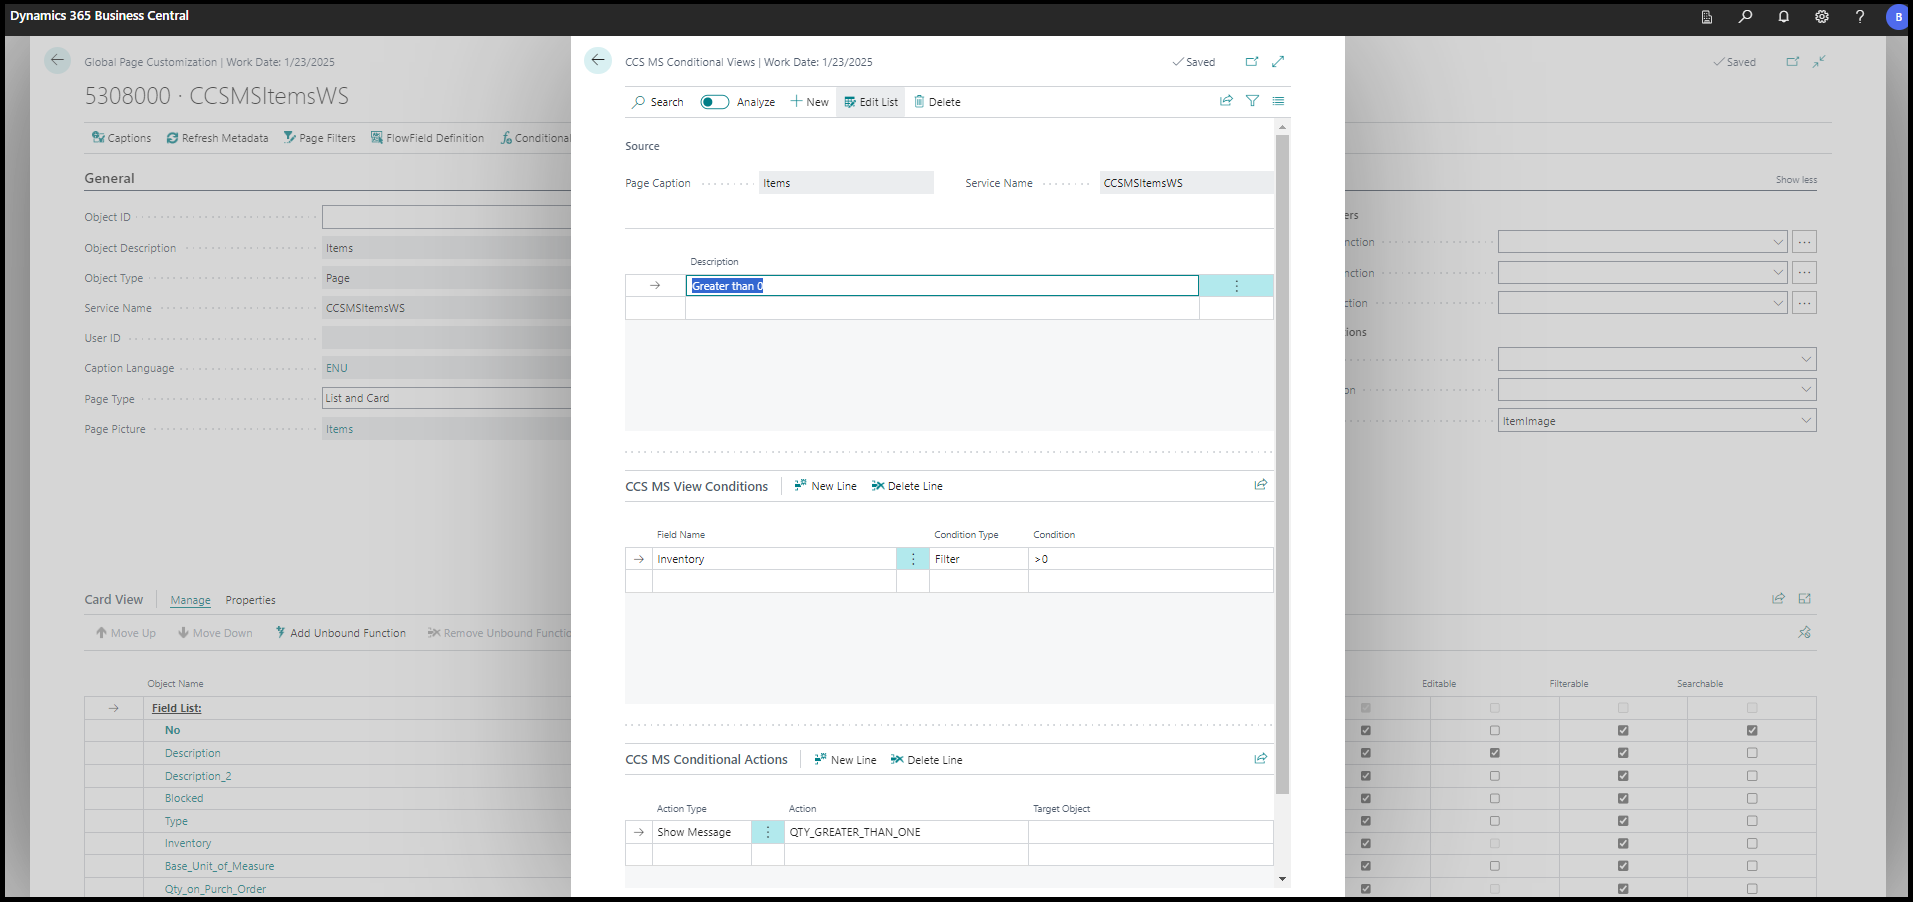
The condition was created for the Inventory field: if it's greater than 0, the previously created message template should pop up in the mobile application. The Action Type is Show Message and the Action field gets the code of the message template. The Target Object field remains empty.
How does it look like in the mobile application?
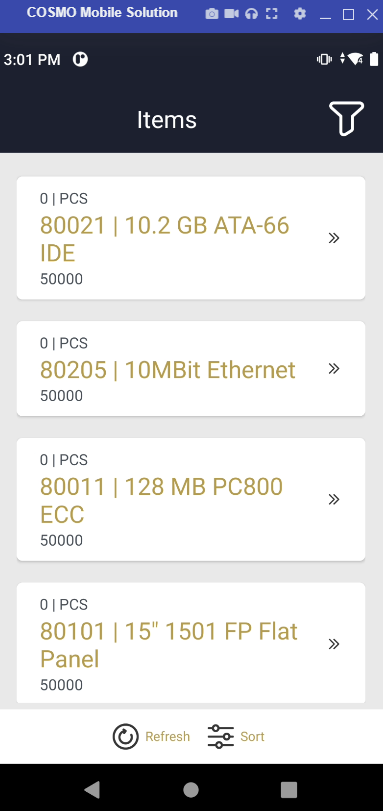
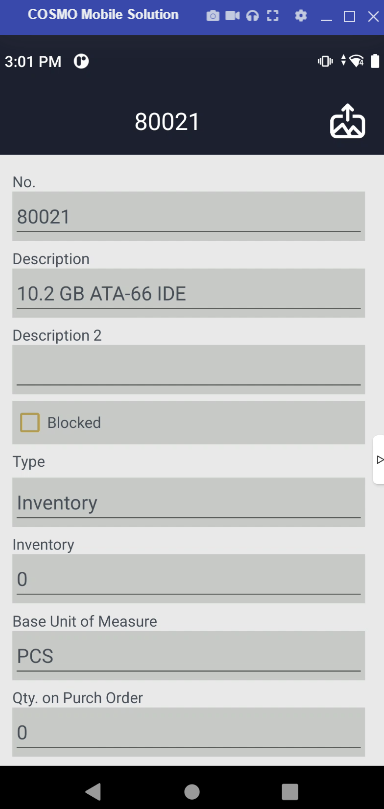
After opening the Items list, an item with 0 inventory and with inventory greater than 0 should be checked. The message only pops up in the second case: No. caption, No. value and Inventory value can also be seen. The message can be closed by pressing the Confirm button.
Printing
On the Actions menu, choose Printing to access the Label Layouts and Custom Report Settings actions:
- Label Layouts, which manages settings for labels to be printed using local label printers
- Custom Report Settings, which handles settings for reports to be printed using Business Central or PDF printers.
For more information, see Printing.
Feedback
Submit feedback for this page .